JDBC Statement trong java: Statement, PrepareStatement và CallableStatement
So sánh Statement với PreparedStatement và CallableStatement trong JDBC Java
Nếu bạn chưa biết JDBC là gì tham thảo bài viết này trước nhé! JDBC Statement trong java dùng để làm gì? Khi một kết nối được thiết lập, chúng ta có thể tương tác với cơ sở dữ liệu. JDBC Statement, PreparedStatement và CallableStatement định nghĩa những phương thức và thuộc tính, cho phép chúng ta thực thi câu lệnh SQL và nhận dữ liệu từ cơ sở dữ liệu của bạn, trong đó:
Statement – Sử dụng để thực hiện các câu truy vấn SQL tĩnh, không có tham số.
PreparedStatement – Sử dụng để thực hiện các câu truy vấn SQL động hoặc có tham số.
CallableStatement – Sử dụng để thực thi các stored procedures.
Statement
Statement được sử dụng để thực thi các câu lệnh SQL tĩnh, chúng ta không thể truyền tham số vào câu SQL trong thời gian runtime.
Statement có hiệu năng (performance) kém hơn PrepareStatement và CallableStatement .
Statement thường được sử dụng trong trường hợp câu lệnh SQL chỉ chạy 1 lần, ví dụ sử dụng để thực thi các câu SQL định nghĩa cơ sở dữ liệu – DDL (Data Denifition Language) như CREATE, ALTER, DROP…
boolean execute (String SQL): Trả về giá trị true nếu thực thi thành công câu lệnh SQL; ngược lại sẽ trả về giá trị false. Sử dụng phương thức này để thực thi các câu lệnh SQL DDL như tạo cơ sở dữ liệu, tạo bảng, …
int executeUpdate (String SQL): Trả về số dòng bị tác động khi thực thi các câu lệnh như INSERT, UPDATE hoặc DELETE.
ResultSet executeQuery (String SQL): Trả về một đối tượng ResultSet khi bạn thực thi câu lệnh SELECT.
PreparedStatement
PreparedStatement được sử dụng để thực thi các câu truy vấn SQL động hoặc có tham số.
PreparedStatement thừa kế từ Statement nhưng nó cho phép truyền các tham số vào câu SQL trong thời gian run time.
PreparedStatement được khuyên sử dụng trong trường hợp câu SQL được sử dụng nhiều lần.
Ví dụ câu lệnh INSERT được dùng lại nhiều lần để insert 1 danh sách user vào database.
CallableStatement được sử dụng để thực thi stored procedures.
CallableStatement được thừa kế từ PreparedStatement và có hiệu năng cao hơn PreparedStatement.
Với CallableStatement, chúng ta có thể truyền 3 loại tham số vào stored procedures là IN (truyền giá trị vào stored procedures), OUT (lấy kết quả trả về từ stored procedures), IN OUT (thực thi cả IN và OUT).
Ví dụ mình tạo một stored procedures thực hiện lấy user theo id:
CREATE PROCEDURE getUserById(IN idUser int)
BEGIN
 SELECT * FROM user_info WHERE id = idUser;
END
Bây giờ mình sẽ sử dụng CallableStatement để gọi câu stored procedures bên trên:
Truyền id = 1 vào stored procedures getUserById và trả kết quả về ResultSet
JDBC là gì ? Tìm hiểu về JDBC trong Java và Cách kết nối java với mysql bằng JDBC
JDBC là gì?
JDBC (Java Database Connectivity) là một API tiêu chuẩn dùng để kết nối các chương trình viết bởi Java với các loại cơ sở dữ liệu quan hệ (MySQL, MS SQL, Postgre SQL, Oracle, DB2…).
JDBC chỉ là một tập các interface, các định nghĩa, thông báo lỗi, đặc tả chứ không phải là thư viện. Với mỗi hệ quản trị cơ sở dữ liệu ta sẽ có một cài đặt JDBC riêng cho nó, ví dụ JDBC cho MySQL, JDBC cho MS SQL …
Các thành phần của JDBC
DriverManager: Dùng để quản lý danh sách các Driver (database drivers). Driver: Dùng để liên kết các kết nối tới cơ sở dữ liệu, dùng để liên kết các liên lạc với cơ sở dữ liệu, điều khiển các liên lạc với database. Connection: Biểu thị kết nối tới cơ sở dữ liệu. Dùng để tạo ra Statement, PreparedStatement và CallableStatement. Statement, PreparedStatement, CallableStatement: Chứa lệnh SQL gửi tới cơ sở dữ liệu để thực thi. ResultSet – biểu diễn một tập kết quả trong cơ sở dữ liệu tạo ra bởi việc sử dụng một câu lệnh SQL là SELECT. SQLException – một lớp xử lý lỗi ngoại lệ chứa các lỗi truy cập cơ sở dữ liệu.
Java kết nối với database dựa trên nguyên tắc nào?
Java sử dụng JDBC để làm việc với các cơ sở dữ liệu.
Ví dụ bạn làm việc với cơ sở dữ liệu Oracle từ Java bạn cần phải có Driver (Đó là class điều khiển việc kết nối với loại cơ sở dữ liệu bạn muốn). Trong JDBC API chúng ta có java.sql.Driver, nó chỉ là một interface, và nó có sẵn trong JDK. Như vậy bạn phải download thư viện Driver ứng với loại Database mà bạn mong muốn.
Chẳng hạn với Oracle thì class thi hành Interface java.sql.Driver đó là: oracle.jdbc.driver.OracleDriver
java.sql.DriverManager là một class trong JDBC API. Nó làm nhiệm vụ quản lý các Driver.
Code ví dụ Kết nối java với mysql bằng JDBC
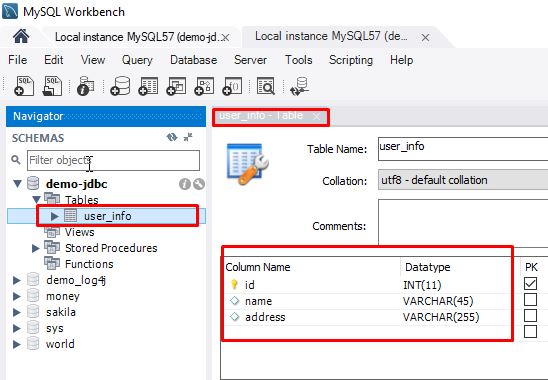
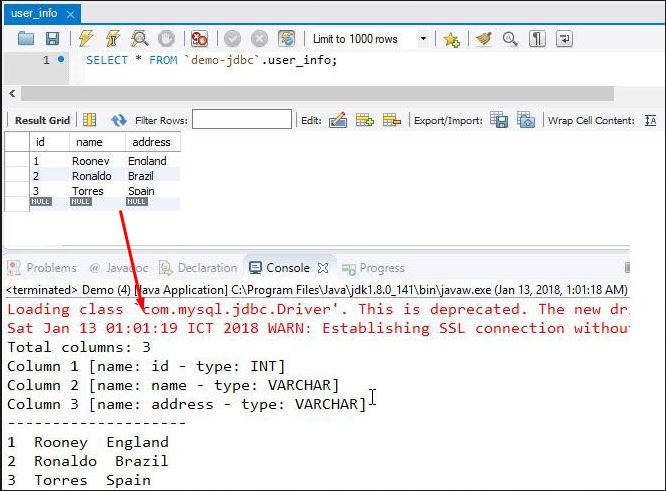
Mình sẽ lấy ví dụ ở stackjava. Tạo cơ sở dữ liệu demo-jdbc và table user_info như hình dưới Bây giờ mình sẽ viết 1 chương trình Java kết nối tới database demo-jdbc và hiển thị các thông tin của table user_info
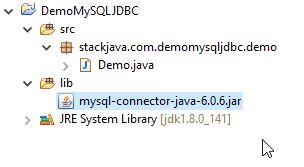
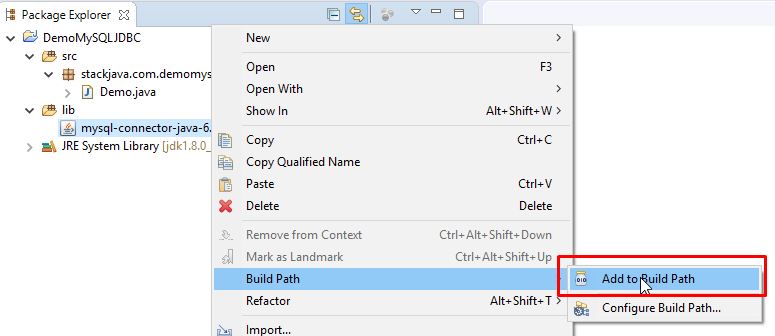
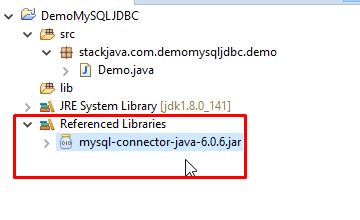
Để kết nối với MySQL bằng Java chúng ta cần download jdbc tương ứng cho MySQL
Class.forName dùng để chỉ dẫn cho Java biết sẽ kết nối tới loại database nào. Class.forName(“com.mysql.jdbc.Driver”) dùng để kết nối tới database MySQL
DriverManager.getConnection(“jdbc:mysql://localhost:3306/demo-jdbc”, “root”, “admin1234”): tạo một connection tới database có url =jdbc:mysql://localhost:3306/demo-jdbc với username = “root” và password = “admin1234”
ResultSetMetaData sẽ đặt meta data cho ResultSet, ở đây ResultSet lấy từ câu SQL “SELECT * FROM user_info” nên nó sẽ gồm tất cả các column trong table user_info. Nếu bạn chuyển câu SQL thành “SELECT id, name FROM user_info” thì ResultSetMetaData sẽ chỉ có 2 column id, name này thôi.
Kết quả: Một số lưu ý:
Từ bản mysql-connector-java-6.0.6.jar bắt đầu chuyển class com.mysql.jdbc.Driver sang com.mysql.cj.jdbc.Driver, nếu bạn vẫn dùng class cũ thì nó sẽ thông báo warning chứ không ảnh hưởng gì.
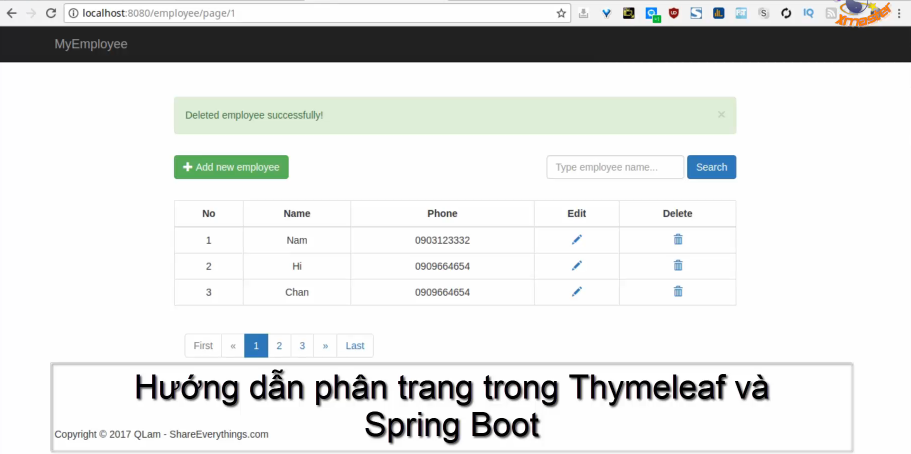
Hướng dẫn phân trang trong Thymeleaf và Spring Boot
Tiếp tục bài viết Lập trình Spring Boot CRUD đơn giản MyEmployee nếu bạn chưa xem bài đó vui lòng xem nó trước khi tiếp tục bài này nhé.Mình sẽ hướng dẫn các bạn cách phân trang trong Thymeleaf và Spring Boot dùng PlacedListHolder.
PlacedListHolder giúp chúng ta phân trang theo danh sách List<Object>. Để hiểu rõ về PlacedListHolder hơn chúng ta sẽ tìm hiểu tiếp phía dưới. Lưu ý:Bài này tiếp tục bài viết Lập trình Spring Boot CRUD đơn giản MyEmployee nếu bạn chưa xem bài đó vui lòng xem nó và tải source code về làm tiếp bài này nhé!
Không dài dòng nữa tiến hành vào phần chính hướng dẫn phân trang cho project Spring Framework dùng PagedListHolder.
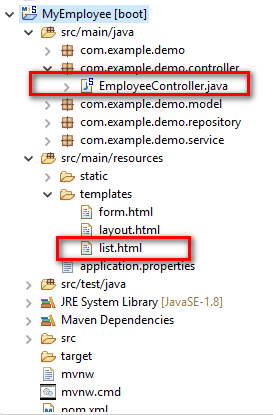
Cấu trúc các file sẽ chỉnh sửa trong project Employee:
1. Yêu cầu: Phân trang cho bảng danh sách Employee này.
2. Thêm phương thức phân trang vào class EmployeeController:
Để thuận tiện sau này chúng ta thêm getMapping(“/”) cho trang chủ:
@GetMapping("/")
	public String home()
		return "redirect:/employee";
Chúng ta cần HttpServletRequest để tạo session employeelist. Đồng thời khởi tạo session này là null.
Dòng 6,7 mình sẽ giải thích cuối bài. Hiện tại bạn có thể bỏ qua nó.
3. Phương thức phân trang showEmployeePage:
Thêm phương thức showEmployeePage vào EmployeeController
@GetMapping("/employee/page/pageNumber")
	public String showEmployeePage(HttpServletRequest request,
			@PathVariable int pageNumber, Model model)
		PagedListHolder<?> pages = (PagedListHolder<?>) request.getSession().getAttribute("employeelist");
		int pagesize = 3;
		List<Employee> list =(List<Employee>) employeeService.findAll();
		System.out.println(list.size());
		if (pages == null)
			pages = new PagedListHolder<>(list);
			pages.setPageSize(pagesize);
		 else
			final int goToPage = pageNumber - 1;
			if (goToPage <= pages.getPageCount() && goToPage >= 0)
				pages.setPage(goToPage);


		request.getSession().setAttribute("employeelist", pages);
		int current = pages.getPage() + 1;
		int begin = Math.max(1, current - list.size());
		int end = Math.min(begin + 5, pages.getPageCount());
		int totalPageCount = pages.getPageCount();
		String baseUrl = "/employee/page/";
		model.addAttribute("beginIndex", begin);
		model.addAttribute("endIndex", end);
		model.addAttribute("currentIndex", current);
		model.addAttribute("totalPageCount", totalPageCount);
		model.addAttribute("baseUrl", baseUrl);
		model.addAttribute("employees", pages);
		return "list";
và tương tự cho hàm search
@GetMapping("/employee/search/pageNumber")
public String search(@RequestParam("s") String s, Model model, HttpServletRequest request,
		@PathVariable int pageNumber)
	if (s.equals(""))
		return "redirect:/employee";

	List<Employee> list = employeeService.search(s);
	if (list == null)
		return "redirect:/employee";

	PagedListHolder<?> pages = (PagedListHolder<?>) request.getSession().getAttribute("employeelist");
	int pagesize = 3;
	pages = new PagedListHolder<>(list);
	pages.setPageSize(pagesize);
	final int goToPage = pageNumber - 1;
	if (goToPage <= pages.getPageCount() && goToPage >= 0)
		pages.setPage(goToPage);

	request.getSession().setAttribute("employeelist", pages);
	int current = pages.getPage() + 1;
	int begin = Math.max(1, current - list.size());
	int end = Math.min(begin + 5, pages.getPageCount());
	int totalPageCount = pages.getPageCount();
	String baseUrl = "/employee/page/";
	model.addAttribute("beginIndex", begin);
	model.addAttribute("endIndex", end);
	model.addAttribute("currentIndex", current);
	model.addAttribute("totalPageCount", totalPageCount);
	model.addAttribute("baseUrl", baseUrl);
	model.addAttribute("employees", pages);
	return "list";
Quá trình xử lý của hàm Controller như sau:
Khi chúng ta truy cập vào trang chủ /employee sẽ khởi tạo mới session Employee List là null. Đồng thời nó sẽ chuyển hướng tới trang đầu tiên của danh sách Employee chẳng hạn như: /employee/page/1. Chúng ta sẽ refresh session EmployeeList nếu chưa khởi tạo, bằng không nó sẽ trả về Page mà người dùng đã truy cập trước đó.
Sau đó sẽ ép session đó sang đối tượng PagedListHolder.(dòng 4)
Nếu đối tượng PagedListHolder là null thì khởi tạo và thiết lập Page Size. Tức là 1 trang bạn muốn hiện bao nhiêu object.(dòng 8)
Thiết lập trang mà chúng ta muốn hiện lên View dựa trên /employee/page/pageNumber (dòng 17)
Thiết lập các thông số cho Pagination, sau đó dùng Model Attributes để đưa sang ViewThymeleaf.(Dòng 18 – 31) Nếu bạn thấy vẫn khó hiểu, không sao mình sẽ hướng dẫn từng bước trong video phía dưới.
4. Phân trang Thymeleaf file list.html
Nội dung file list.html sau khi thêm phân trang như sau:
Như bài trước, khi phương thức save hay delete gọi addFlashAttribute thì nó sẽ thông báo ra cho trang redirect (/employee) về là hãy truyền thông điệp gì đó. Nhưng bây ở đây phương thức /employee chỉ là trung gian nên mình phải chuyển thêm 1 lần addFlashAttribute qua trang /employee/page/pageNumber
Đoạn code model.asMap().get("success")để lấy giá trị của đối tượng FlashAttribute.
5. Video Hướng dẫn phân trang trong Thymeleaf và Spring Boot: (video chưa update code mới nhé, nên chỉ hoạt động trên mysql 5.6)
Install WinRAR In Ubuntu (Linux) with Terminal In One Step
Cài đặt WinRar trên Linux (Ubuntu, Mint) với Terminal đơn giản
WinRAR chắc chắn là một trong những công cụ nén nổi tiếng nhất. Nhiều trang web tải tệp lên máy chủ của họ bằng cách nén chúng trong tệp RAR để tiết kiệm băng thông và không gian. WinRAR là một công cụ được tạo ra để tạo và giải nén các tệp RAR.
Bạn có thể cài đặt WinRAR trên Ubuntu hay Mint (Linux) với chỉ một câu lệnh. Cách sử dụng của nó trong Ubuntu rất giống với Windows. Bạn có thể dễ dàng nén và giải nén các tệp và thư mục trong Ubuntu bằng WinRAR.
Mở Terminal và nhập lệnh dưới để cài đặt WinRar cho Linux:
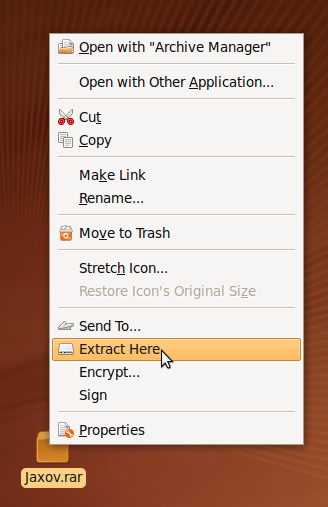
Sau khi cài đặt hãy nhấp chuột phải vào file rar và chọn Extra Here để giải nén file đó.
Để nén thư mục hay 1 file, đơn là bạn nhấn chuột phải vào thư mục đó hay file đó và chọn Create Archive hay Compress. Sau đó hãy thiết lập các chức năng mà bạn muốn. Cuối cùng nhấn Create để tạo file nén.
Install WinRAR In Ubuntu (Linux) Via Terminal In One Step
Hướng dẫn quay màn hình có âm thanh với VLC trên Linux
Bạn bị lỗi quay màn hình với VLC trên linux? Bạn quay màn hình được nhưng không có âm thanh, Làm thế nào để giải quyết?
Trước khi giải quyết vấn đề, chúng ta sẽ tìm hiểu về VLC cho bạn nào chưa biết!
Hướng dẫn quay màn hình có âm thanh với VLC media player. VLC media player (thường gọi tắt là VLC) là một media player và streaming media server mã nguồn mở di động cao và đa nền tảng được viết bởi VideoLAN project. Chi tiết thêm ở đây. VLC không chỉ là phần mềm chơi nhạc, phim mà nó còn có thể:
Chuyển định dạng file
Phát nội dung số qua mạng nội bộ (stream) hoặc qua Internet
Ghi lại video quay màn hình máy tính
Điều chỉnh quá trình phát nội dung từ xa thông qua trình duyệt
Xem video YouTube
Xem Podcast
Nghe radio trên Internet
Chơi video dưới dạng ký tự ASCII …
Cài đặt VLC media player trên linux(ubuntu, linux mint):
Mở Terminate và nhập:
sudo apt update
sudo apt install vlc
Hướng dẫn quay màn hình có âm thanh với VLC trên Linux
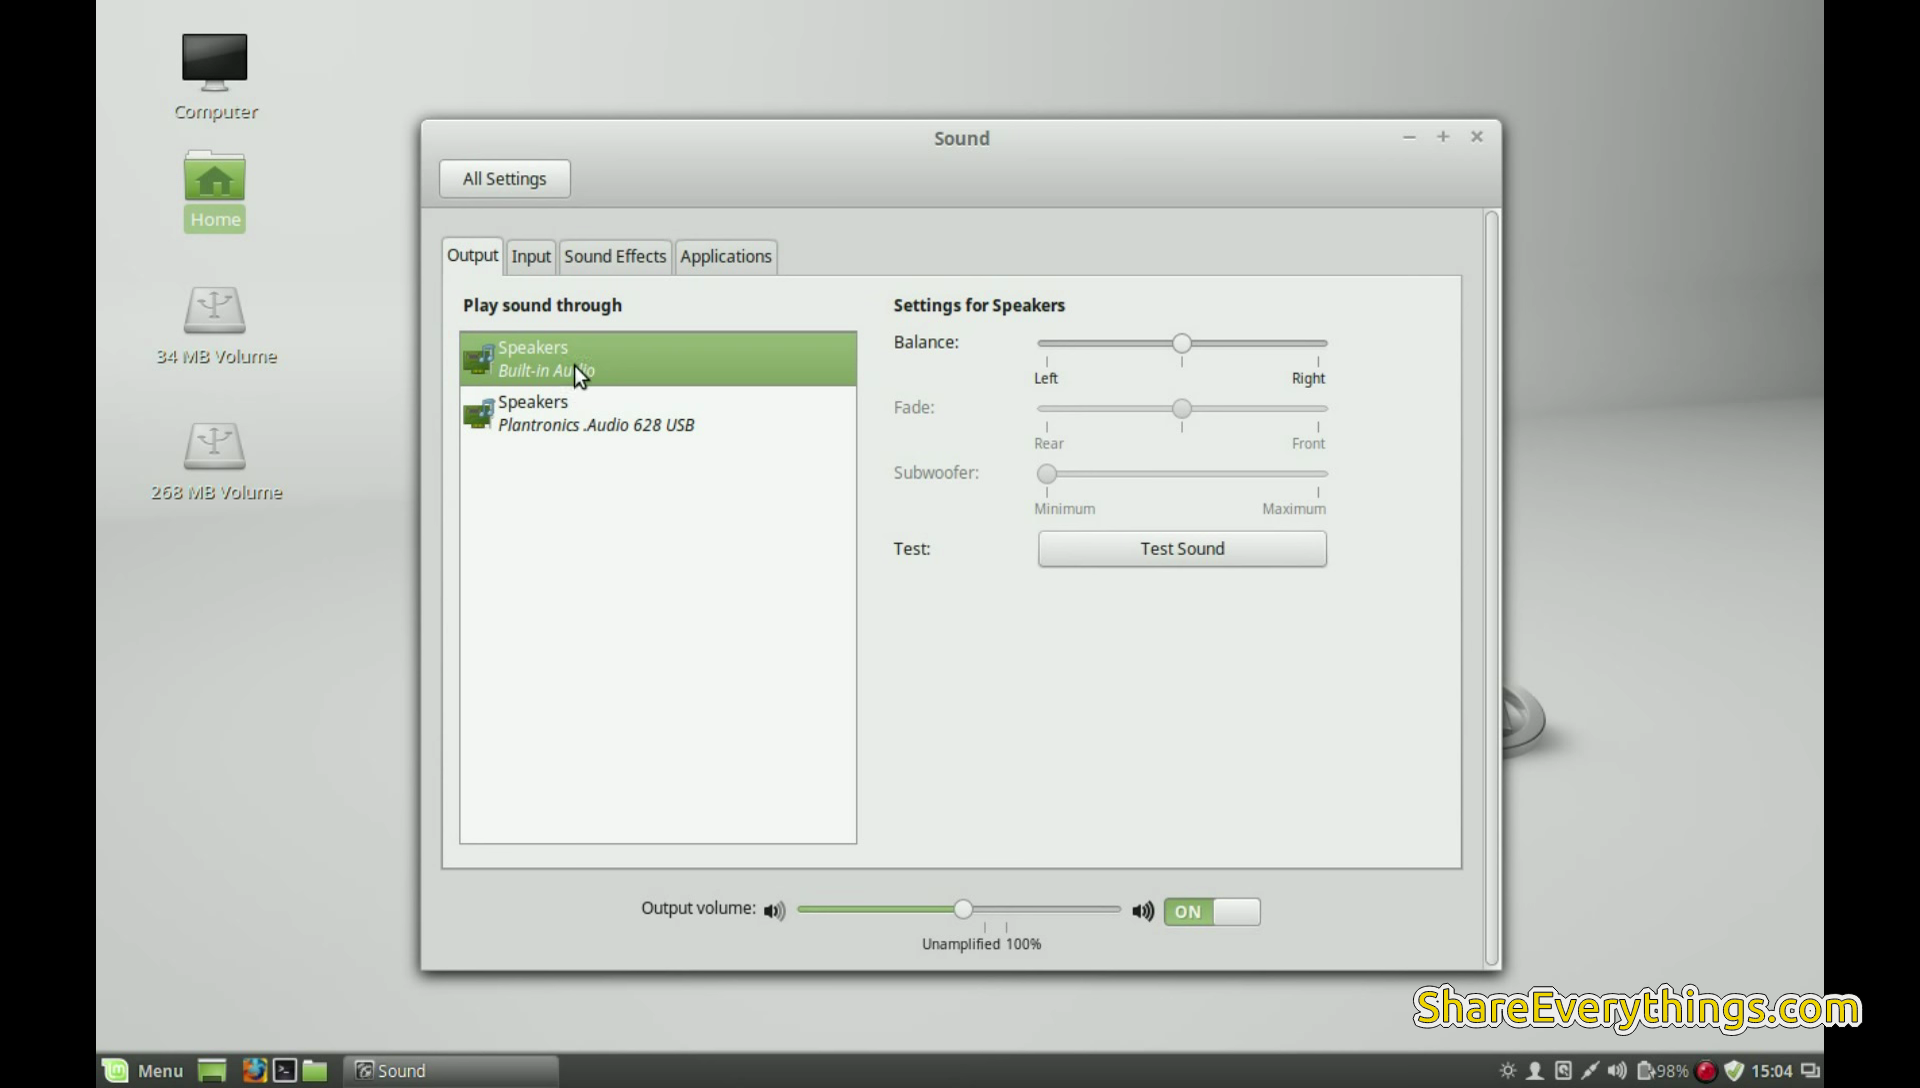
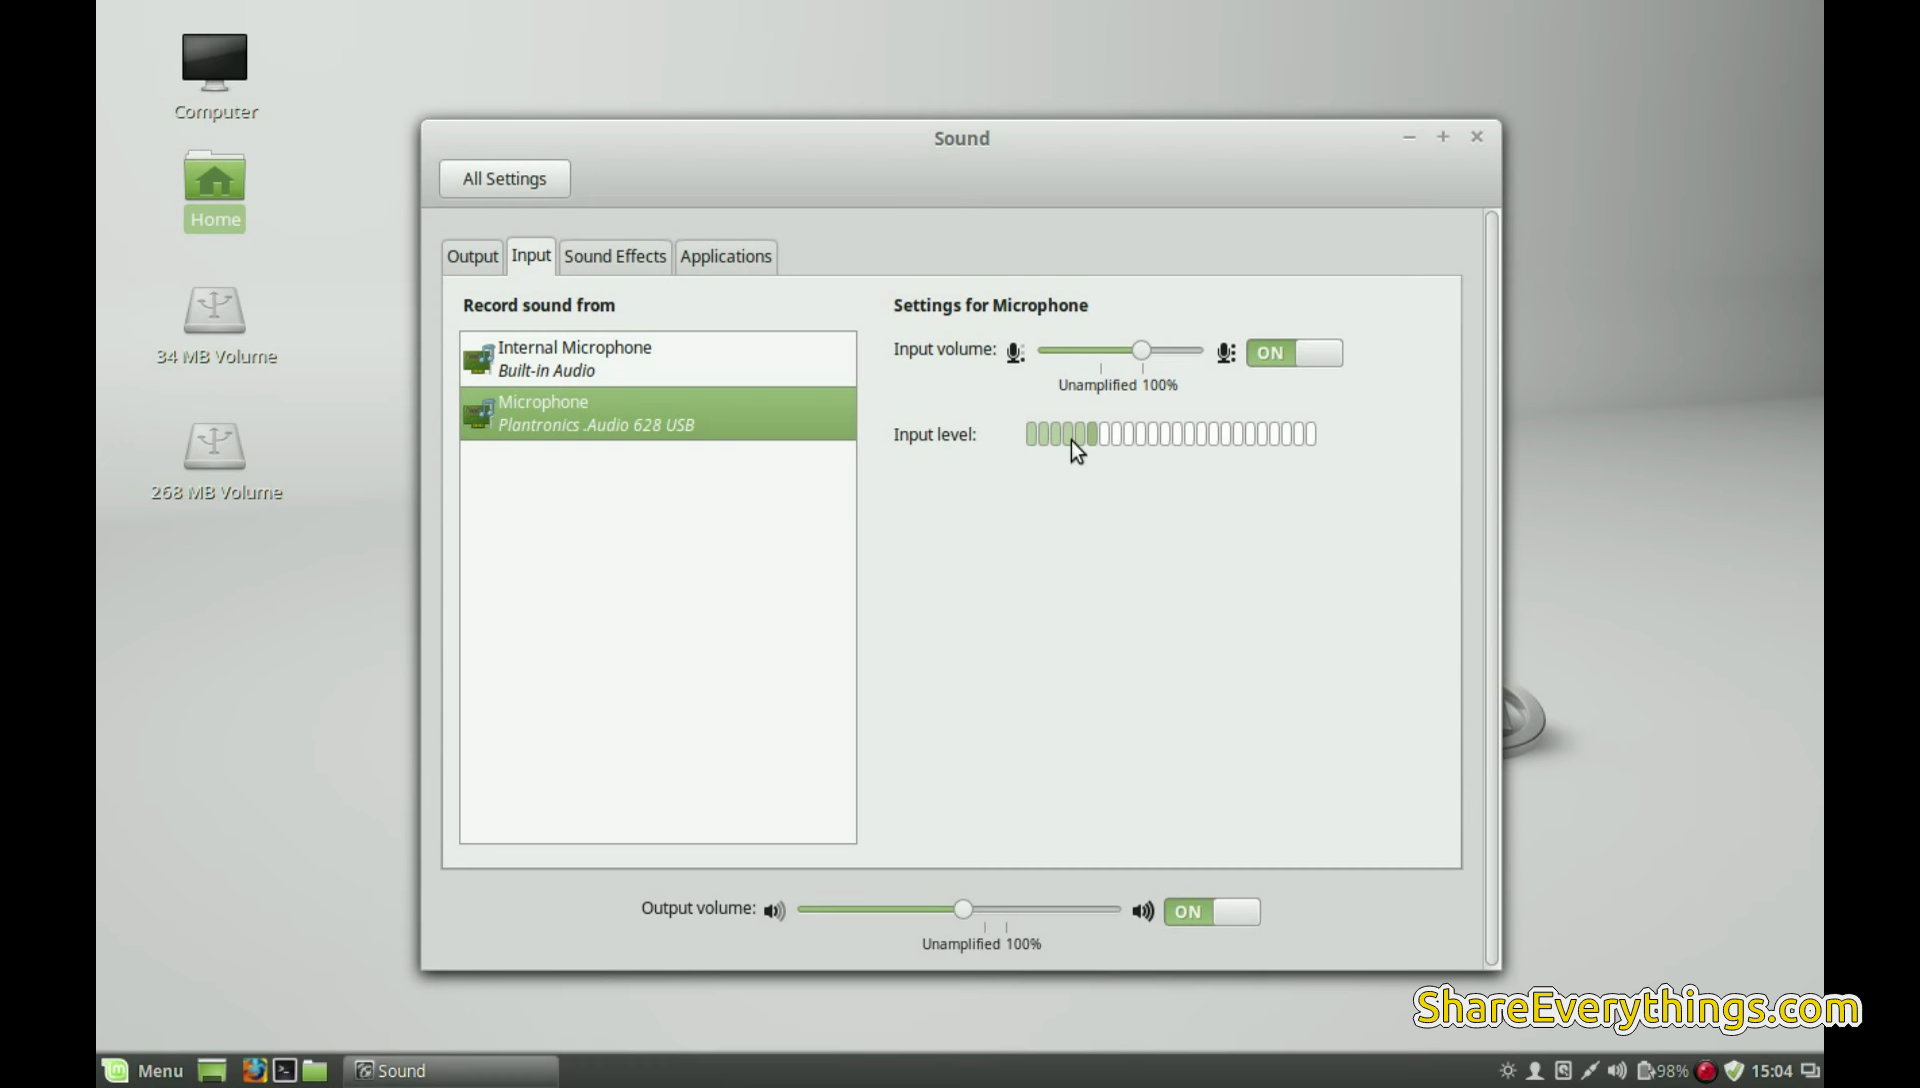
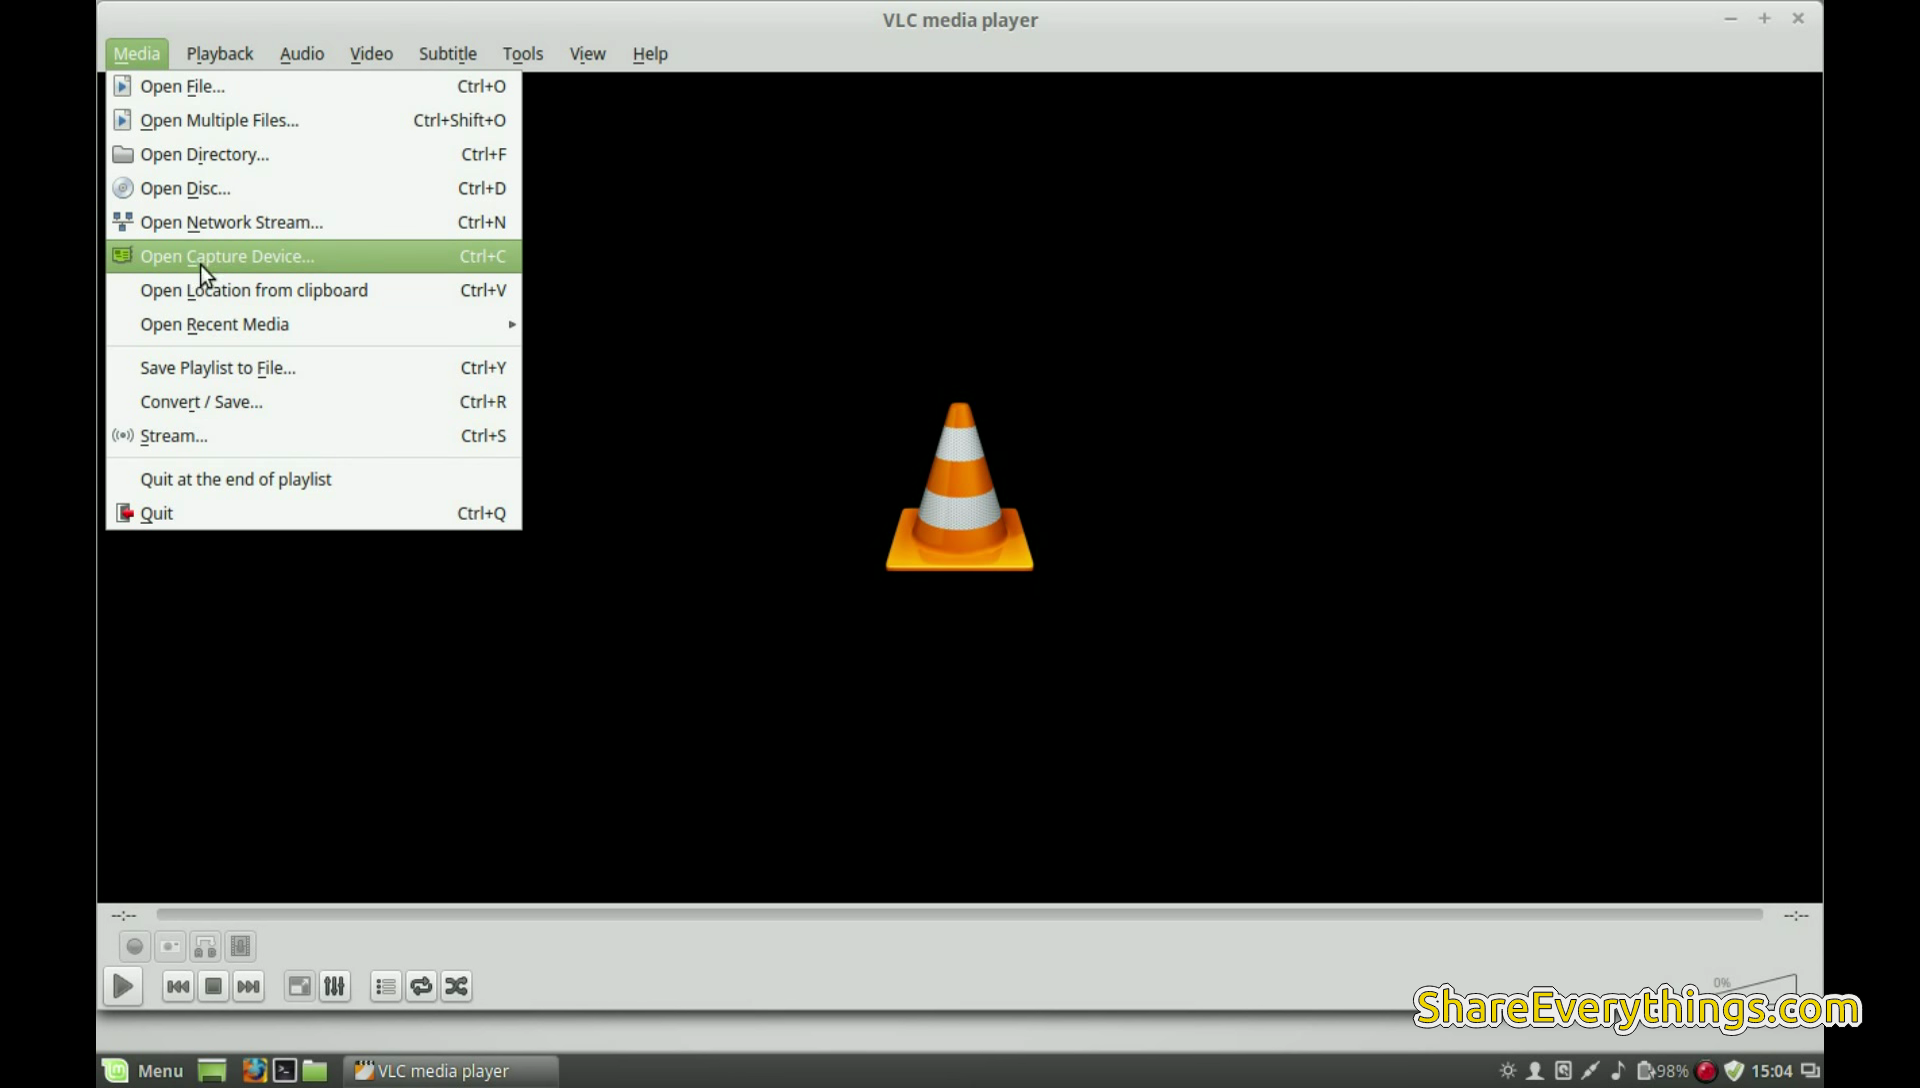
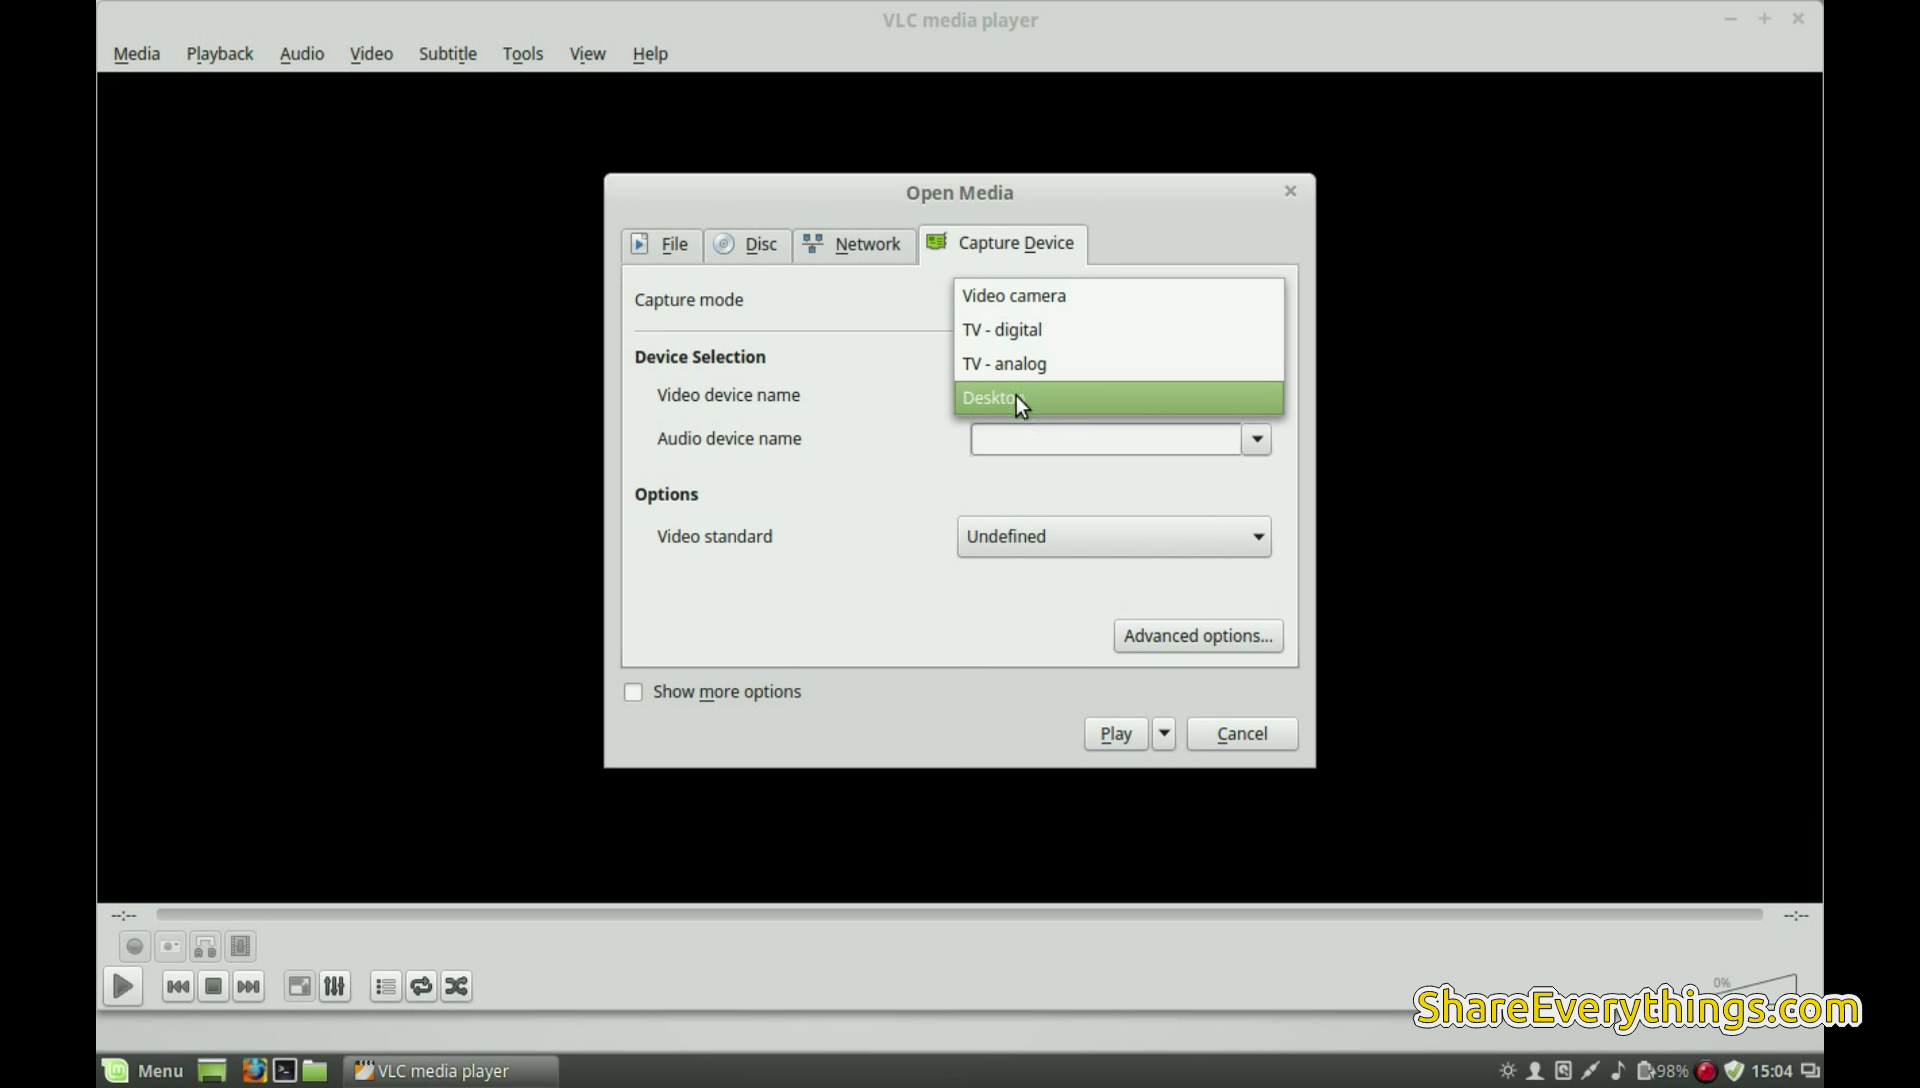
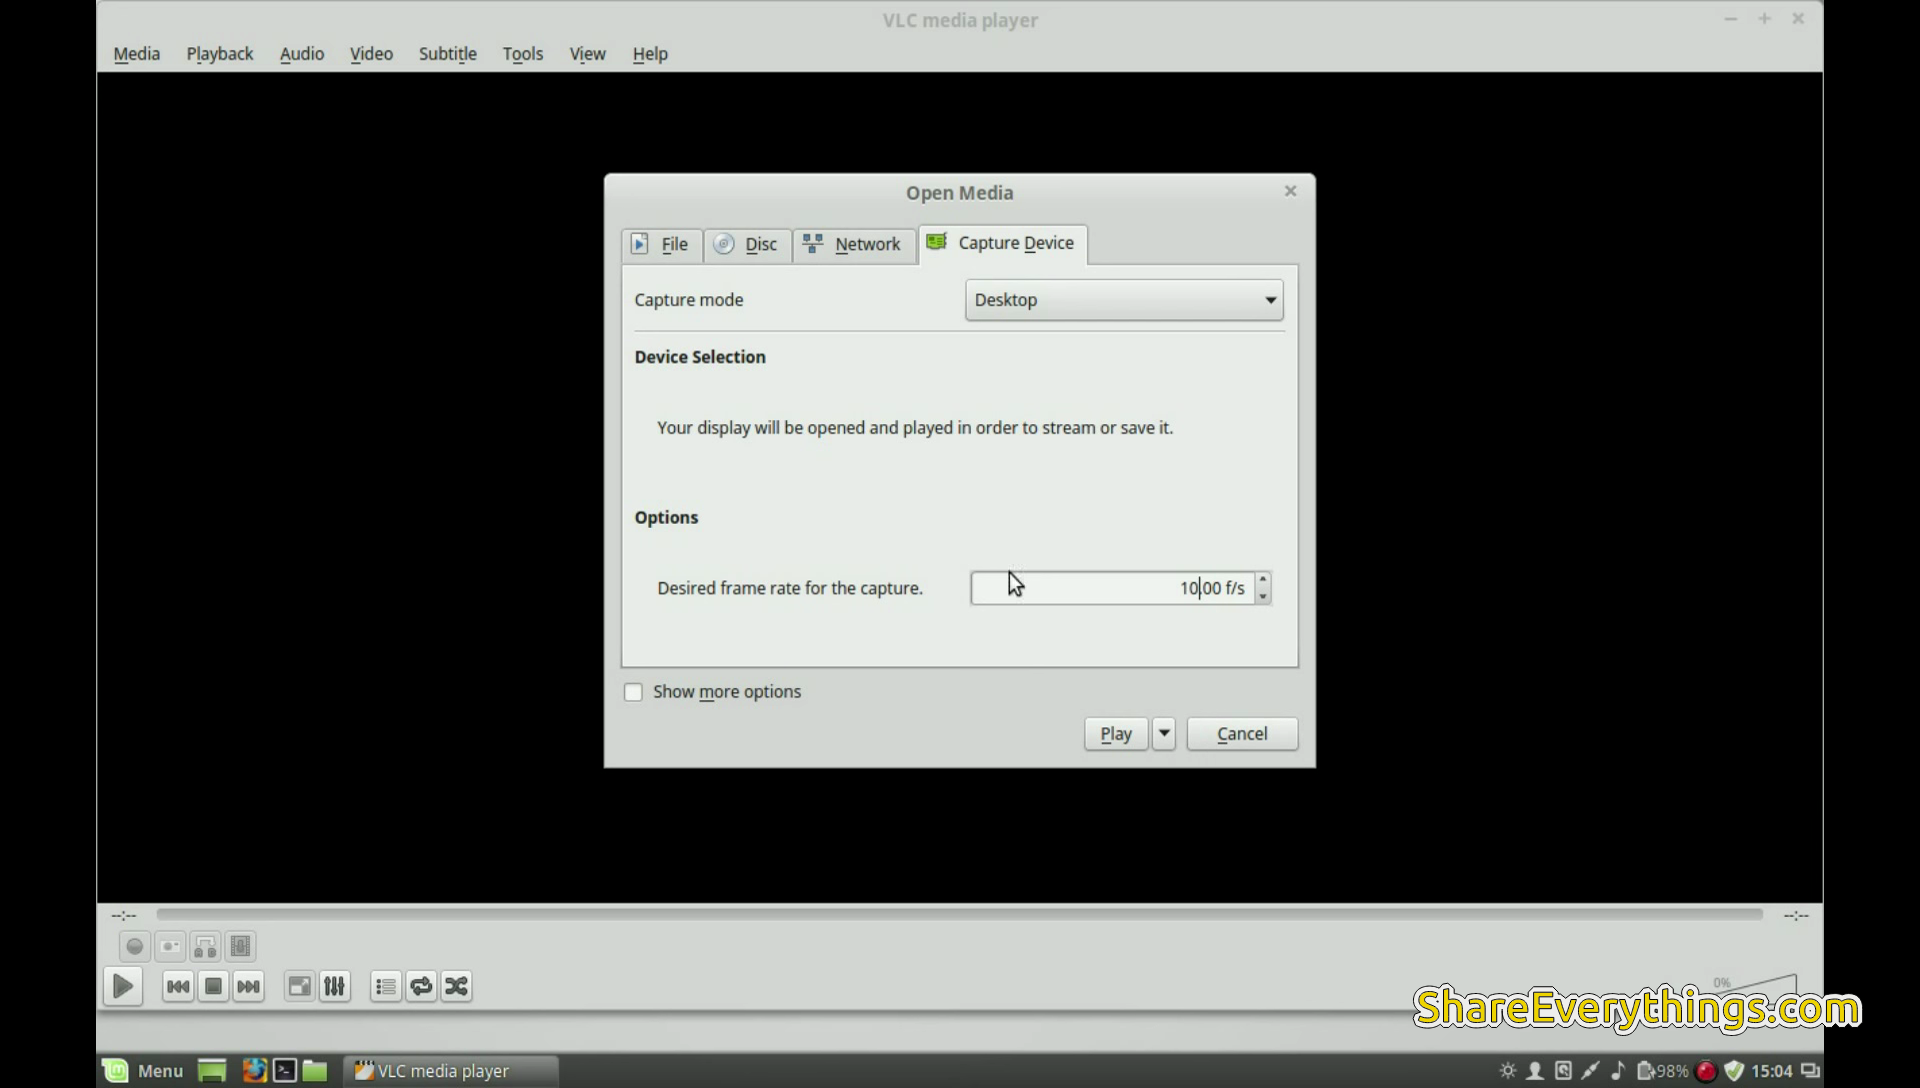
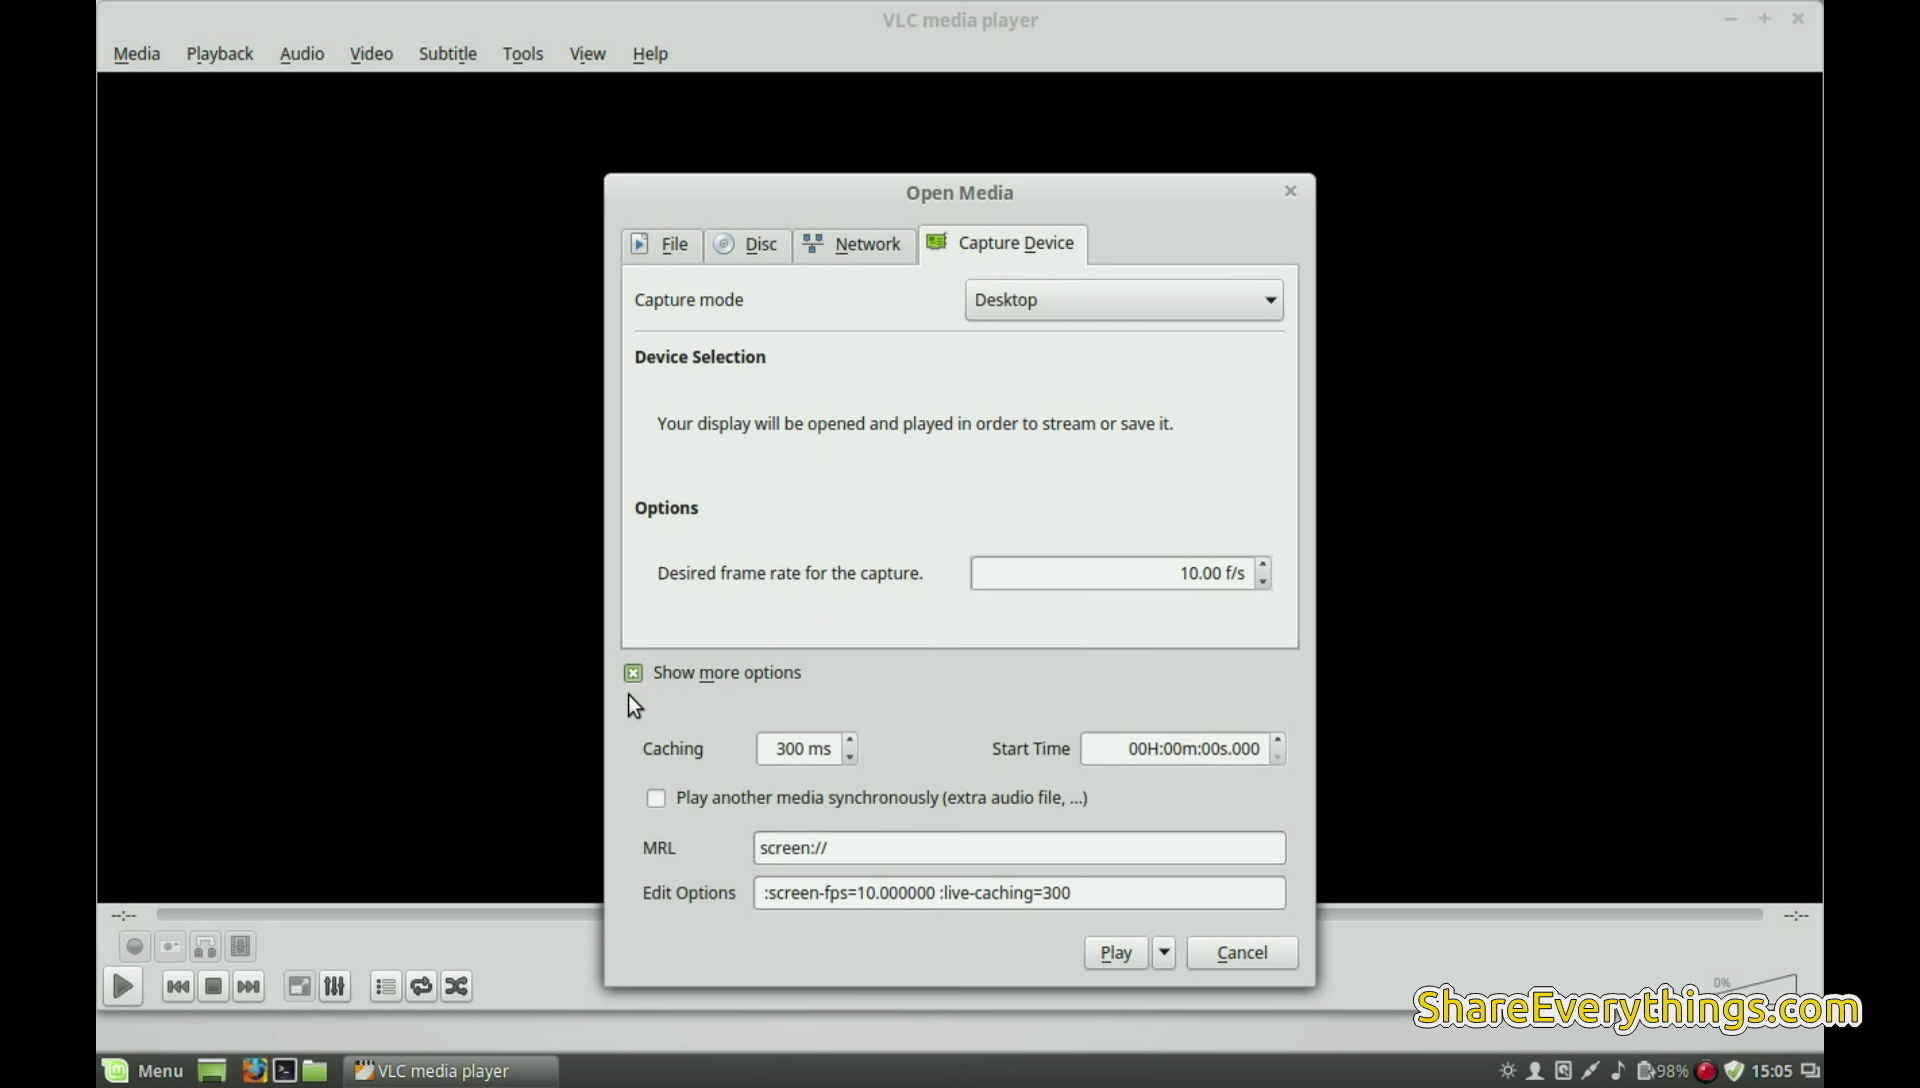
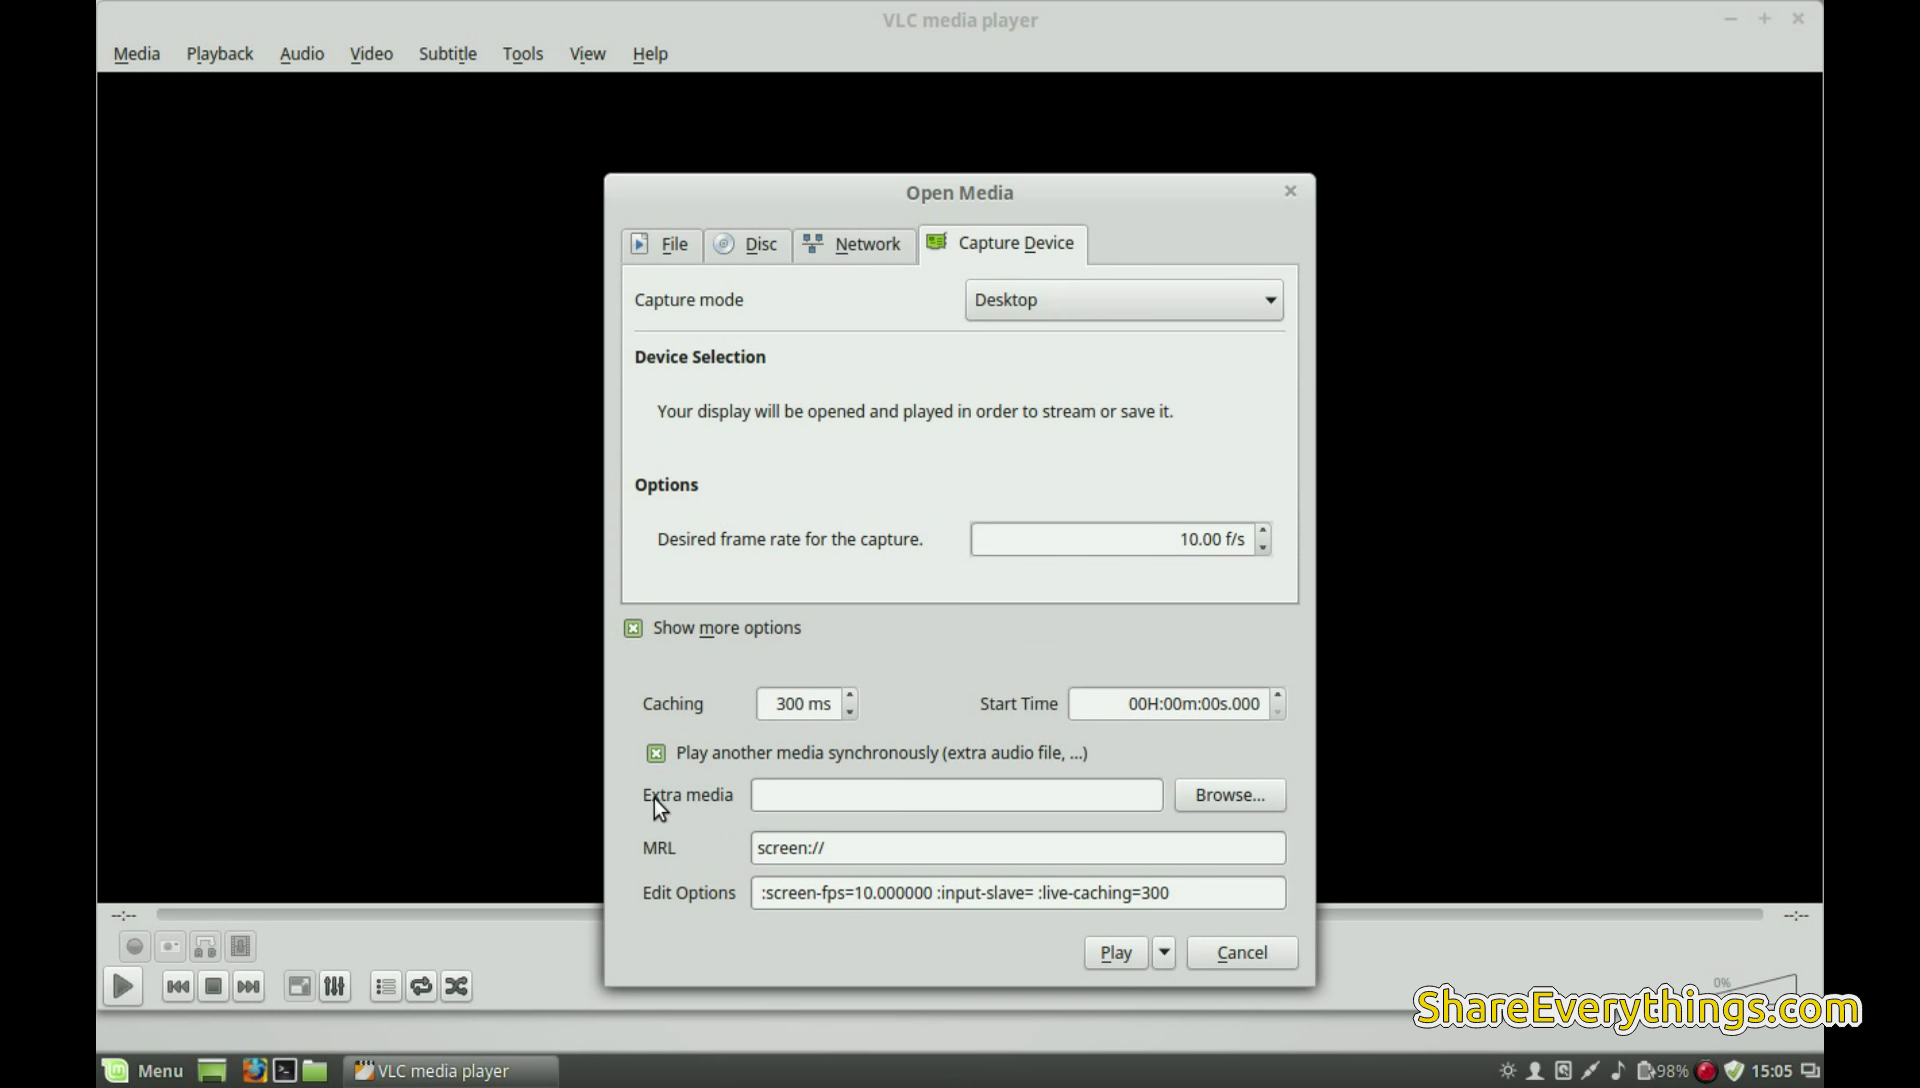
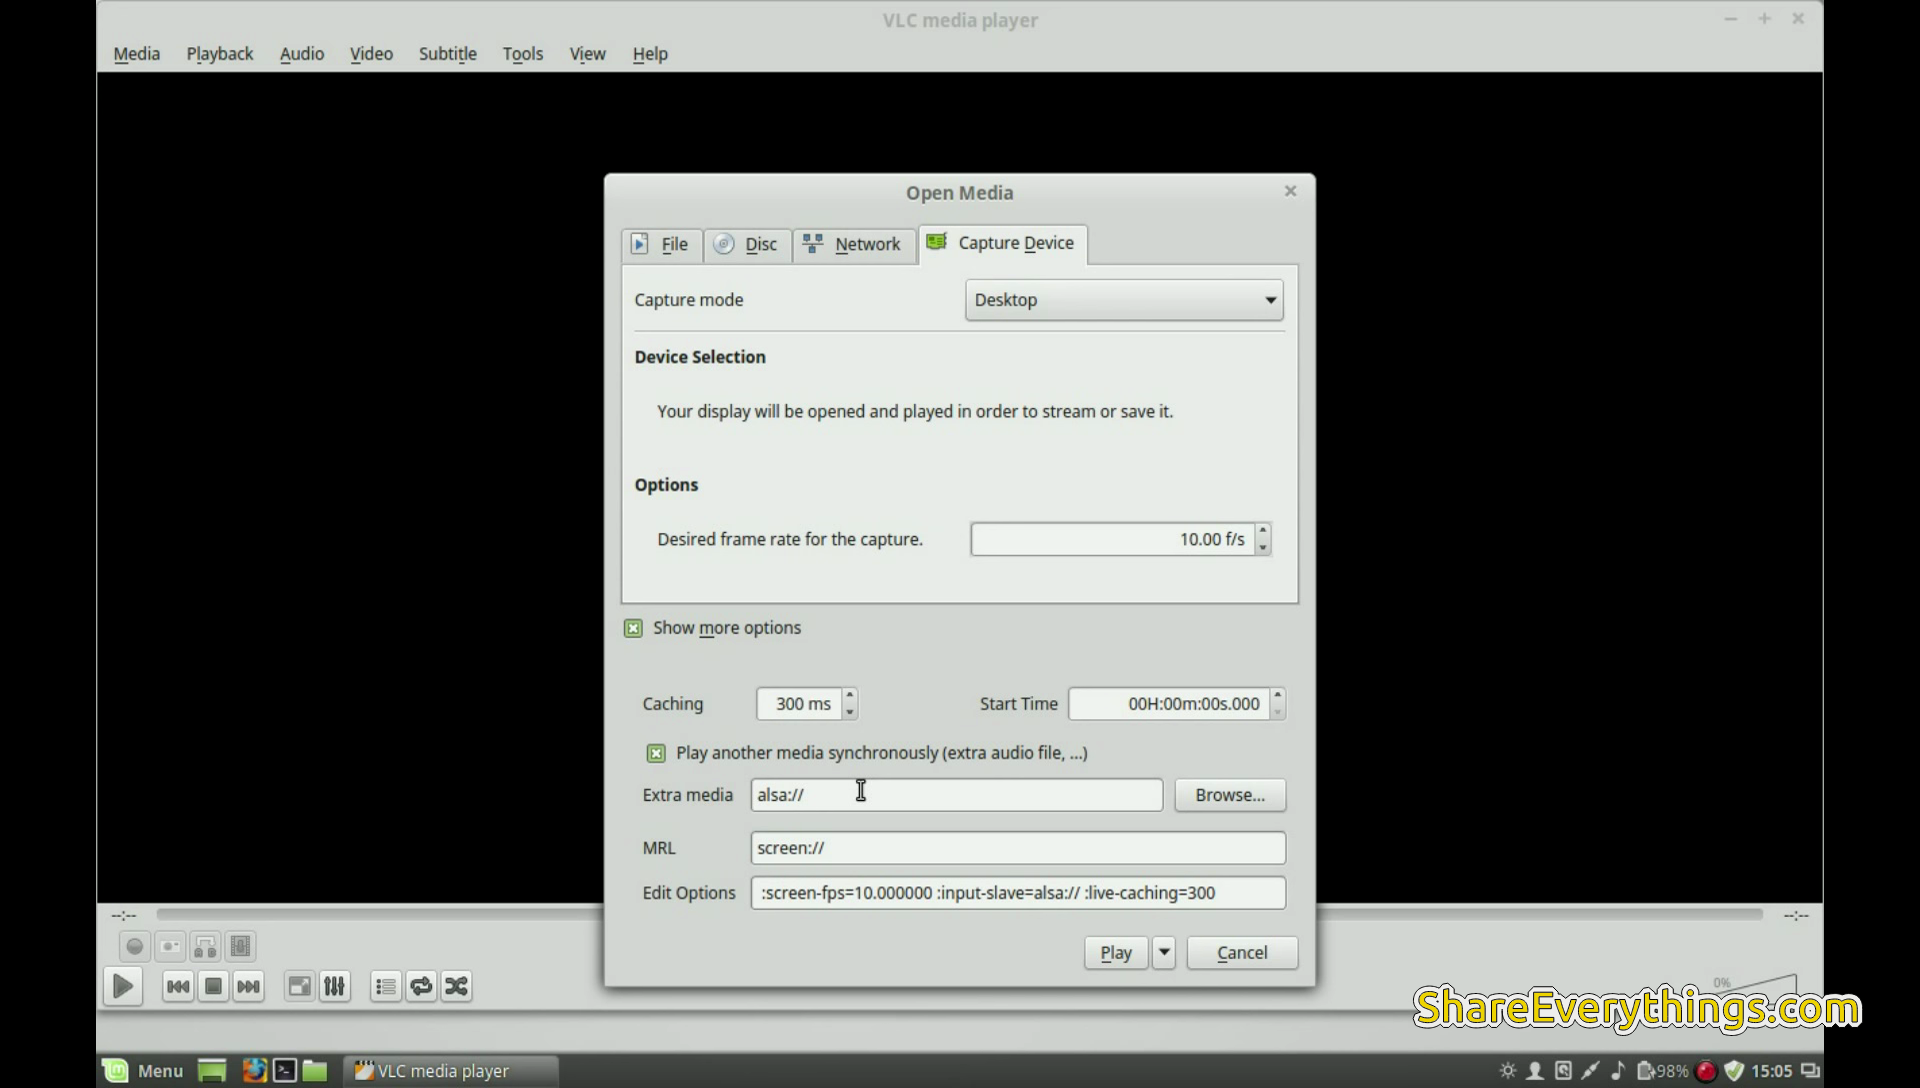
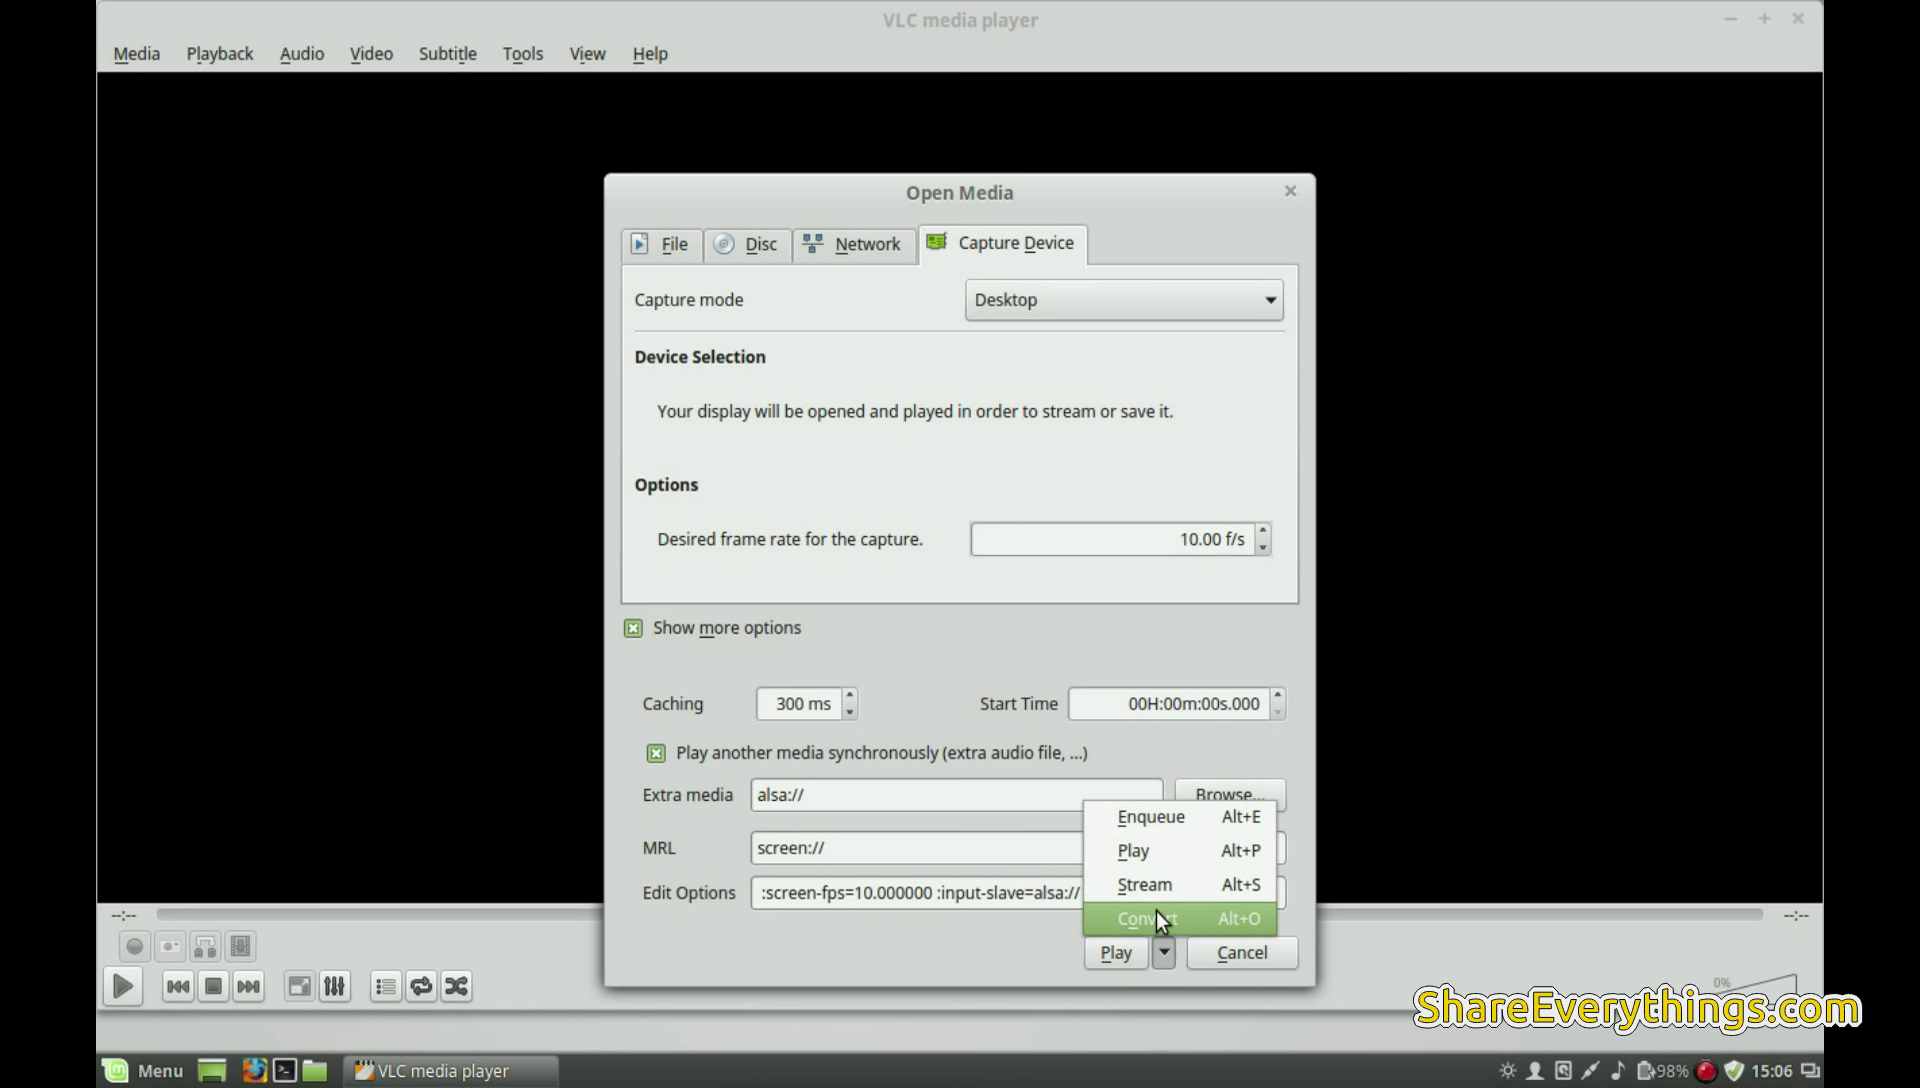
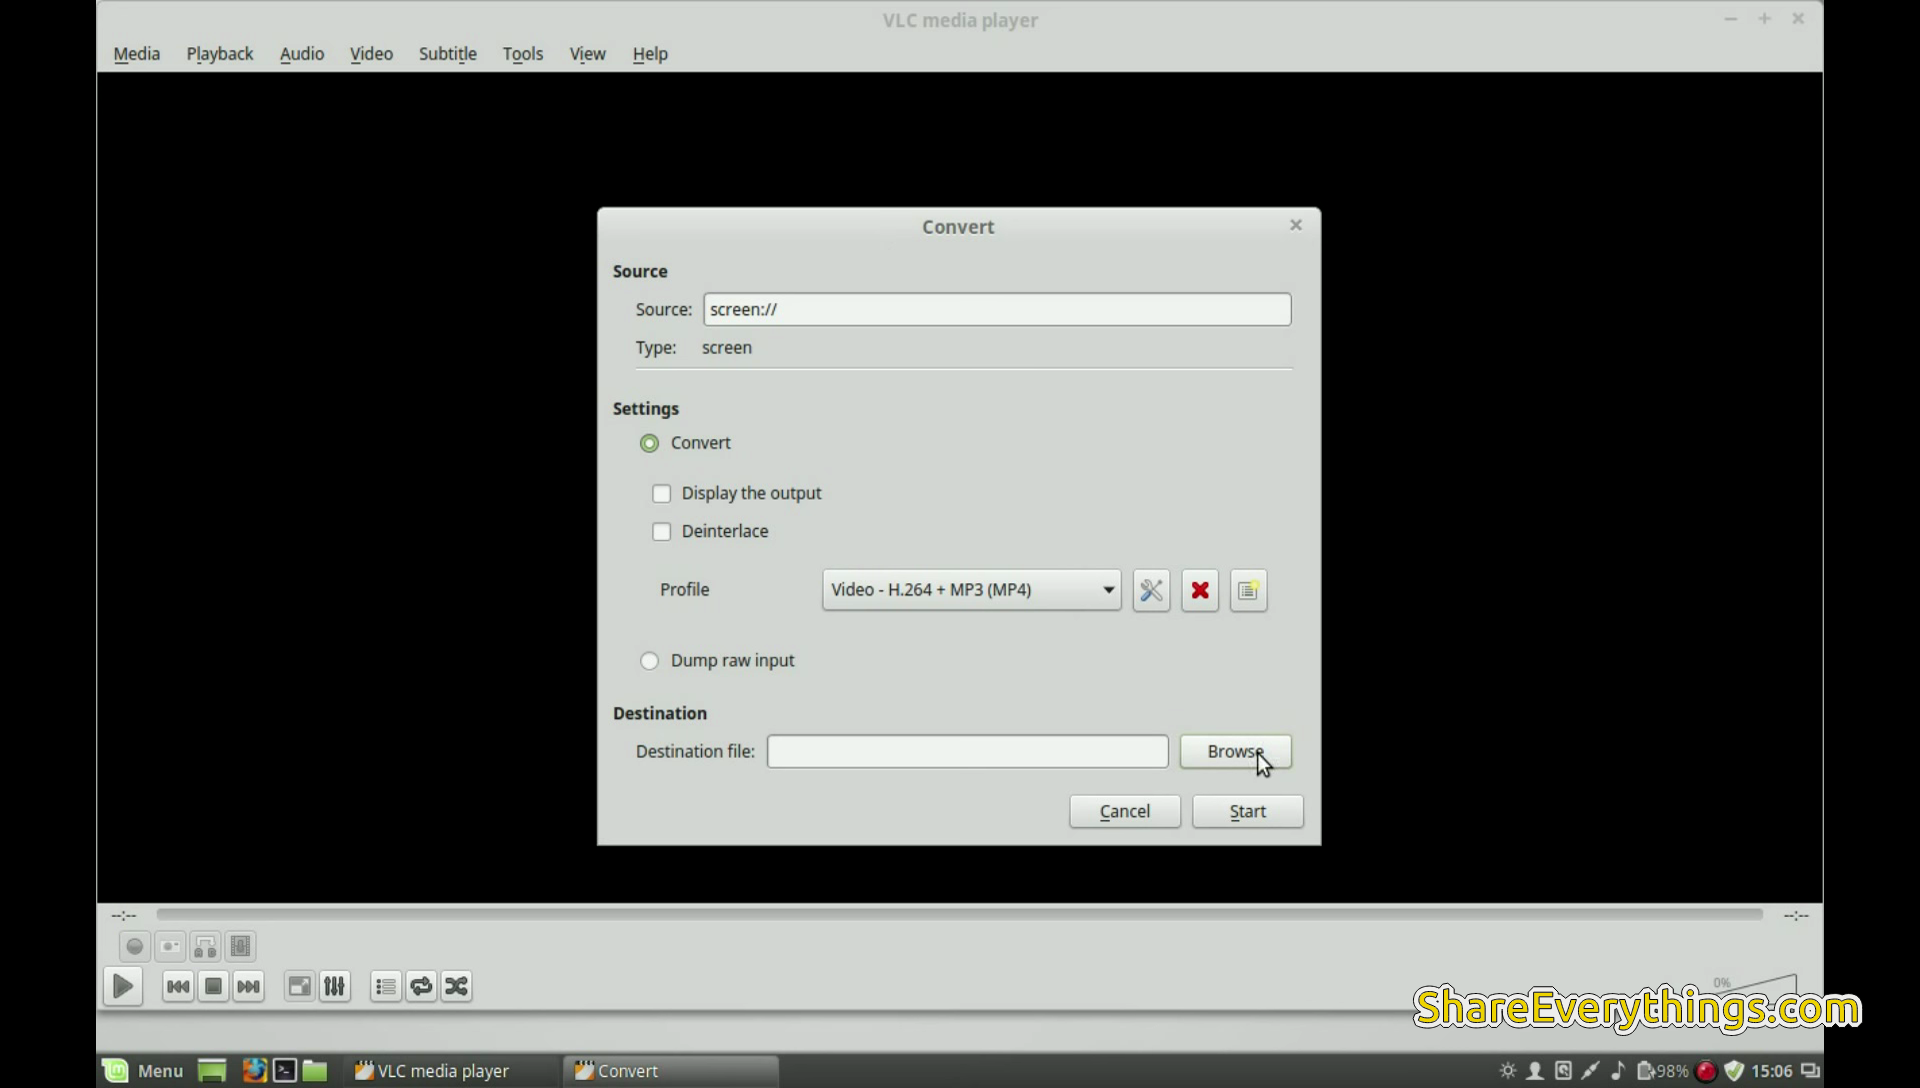
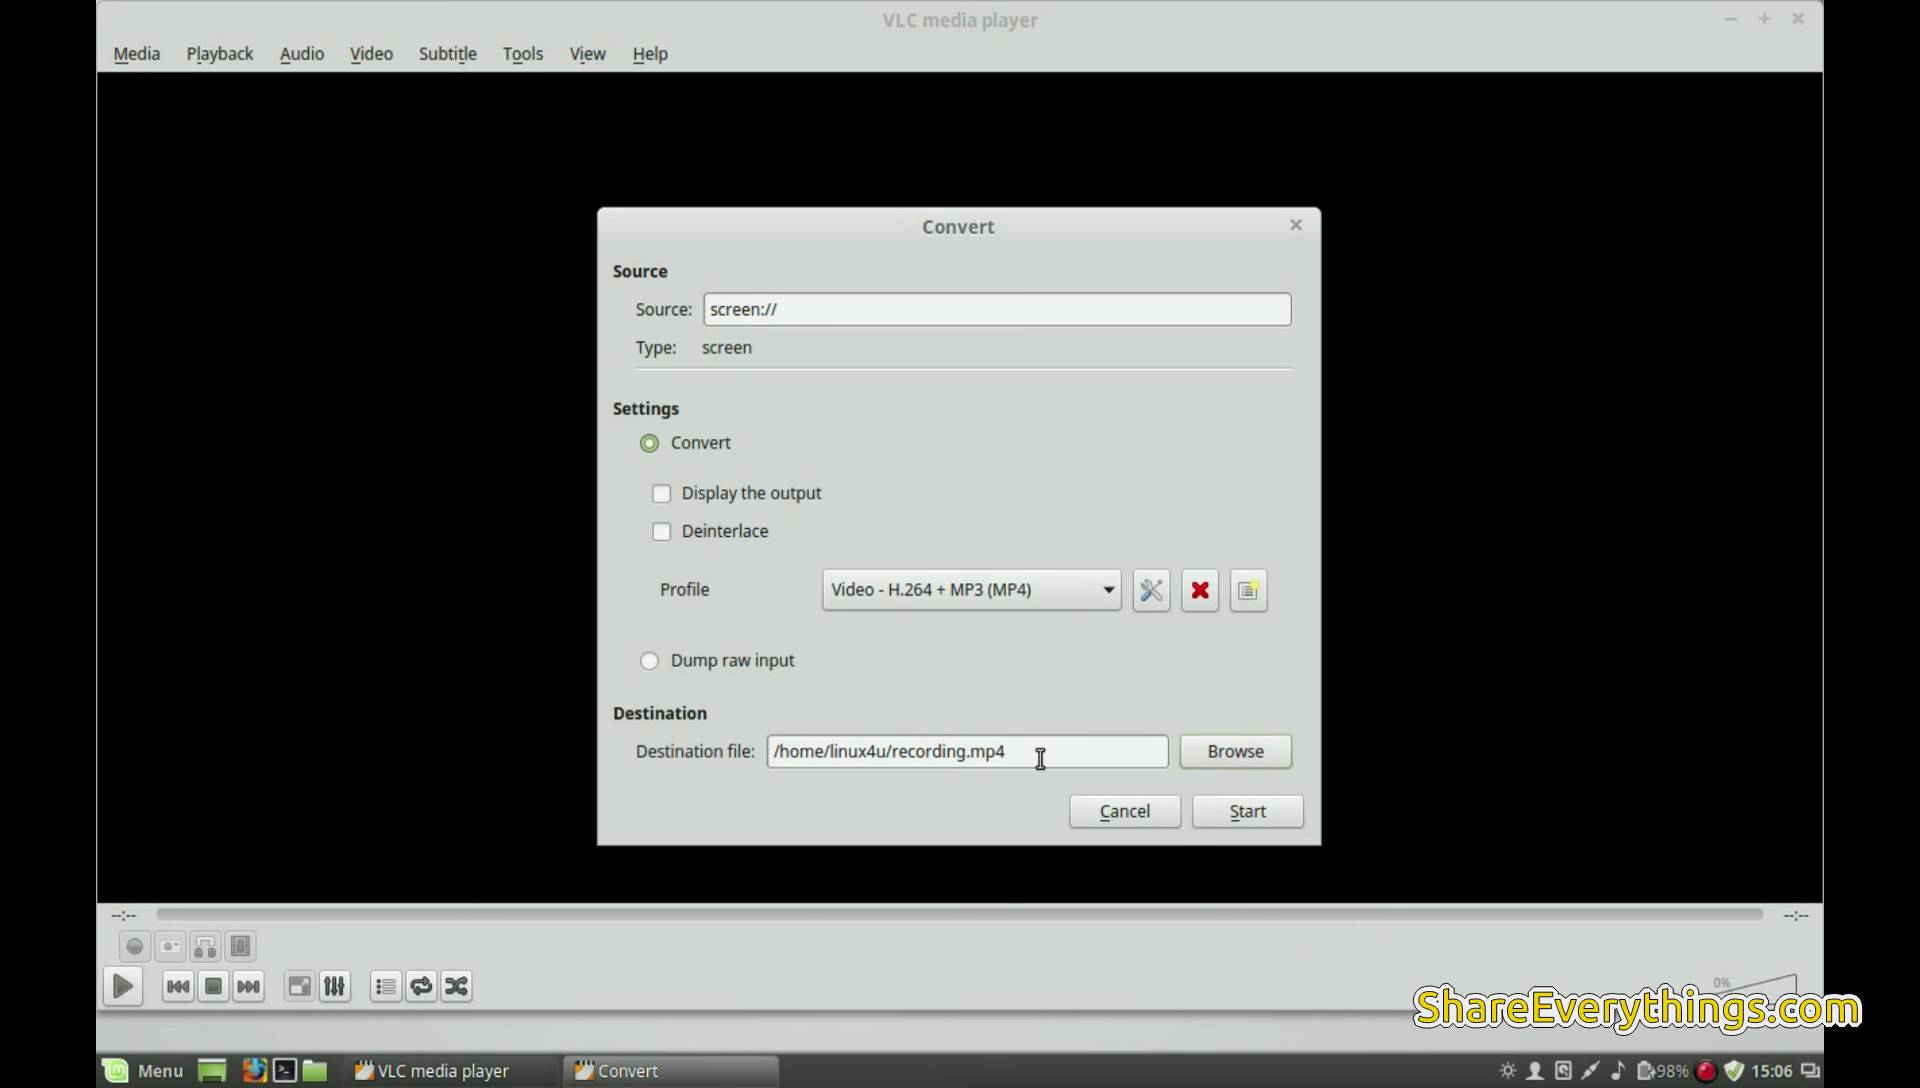
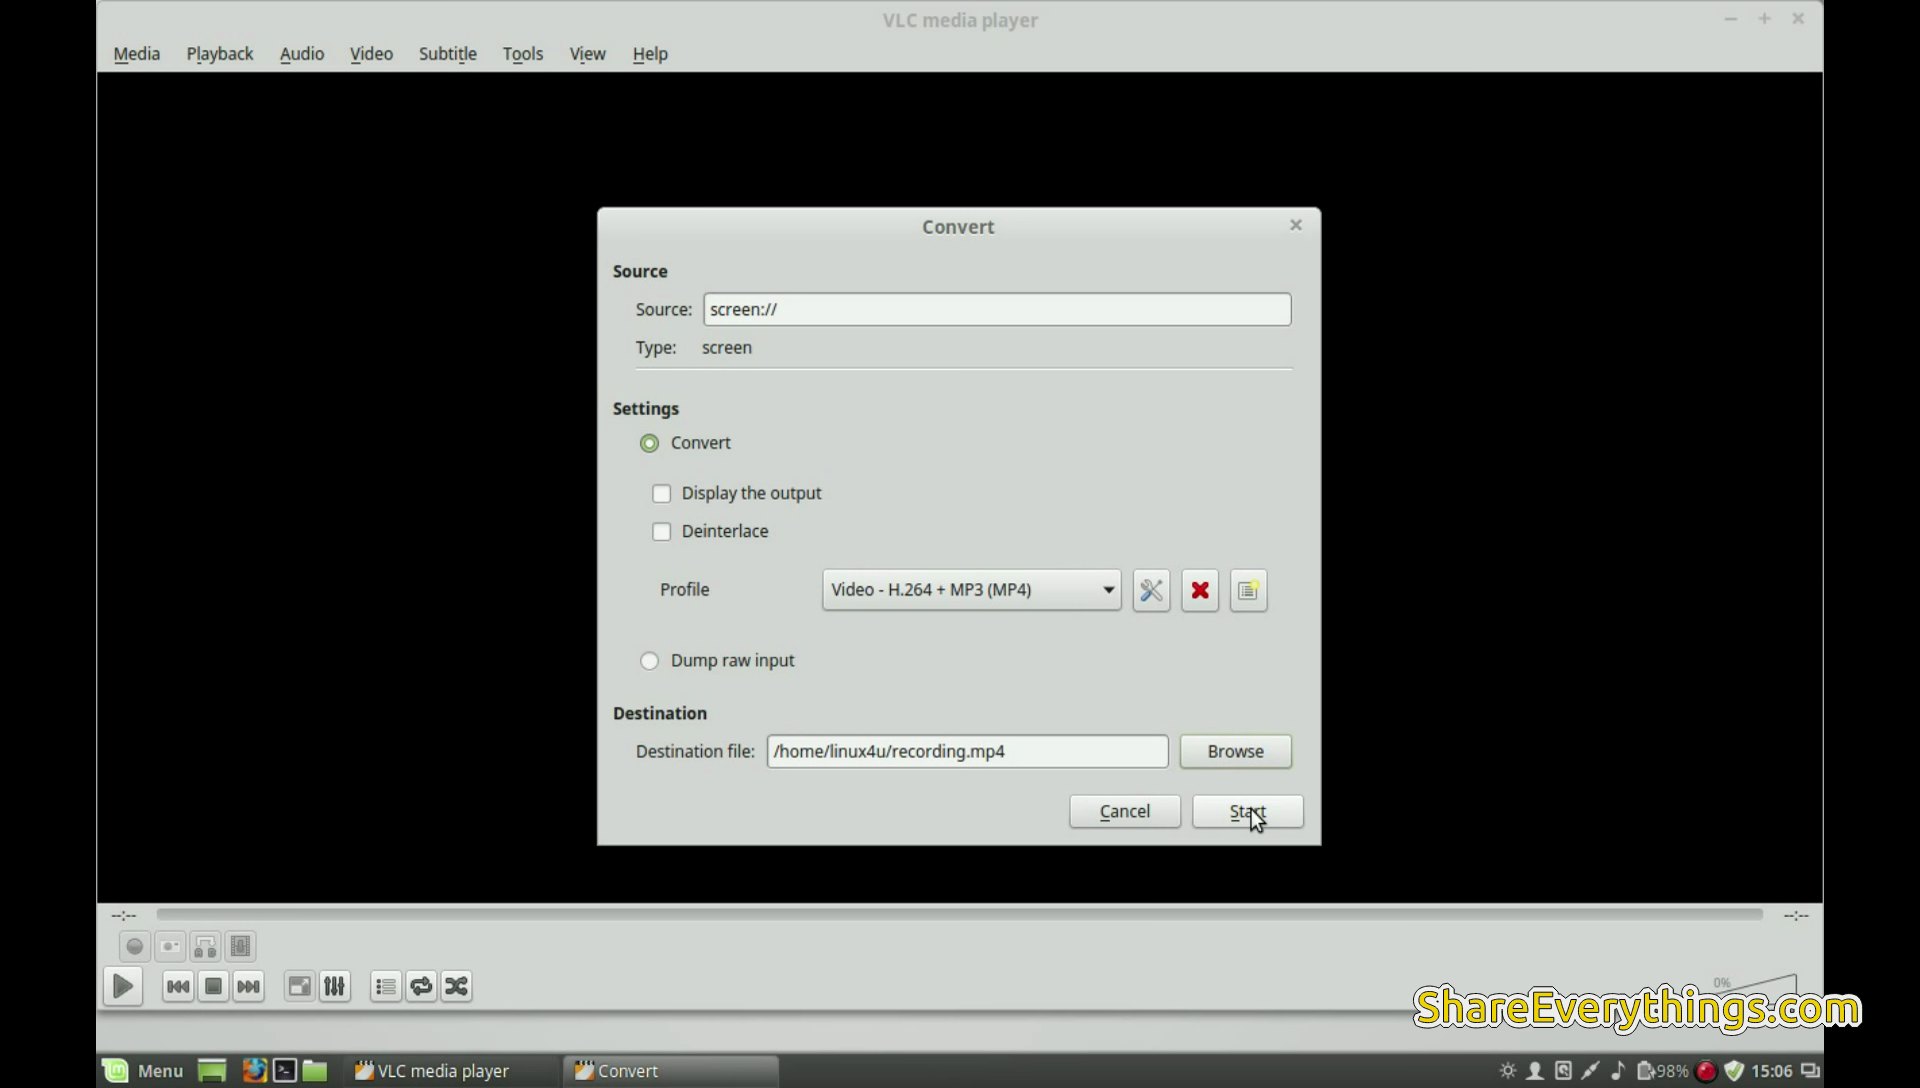
Để tránh lỗi quay màn hình được nhưng không có âm thanh. Các bạn làm theo từng bước như các hình ảnh dưới đây (VLC trên Linux Mint):
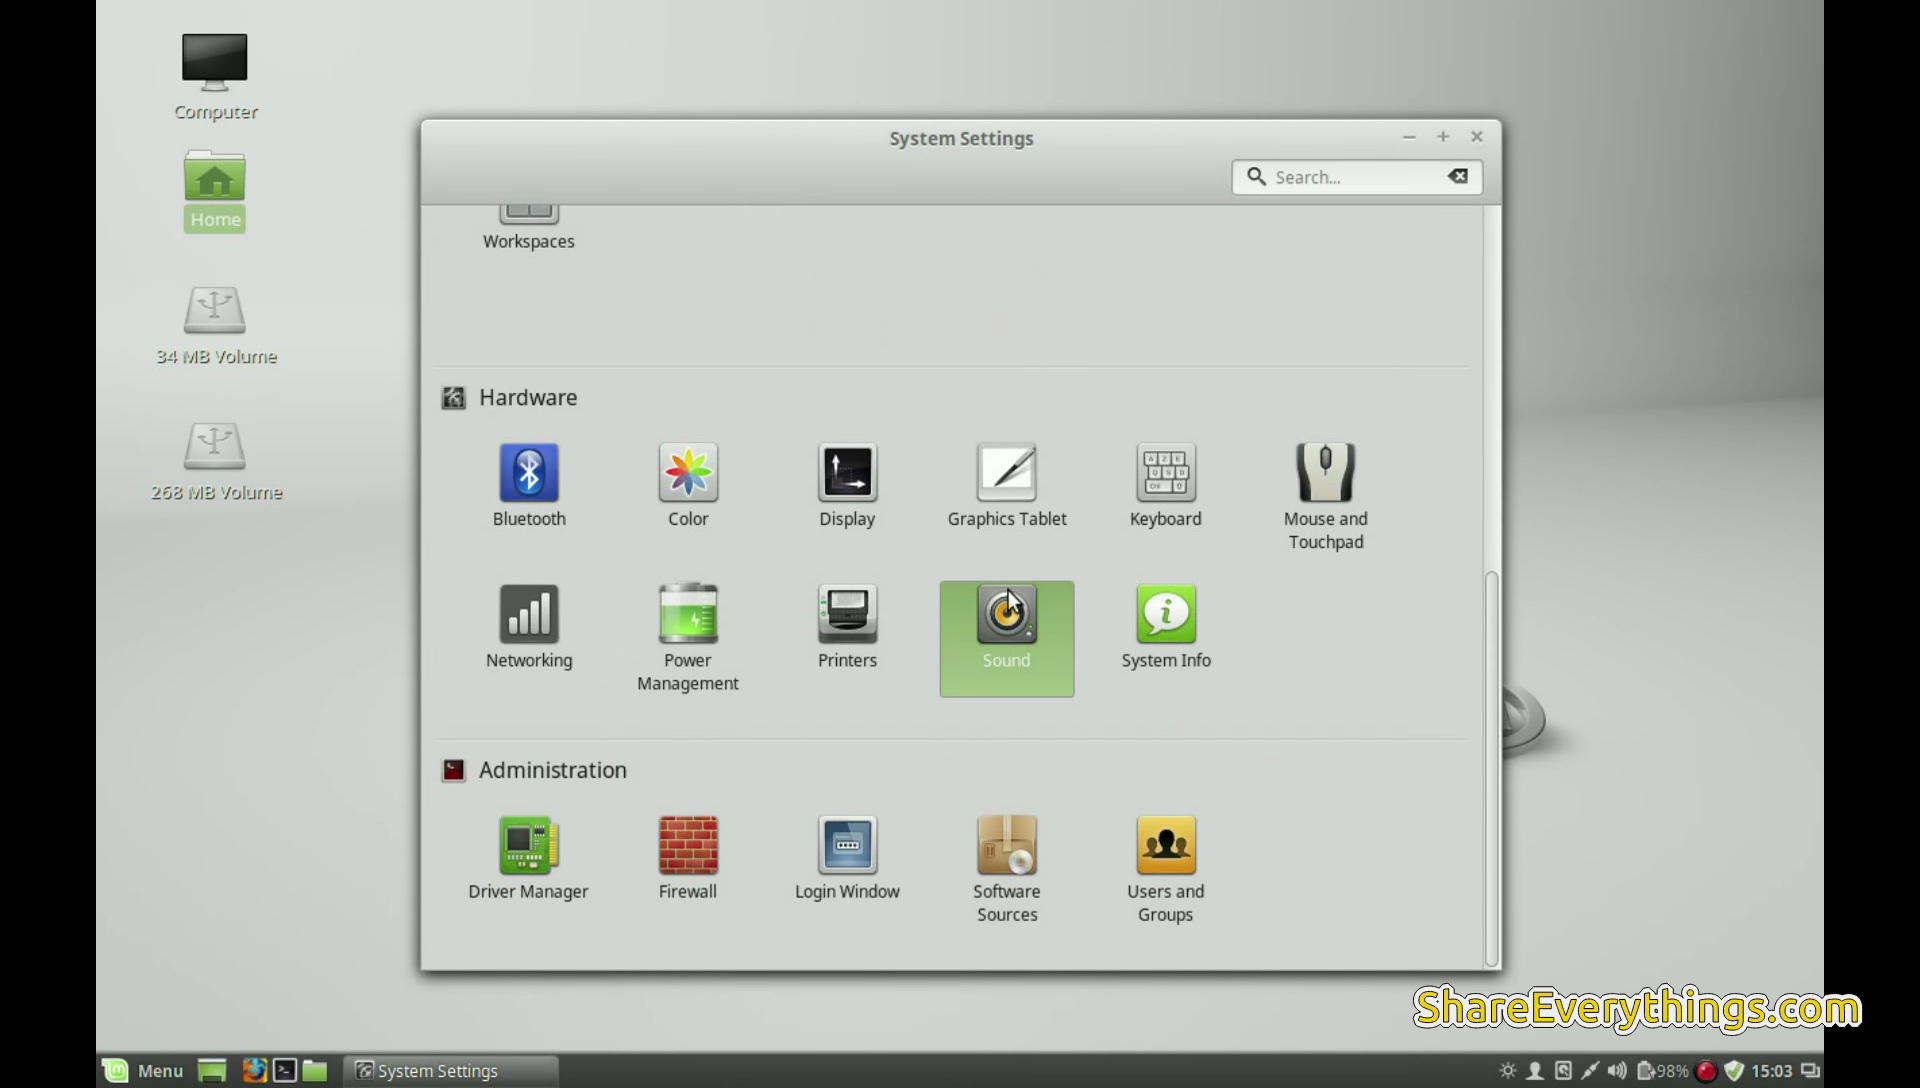
Kiểm tra thiết lập âm thanh của hệ thống hoạt động bình thường.
VLC screen recording with audio in Linux
Bắt đầu chạy VLC media player.
Thay đổi Frame rate (FPS) nên chỉnh từ 15 đến 30 FPS
Mở rộng Show More Options. Nếu bạn bỏ qua bước này thì sẽ bị lỗi không ghi được âm thanh khi quay màn hình với VLC.
Tại Extra media Nhập alsa://
Bạn có thể thiết lập Project để thay đổi định dạng video xuất ra.
Xong rồi! Nhấn nút Start để bắt đầu quay màn hình với VLC. Khi bạn muốn dừng quay thì nhấn nút Stop trên thanh playback của VLC nhé!
Mình đã Hướng dẫn quay màn hình có âm thanh với VLC trên Linux. Trong quá trình thực hiện bạn gặp khó khăn gì thì hãy bình luận bên dưới nhé!
Cách tích hợp Ckfinder vào Ckeditor trong project Spring Boot Java
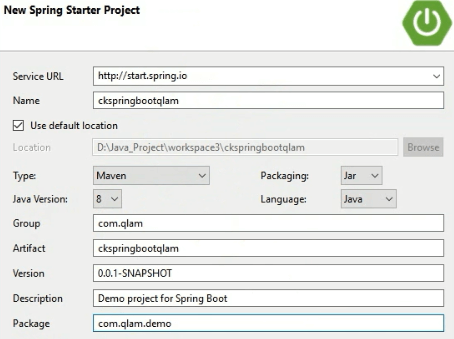
Trong bài viết này mình sẽ hướng dẫn tích hợp Ckfinder và Ckeditor trong project Spring Boot Java. Mình sẽ dùng Ckfinder 2 do Ckfinder 3 chỉ hỗ trợ cho PHP và ASP.NET mà không hỗ trợ cho Java.
Đối với với những web developer việc ứng dụng các WYSIWYG editor vào việc quản trị nội dung cho website dường như là điều bắt buộc. Người dùng có thể dễ dàng cập nhật và định dạng nội dung theo ý muốn một cách dễ dàng như dùng MS Word. Hiện tại có rất nhiều WYSIWYG editor được các nhà phát triển website sử dụng xem tại đây. Top 10 Jquery HTML5 WYSIWYG Plugins Editor
Giới thiệu Ckeditor
CKEditor (còn gọi là FCKeditor) là một trình soạn thảo mã nguồn mở theo kiểu WYSIWYG (tay làm – mắt thấy) của CKSource.
Cũng giống các trình soạn thảo dành cho web khác, CKEditor sử dụng JavaScript là nền tảng, riêng việc tương tác với server thì CKEditor sử dụng các ngôn ngữ phổ biến sau: ASP, ASP.NET, ColdFusion, Java, JavaScript, Perl, PHP và Python.
CKEditor tương thích với hầu hết các trình duyệt Internet, gồm có: Internet Explorer 6.0+ (Windows), Firefox 2.0+, Safari3.0+, Google Chrome (Windows), Opera 9.50+…
Giới thiệu Ckfinder
CKfinder là 1 trình quản lý file, nó cho phép chúng ta quản lý file, folder trên server bao gồm phân quyền sử dụng, upload file từ client. Hiện tại nếu bạn chỉ sử dụng CKEditor thì chức năng upload ảnh từ client và chèn vào bài viết không sử dụng được
.
Hướng dẫn tích hợp Ckfinder vào Ckeditor trong Spring Boot Java
Vào phần chính nào, hầu hết đa số trên mạng có rất nhiều hướng dẫn tích hợp Ckfinder vào Ckeditor trên PHP, ASP.NET. Thậm chí là Java nhưng hầu như chỉ hướng dẫn tích hợp Ckfinder cho Java web JSP hay Spring Framework với web.xml. Ngay cả document của trang chủ Ckfinder cũng chỉ hướng dẫn theo dạng web.xml. Vì thế mình quyết định viết bài Hướng dẫn tích hợp Ckfinder vào Ckeditor trong Spring Boot Java. Các công nghệ sử dụng:
Spring Boot + Thymeleaf
Công cụ yêu cầu:
Ckfinder 2
Ckeditor 3
Eclipse + Plugin spring suite tool
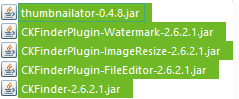
Quá trình làm gồm các bước cụ thể dưới đây! Để chi tiết bạn nên xem video cuối bài !
if (childNode.getNodeName().equals("licenseName")) this.licenseName = childNode.getTextContent().trim(); if (childNode.getNodeName().equals("licenseKey")) this.licenseKey = childNode.getTextContent().trim(); String value; if (childNode.getNodeName().equals("imgWidth")) value = childNode.getTextContent().trim(); value = value.replaceAll("//D", ""); try this.imgWidth = Integer.valueOf(value); catch (NumberFormatException var13) this.imgWidth = null;
if (childNode.getNodeName().equals("imgQuality")) value = childNode.getTextContent().trim(); value = value.replaceAll("//D", ""); method = clazz.getDeclaredMethod("adjustQuality", new Class[]String.class); method.setAccessible(true); this.imgQuality = Float.parseFloat(method.invoke(this, value).toString());
if (childNode.getNodeName().equals("imgHeight")) value = childNode.getTextContent().trim(); value = value.replaceAll("//D", ""); try this.imgHeight = Integer.valueOf(value); catch (NumberFormatException var12) this.imgHeight = null;
if (childNode.getNodeName().equals("thumbs")) method = clazz.getDeclaredMethod("setThumbs", new Class[]NodeList.class); method.setAccessible(true); method.invoke(this, childNode.getChildNodes());
if (childNode.getNodeName().equals("accessControls")) method = clazz.getDeclaredMethod("setACLs", new Class[]NodeList.class); method.setAccessible(true); method.invoke(this, childNode.getChildNodes());
if (childNode.getNodeName().equals("hideFolders")) method = clazz.getDeclaredMethod("setHiddenFolders", new Class[]NodeList.class); method.setAccessible(true); method.invoke(this, childNode.getChildNodes());
if (childNode.getNodeName().equals("hideFiles")) method = clazz.getDeclaredMethod("setHiddenFiles", new Class[]NodeList.class); method.setAccessible(true); method.invoke(this, childNode.getChildNodes());
if (childNode.getNodeName().equals("checkDoubleExtension")) this.doubleExtensions = Boolean.valueOf(childNode.getTextContent().trim()).booleanValue(); if (childNode.getNodeName().equals("disallowUnsafeCharacters")) this.disallowUnsafeCharacters = Boolean.valueOf(childNode.getTextContent().trim()).booleanValue(); if (childNode.getNodeName().equals("forceASCII")) this.forceASCII = Boolean.valueOf(childNode.getTextContent().trim()).booleanValue(); if (childNode.getNodeName().equals("checkSizeAfterScaling")) this.checkSizeAfterScaling = Boolean.valueOf(childNode.getTextContent().trim()).booleanValue(); Scanner sc; if (childNode.getNodeName().equals("htmlExtensions")) value = childNode.getTextContent(); sc = (new Scanner(value)).useDelimiter(","); while (sc.hasNext()) String val = sc.next(); if (val != null && !val.equals("")) this.htmlExtensions.add(val.trim().toLowerCase());
if (childNode.getNodeName().equals("secureImageUploads")) this.secureImageUploads = Boolean.valueOf(childNode.getTextContent().trim()).booleanValue(); if (childNode.getNodeName().equals("uriEncoding")) this.uriEncoding = childNode.getTextContent().trim(); if (childNode.getNodeName().equals("userRoleSessionVar")) this.userRoleSessionVar = childNode.getTextContent().trim(); if (childNode.getNodeName().equals("defaultResourceTypes")) value = childNode.getTextContent().trim(); sc = (new Scanner(value)).useDelimiter(","); while (sc.hasNext()) this.defaultResourceTypes.add(sc.next());
if (childNode.getNodeName().equals("plugins")) method = clazz.getDeclaredMethod("setPlugins", new Class[]Node.class); method.setAccessible(true); method.invoke(this, childNode);
if (childNode.getNodeName().equals("basePathBuilderImpl")) method = clazz.getDeclaredMethod("setBasePathImpl", new Class[]String.class); method.setAccessible(true); method.invoke(this, childNode.getTextContent().trim());
method = clazz.getDeclaredMethod("setTypes", new Class[]Document.class); method.setAccessible(true); method.invoke(this, doc); field = clazz.getDeclaredField("events"); field.setAccessible(true); field.set(this, new Events()); this.registerEventHandlers();
File CKFinderServletConfig.java dùng để thiết lập thuộc tính trên file application.properties
File WebMvcConfig.java dùng để thiết lập đường dẫn thư viện và file upload theo Spring MVC
package com.qlam.demo.config;
import org.springframework.context.annotation.Configuration;
import org.springframework.web.servlet.config.annotation.ResourceHandlerRegistry;
import org.springframework.web.servlet.config.annotation.WebMvcConfigurerAdapter;
@Configuration
public class WebMvcConfig extends WebMvcConfigurerAdapter
	@Override
	public void addResourceHandlers(ResourceHandlerRegistry registry)
		// file:D:\\data\\file\\image\\
		registry.addResourceHandler("/public/image/**").addResourceLocations("classpath:/static/uploadmedia/");
		registry.addResourceHandler("/static/**").addResourceLocations("classpath:/static/");
		registry.addResourceHandler("/ckfinder/**").addResourceLocations("classpath:/static/ckfinder/");
		super.addResourceHandlers(registry);
File application.properties
# ===============================
# THYMELEAF
# ===============================
spring.thymeleaf.cache=false
# ===============================
# DATASOURCE
# ===============================
# Set here configurations for the database connection
# config dir so that ckeditor and ckfinder loading to media upload, write null so that use ckfinder.xml
ckeditor.storage.image.path=src/main/resources/static/uploadmedia/
ckeditor.access.image.url=http://localhost:8080
Xử lý với Controller class
Tạo package com.qlam.demo.controller
Chúng ta cần 1 class Controller để chạy trang chủ.
File QController.java đơn giản là mình cho nó dùng giao diện file adpost.html để hiện cho trang chủ.
package com.qlam.demo.controller;
import org.springframework.stereotype.Controller;
import org.springframework.web.bind.annotation.GetMapping;
@Controller
public class QController
	@GetMapping("/")
	public String home()
		return "adpost";
Thiết kế giao diện với thymeleaf engine
Mình tạo giao diện web đơn giản chia làm 2 phần:
Dùng Ckeditor tích hợp Ckfinder khi upload ảnh
Chạy Ckfinder khi nhấn một nút
Trong phần src/main/resources/templates tạo file adpost.html
filebrowserBrowseUrl : 'ckfinder/ckfinder.html', filebrowserImageBrowseUrl : 'ckfinder/ckfinder.html?type=Images', filebrowserFlashBrowseUrl : 'ckfinder/ckfinder.html?type=Flash', filebrowserUploadUrl : 'ckfinder/core/connector/java/connector.java?command=QuickUpload&type=Files', filebrowserImageUploadUrl : 'ckfinder/core/connector/java/connector.java?command=QuickUpload&type=Images', filebrowserFlashUploadUrl : 'ckfinder/core/connector/java/connector.java?command=QuickUpload&type=Flash' ); /*Avatar start*/ function BrowseServer(startupPath, functionData) // You can use the "CKFinder" class to render CKFinder in a page: var finder = new CKFinder(); // The path for the installation of CKFinder (default = "/ckfinder/"). finder.basePath = '../'; //Startup path in a form: "Type:/path/to/directory/" finder.startupPath = startupPath; // Name of a function which is called when a file is selected in CKFinder. finder.selectActionFunction = SetFileField; // Additional data to be passed to the selectActionFunction in a second argument. // We'll use this feature to pass the Id of a field that will be updated. finder.selectActionData = functionData; // Name of a function which is called when a thumbnail is selected in CKFinder. Preview img // finder.selectThumbnailActionFunction = ShowThumbnails; // Launch CKFinder finder.popup();
// This is a sample function which is called when a file is selected in CKFinder. function SetFileField(fileUrl, data) document.getElementById(data["selectActionData"]).innerHTML = this .getSelectedFile().name; document.getElementById("imgpreview").src = fileUrl;
/*Avatar end*/ </script> </body> </html>
Chạy project
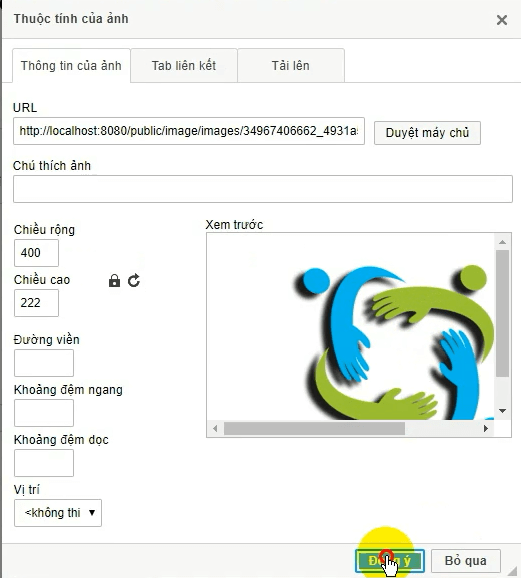
Kết quả thành công! Nhờ các plugin bạn có thể thay đổi kích thước ảnh.
Video chi tiết Hướng dẫn tích hợp Ckfinder vào Ckeditor trong Spring Boot Java
Trong bài viết này, tôi sẽ hướng dẫn thủ thuật nén file đạt mức tối ưu bằng phần mềm 7 ZIP (nén tốt hơn winrar). Điểm mạnh của 7 ZIP đó là nó hoàn toàn free và chức năng không hề kém cạnh các trình compress khác.
Nén và giải nén là việc rất cần thiết cho việc lưu trữ dữ liệu gọn nhẹ. Và nhiều người cũng đã từng đặt câu hỏi “Tại sao file khi tải về file khá nhẹ mà giải nén ra nặng thế”. Đó là do người nén file đã sử dụng các kĩ thuật nén file đạt mức tối ưu nhất để giảm dung lượng file xuống mức tối thiểu.
Khác với phần mềm nén thông dụng như winrar (có phí), thì 7 zip hoàn toàn miễn phí.
[toggle title=”Lưu ý”]Thực tế không phải là trường hợp nào cũng nén được cao. Ví dụ, đối với file văn bản (word, exel,…) thì sẽ nén được rất nhiều nhưng đối với file .exe hoặc nhạc, phim, hình gì đó thì mức nén không cao (gần như chẳng nén được bao nhiêu hết). Những file đó có mức nén không cao vì vốn nó đã được nén rồi. Cho nên ta mới có thuật ngữ là nhạc nén, phim nén,… Điển hình là một bài hát, nếu không nén thì dung lượng một bài hát khoảng 5 phút thì sẽ có dung lượng khoảng 25MB (nhạc lossless) nhưng những bài hát .mp3 ta down trên mạng chỉ có khoảng 5MB. Hình cũng vậy, hình chưa nén là hình RAW, còn những định dạng ta hay xài .jpg là đã được nén. Vì thế, các bạn không nên quá lạm dụng.[/toggle]
Giới thiệu sơ về 7-zip:
– Đây là một phần mềm nén miễn phí vì là phần mềm mã nguồn mở open source (giống Firefox, Google Chrome,… )
– Nhỏ gọn, tính năng không hề thua kém các phần mềm thương mại như Winrar, WinZip và thậm chí còn nén tốt hơn.
– Có 74 ngôn ngữ trong đó có cả tiếng Việt.
– Có chương trình quản lí tập tin (File Manager).
– Hỗ trợ nén và giải nén đa định dạng.
– Mức nén rất cao và tốc độ cũng rất nhanh nhờ sử dụng thuật toán LZMA.
– Hỗ trợ mã hóa file nén dùng AES-256 và đặt password cho file nén.
[alert-warning]7 zip chỉ có nhược điểm thế này. Sau khi mình dùng nhiều lần thì 7 zip nó tốn nhiều bộ nhớ khi nén và giải nén hơn winrar nên tốc độ nén nó nhanh hơn. Điều này bạn vẫn có thể khắc phục tránh tình trạng treo máy theo hướng dẫn bên dưới.[/alert-warning]
Sau đây mình sẽ hướng dẫn sử dụng 7 zip để nén và giải nén file:
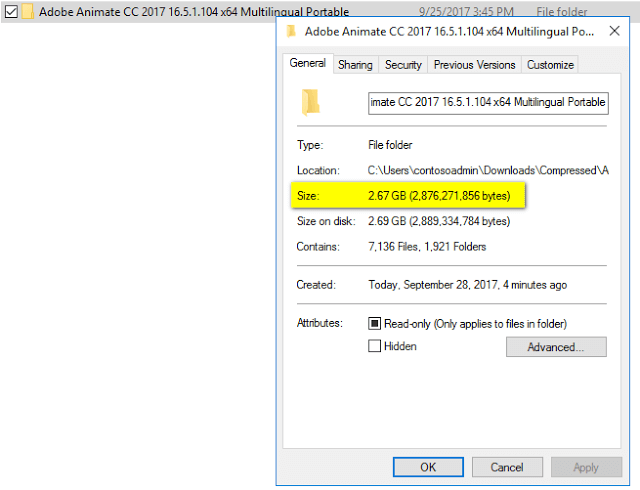
Mình sẽ nén 1 folder có dung lượng khoảng 2.6 GB như hình dưới
Bạn hãy tìm đến file hoặc folder mình cần nén và chọn 7-Zip > Add to archive…
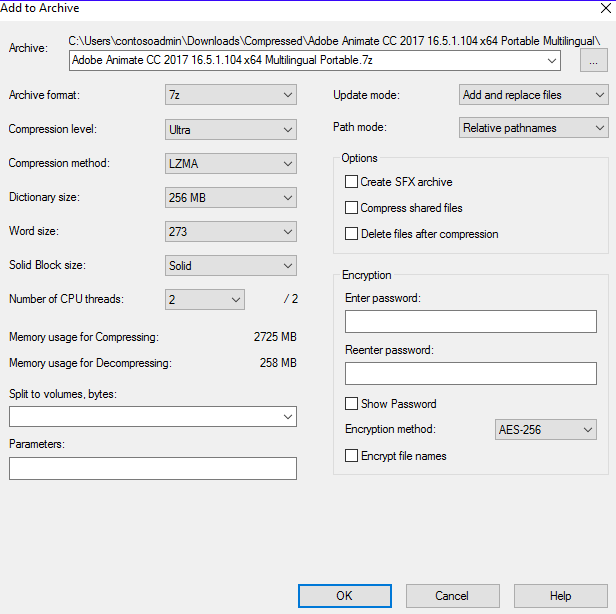
Tại đây bạn sẽ chỉnh các thông số như sau
Giải thích các thiết lập nén
Archive format: dạng nén, bạn nên chọn 7z để nén nhanh và mạnh nhất.
Compression level: mức độ nén, chỉ khả năng yếu hay mạnh. Độ mạnh sắp xếp tăng dần trừ trên xuống dưới. Mức nén càng cao càng tốn nhiều RAM và thời gian.
Ultra: Mức nén cao nhất
Maximum: Tối đa
Normal: Bình thường
Fast: Nhanh
Fastest: Nhanh nhất
Store: Không nén
Compression method: Thuật toán nén file với 7-Zip
LZMA: thuật toán nén mặc định, tốc độ nhanh và mạnh(nên chọn nếu bạn muốn giải nén với winrar)
LZMA2: nâng cấp của LZMA có thể kém hơn trong 1 số trường hợp như WinRAR không đọc được file nén này
PPMd: chủ yếu dùng cho file văn bản với khả năng nén nhanh và mạnh
BBzip2: chủ yếu cùng cho file văn bản với tốc độ cao và khả năng nén tốt
Dictionary size: lượng RAM dùng để nén và giải nén. Số càng lớn thì RAM tốn càng nhiều nhưng nén mạnh và nhanh
Memory usage for Compressing: Nén
Memory usage for Decompressing: Giải nén
Word size: mục này để số càng cao thì khả năng nén càng mạnh. Vì vậy ta chọn số lớn nhất
Solid BLock size: mức độ nén cứng, số càng cao thì nén càng mạnh nhưng tốc độ nén bị giảm. Không ảnh hưởng đến RAM và chỉ sử dụng với chuẩn 7z, để đạt mức nén cao hãy chọn Solid
Number of CPU threads: số nhân CPU tham gia quá trình nén(không nên chọn tối đa. Ví dụ máy bạn có 4 luồng thì bạn nên chọn 2/4 hoặc 3/4 thôi nhé).
Ngoài ra bạn cũng có thể đặt password cho file nén, bạn tự tìm hiểu thêm.
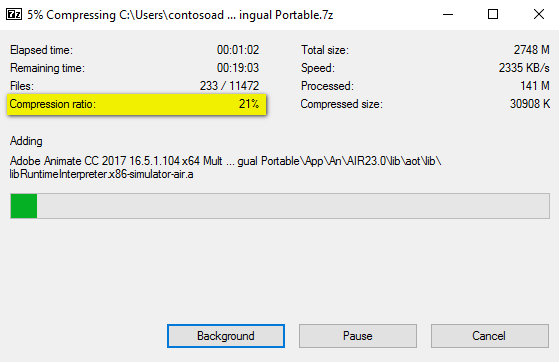
Sau khi cấu hình xong nhấn OK để bắt đầu.
Thông số Compression ratio càng nhỏ tức tỉ lệ nén càng cao. Thời gian nén phụ thuộc hoàn toàn vào cấu hình máy của bạn cũng như tài nguyên đang có, không có 1 con số chính xác nào đâu nhé.
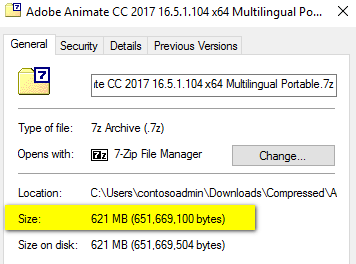
Kết quả nén với 7 zip từ 2.6 GB giảm còn 621 MB
Bạn lưu ý khi bạn cấu hình nén phía trên thì các thiết đặt đã tự động được lưu lại, nếu bạn có muốn nén file khác sẽ không cần phải thay đổi các thông số nữa.





 Cấu trúc thư mục