Showing posts with label Internet. Show all posts

Chuyển đổi video từ kênh Youtube chính sang kênh phụ

Leave a Comment

Chuyển đổi video từ kênh Youtube chính sang kênh phụ

Hiện tại mình muốn phát triển 1 kênh mới để kiếm tiền. Tuy nhiên mình muốn lấy toàn bộ video của kênh cũ để chuyển đổi sang kênh mới. Vậy điều này có được không? Có vi phạm gì trong điều khoảng của YouTube không?


Việc bạn muốn chuyển toàn bộ video từ một kênh YouTube này sang một kênh YouTube khác có thể do những nguyên nhân sau.
Nguyên nhân khách quan là do kênh của bạn đang làm đã có một vài cảnh bảo xấu, hay vi phạm nguyên tắc cộng đồng. Điều này có thể chưa dẫn tới vô hiệu hóa hoàn toàn việc kiếm tiền trên các video. Tuy nhiên bạn muốn chuyển đổi toàn bộ video này sang một kênh mới nhằm "làm sạch" để thông tin trên kênh mới và toàn bộ video đó của bạn ở trạng thái tốt nhất.
Giả thiết kênh có video cần chuyển là kênh A. Kênh mới lập để chuyển video sang là kênh B
Trước hết bạn hãy xem lại trong thông tin của kênh A có mục Content ID đang ở tình trạng như thế nào. Nếu nó có nút màu xanh báo hiệu rằng kênh của bạn đã bật Content ID thì toàn bộ video trên kênh A này đã được YouTube quản lý. Việc bạn dùng video của kênh A để mang sang kênh B sẽ bị khuyến cáo Conten ID claim. Chi tiết về Content ID được YouTube giải thích tại đây.
https://support.google.com/youtube/answer/2797370?hl=en
Vậy trong trường hợp này giải pháp sẽ là. Bạn hãy dùng tính năng bản quyền trên mỗi video. Bạn chỉnh tất cả các video của kênh A thành bản quyền ghi nhận tác giả. Với bản quyền này bạn hoàn toàn dễ dàng tái sử dụng video đó mang sang bất kỳ kênh nào khác nếu muốn.
Chú ý: Nếu bạn không muốn có ai đó cũng sử dụng lại những video đó thì bạn hãy để toàn bộ video của kênh A ở trạng thái riêng tư (private) và bạn hãy cấp quyền cho tài khoản kênh B có thể xem. Khi đó kênh B có thể tái dùng video trên kênh A với bản quyền ghi tác giả trên mỗi video.
Bạn cần kiểm tra video trên kênh B đã đúng và có thể bật đầy đủ các tính năng kiếm tiền và công khai. Trước khi bạn quyết định xóa những video đó ở kênh A
Nguyên nhân chủ quan là do bạn muốn có chiến lược phát triển kênh mới và muốn thay đổi hiện trạng kênh A. Bạn muốn tìm kiếm thị trường người xem mới. Tất nhiên trong tình trạng kênh tốt, mọi video đều do bạn làm ra và không có bất kỳ sự vi phạm đáng kể nào.
Trong trường hợp này bạn hoàn toàn có thể dùng cách chuyển đổi giống như trên. Thay đổi thông tin ghi nhận bản quyền video và chuyển sang kênh B. 
Đối với trường hợp Content ID kênh A chưa bật. Bạn có thể không phải chuyển đổi theo phương pháp thay đổi bản quyền video. Bạn hãy dùng lại ngay video đó bằng các tải về và up lên trên YouTube, hoặc lấy những video đang có trên máy tính bạn từ trước đó. Sau khi tải lên bạn có thể xóa video cũ trên kênh A.
Tham khảo tại đây: http://www.quora.com/Is-it-possible-transfer-a-video-from-one-YouTube-channel-to-another
Nguồn: vietnoiviet.com/content/hoi-ve-viec-chuyen-doi-video-tu-kenh-chinh-sang-kenh-phu-va-nguoc-lai
Xem Tiếp

Tạo kiểu chữ độc lạ trên Facebook

Leave a Comment

Tạo kiểu chữ độc lạ trên Facebook

Hướng dẫn tạo kiểu chữ độc lạ trên Facebook 3Hướng dẫn tạo kiểu chữ độc lạ trên Facebook
Hôm nay tôi sẽ giới thiệu đến các bạn công cụ đổi font chữ độc đáo, cùng tìm hiểu bên dưới nhé.
Nhập nội dung sau đó nhấn CONVERT -> RỒI COPY THÔI !!! :D
Xem Tiếp

Windows 7 Aero Blue Lite Edition 2016 (x64) - Bản Cài Win7 Siêu Nhẹ, Full Soft

Leave a Comment
Windows 7 Aero Blue Lite Edition 2016 (x64) - Bản Cài Win7 Siêu Nhẹ, Full Soft - 1.03GB

[​IMG]

Windows 7 Aero Blue Lite Edition 2016 64-Bit the best Version based on the full version of Ultimate SP1 and the original Microsoft And files were deleted unimportant and unnecessary language packs them Version ships with all features in addition towards the well-known figure pictures que and fascinating themes. Size of the image is reduced to 1060 MB only. Windows ocuppies 2.7GB on fresh install without pagefile.It has Internet Explorer 9 (IE9) integrated with the updates for it until Jun-2012 (old IE8 replaced). It can be updated via Windows Update. All important hotfixes and optional updates work until Jun-2012.

Windows 7 Aero Blue 2016 Lite Edition 2016 64-Bit:
Original OS: Windows 7 Ultimate SP1
Version: 6.1 (Build 7601, Servicre Pack 1)
Language: English
Publisher: Microsoft
Author Assembly: Muhammad Sadeem
Re-Designer: Computer Worms Team
Type of Medicine: Windows Loader By Daz 2.1.7

Some Feature in This Windows & Why Download This OS ?
• Beautiful Aero Blue Theme & Backgrounds & Cursors that have been used with version.
• Fixed and stable Version means what exactly problems do not occur.
• Windows and ships only full Sized 1060 MB Whatever your potential.
• Version excellent and pre-loaded with some within the important programs the last updates.
• Integrated Some Usefull Program Pre-Activated & Pre-Installed.
• More faster and it also make your game experience better than before.
• Lite edition has been reduce some feature that make your notebook, laptop & Desktop PC slower.

Pre-Installed Applications:
• Foxid Reader v2.3
• Internet Download Manager 6.25 Build 12
• Typing Master Pro v7.0
• WinRAR 5.31 Final
• uTorrentPro 3.4.5 Build 41372
• USB Disk Security 6.5 Final
• Free Fire Screensaver Final
• Free ISO Burner 1.2
• Aero Glass Audio Player

PC Games:
• Cue Club PC Game
• Alien Wars PC Game

What has been removed:
All the languages except English (keyboards layouts are intact). *Language Packs cannot be installed*.

Drivers: video cards, modems, printers, scanners, TV tunners, fax machines, some storage controller.

Following gadgets are not here: Currency, MediaCenter, PicturePuzzle, RSSFeeds, SlideShow & Weather.

All the games: card games, Chess, Mahjong, Backgammon, Checkers, Spades, Minesweeper & Purble Place.

Hardware support for the following devices: iSCSI devices, Microsoft Multi-Path Bus and Smart cards.

Multimedia: Media Center, music and video samples, except these needed for Windows Experience Index, all sample pictures, all screensavers, all sounds, all the desktop themes except the default aero one.

Network: Internet Information Services, Remote Desktop & Assistance (Remote Desktop Connection here) RIP Listener, Simple Network Management Protocol (SNMP), Telnet Client, Telnet Server and TFTP Client.
.
Services: Distributed Transaction Coordinator (DTC), Error Reporting service, Offline Files, Quality
Windows Audio Video Experience, Windows Search (Indexing service only but not built-in search option).

System: most of Tablet PC components, BitLocker Drive Encryption, Manual Install and Upgrade Option, Help, Windows Easy Transfer, Sync Center, Subsystem for UNIX-based Applications (SUA), Welcome Center, Windows Defender, Accessibility, Speech Support & Narrator, Windows Journal, Migwizard, Microsoft IME, Jet Database Engine, Microsoft Message Queue (MSMQ), Parental Controls, System Recovery disc creation, Natural Language, Microsoft Client for NFS, Software Quality Management, built CD/DVD burning support.

What is integrated:
NOTHING except IE9. Some files are replaced with modified ones: msoe.dll, winsetup.dll and boot.sdi.

What about activation?
Windows should be activated after installation with proper key and certificate if SLIC 2.1 is found or
using "Windows Loader 2.1.7 by Daz"

Useful Tweaks Applied:
Allow 3rd party themes
Check for updates but do not download
Clear IE history upon exit; Disable Hibernation
Disable IE First Run Customize
Disable Search Online on unknown file extensions
Disable warning on IE9 tabs close
Double mouse speed; Enable DVD in Media Player
IE Homepage set to http://computerworm.net
Remove Shortcut prefix
Remove Windows Mail splash
Restore previous folder at Logon
Set Google as default Search Provider in IE9
Show Computer icon on desktop
Show 'Downloads' on Start Menu
Show hidden files and folders
Show Notepad statusbar
Take Ownership option with icon on right-click context menu
Turn on IE Clear Type text
Unlimited simultaneous downloads
When a popup is encountered - open in New Tab; Word Wrap in Notepad

I guarantee that my image is absolutely clean. If checksums don't match the image can contain viruses!

Easiest way to infect a computer is on fresh install while Anti-virus software is still not installed.

Have your drivers ready before setup! Drivers left are base system, sound and network adapter drivers

Screenshots

[​IMG]
[​IMG]
[​IMG]
[​IMG]
[​IMG]

INSTALLATION & INFORMATION - Hướng dẫn dùng
• Create bootable USB (highly recommended) with Rufus, (phần mềm mới nhất 2.6 chứa trong thư mục download) - Tạo usb boot với rufus (không biết thì bạn tìm trên google)
Boot toàn bộ file iso vào usb
Sử dụng khi cắm usb lúc boot vào máy!

Warning! - Nên Kiểm tra checksum sau khi tải về !
Compare checksums of the iso file! If they aren't like ones I posted below someone modified the Image!
File Size: 1.03 GB
SHA1 – 9facfaa23b19a070983aa43387faa897961bd2b0
MD5 – 54c71abb040da7e8490f2f36aa67646f
MD4 – acdb886b25bac3642c2cdf4ba4d0844e
CRC32 – 81779b56
Nguồn: snew.vn/threads/windows-7-aero-blue-lite-edition-2016-x64-ban-cai-win7-sieu-nhe-full-soft.381

Xem Tiếp

1 Số hosting free Cho Phép Kết nối Mysql Remote - Mysql từ xa

Leave a Comment

1 Số hosting free Cho Phép Kết nối Mysql Remote - Mysql từ xa

Kết quả hình ảnh cho mysql
Sau khi tìm 1 số hosting free cho phép kết nối mysql remote mình chia sẽ 2 hosting dưới này (Ưu nhược điểm của chúng đều đối nghịch nhau-> tùy vào mục đích mà dùng :))

1.eatj.com

Nhược: giới hạn kết nối, nên nếu app của bạn chạy nhiều câu lệnh truy vấn dẫn tới tắt nghẽn và bị chặn trong 1 khoảng thời gian. 
Dùng myphpadmin 5.0  cũ

Ưu: tốc độ tạm chấp nhận

Cách kết nối với web Java:
cons = DriverManager.getConnection(
                    "jdbc:mysql://72.13.93.206:3307/"+dbname+"?autoReconnect=true&useUnicode=true&characterEncoding=UTF-8", dbuser, dbpass);


2.https://db4free.net/

Nhược: tốc độ chậm hơn hosting phía trên

Ưu: ít giới hạn kết nối, cho phép nhiều kết nối hơn. 
Dùng myphpadmin 5.7 mới 

Cách kết nối với web Java:
cons = DriverManager.getConnection(
                    "jdbc:mysql://db4free.net:3306/"+dbname+"?autoReconnect=true&useUnicode=true&characterEncoding=UTF-8", dbuser, dbpass);

Theo mình biết là vậy. Do đa số hosting free PHP khác đều cấm remote mysql cho tài khoản FREE!
Nói chung, đã FREE thì chúng ta phải chịu sự ĐAU ĐỚN NÀY !!!
Xem Tiếp

Fix lỗi Unable to Connect to SSL Services due to PKIX Path Building Failed

Leave a Comment

Fix lỗi Unable to Connect to SSL Services due to PKIX Path Building Failed

Gửi mail hay đọc mail inbox Java thường sẽ gặp lỗi Unable to Connect to SSL Services due to PKIX Path Building Failed

Dưới đây là cách khắc phục :D

Problem - tại sao bị thế!
Attempting to access applications that are encrypted with SSL (for example HTTPS, LDAPS, IMAPS) throws an exception and the connection is refused. This can happen when attempting to establish a secure connection to any of the following:
  • Active Directory server
  • Mail server 
  • Another Atlassian application using Application Links
For example, the following error appears in the UI when Using the JIRA Issues Macro:
1
Error rendering macro: java.io.IOException: Could not download: https://siteURL/jira/secure/IssueNavigator.jspa?view=rss&&type=12&type=4&type=3&pid=10081&resolution=1&fixfor=10348&sorter/field=issuekey&sorter/order=DESC&sorter/field=priority&sorter/order=DESC&tempMax=100&reset=true&decorator=none
While the following appears in the logs:
1
javax.net.ssl.SSLHandshakeException: sun.security.validator.ValidatorException: PKIX path building failed: sun.security.provider.certpath.SunCertPathBuilderException: unable to find valid certification path to requested target
sun.security.validator.ValidatorException: PKIX path building failed: sun.security.provider.certpath.SunCertPathBuilderException: unable to find valid certification path to requested target
at sun.security.validator.PKIXValidator.doBuild(PKIXValidator.java:387)

========= Solve - giải quyết làm theo từng bước nhé ========

Chi tiết cách dễ nhất:

Obtain and Import the Server's Public Certificate

  1. Download and install the Portecle 
  2. Ensure the <JAVA_HOME> variable is pointing to the same version of Java that your application uses. See our Setting JAVA_HOME docs for further information on this.
    (info) If running on a Linux/UNIX server, X11 will need to be forwarded when connecting to the server (so you can use the GUI), as below:
    1
    ssh -X user@server
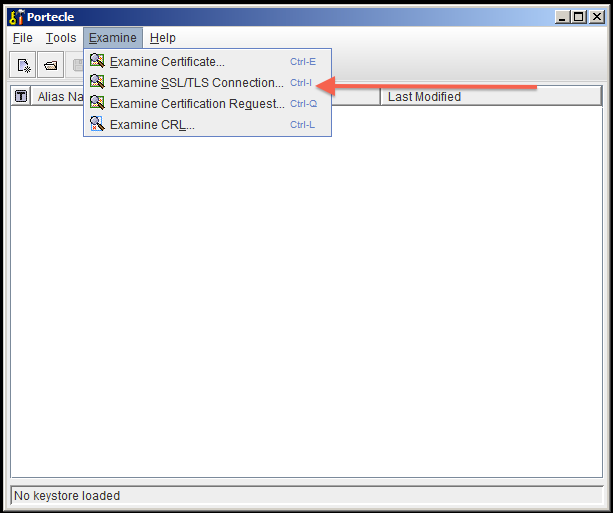
  3. Select the Examine menu and then click Examine SSL/TLS Connection:
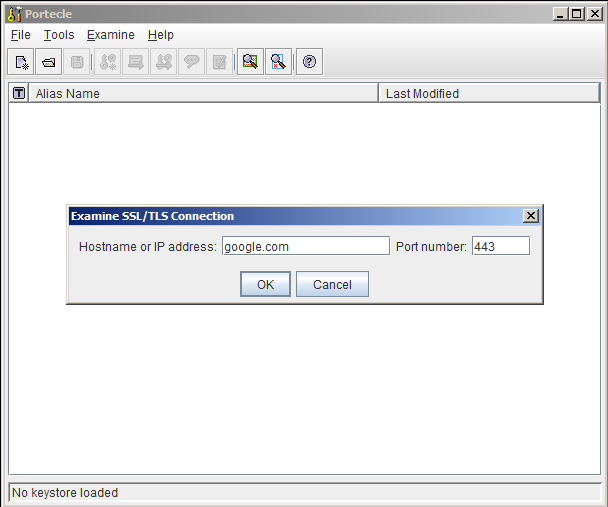
  4. Enter the SSL Host and Port of the target system:
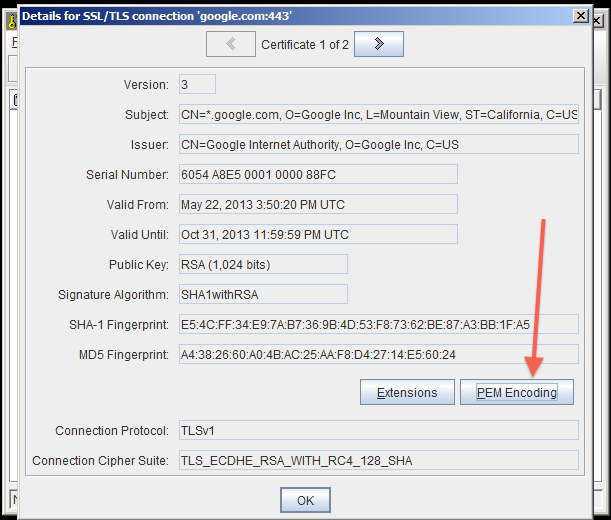
  5. Wait for it to load, then select the public certificate and click on PEM:
  6. Export the certificate and save it.
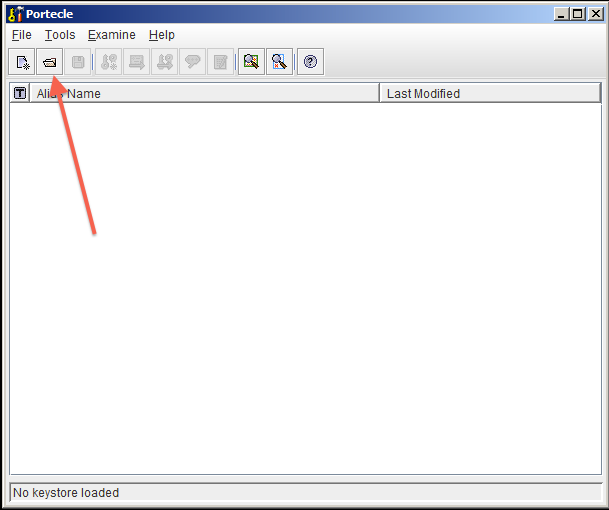
  7. Go back to the main screen and select the Open an existing keystore from disk option, select cacerts (for example $JAVA_HOME/lib/security/cacertsthen enter the password (pass mặc định (the default) là changeit).
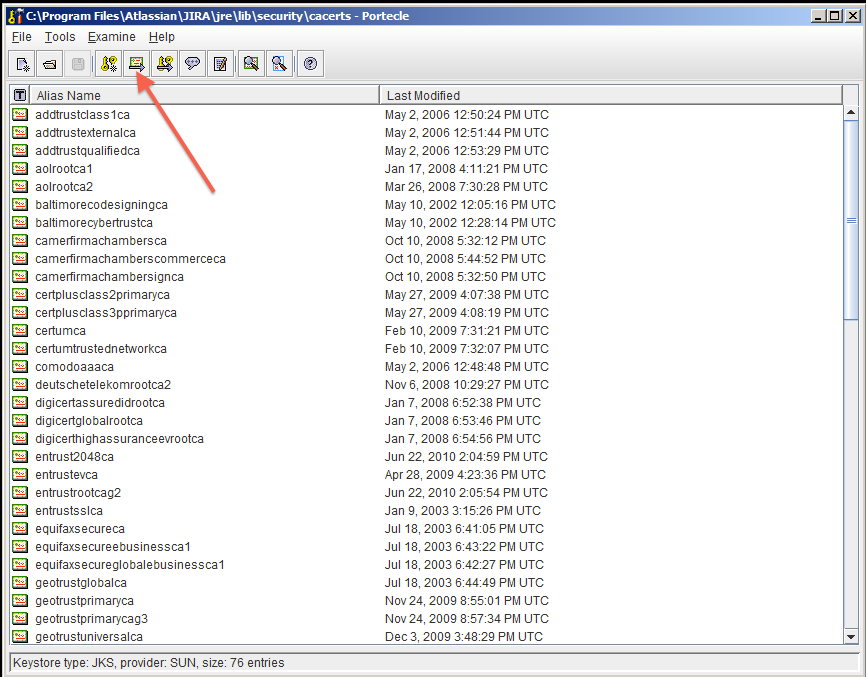
  8. Select the Import a trusted certificate into the loaded keystore button:
  9. Select the certificate that was saved in step 6 and confirm that you trust it, giving it an appropriate alias (e.g.: confluence).
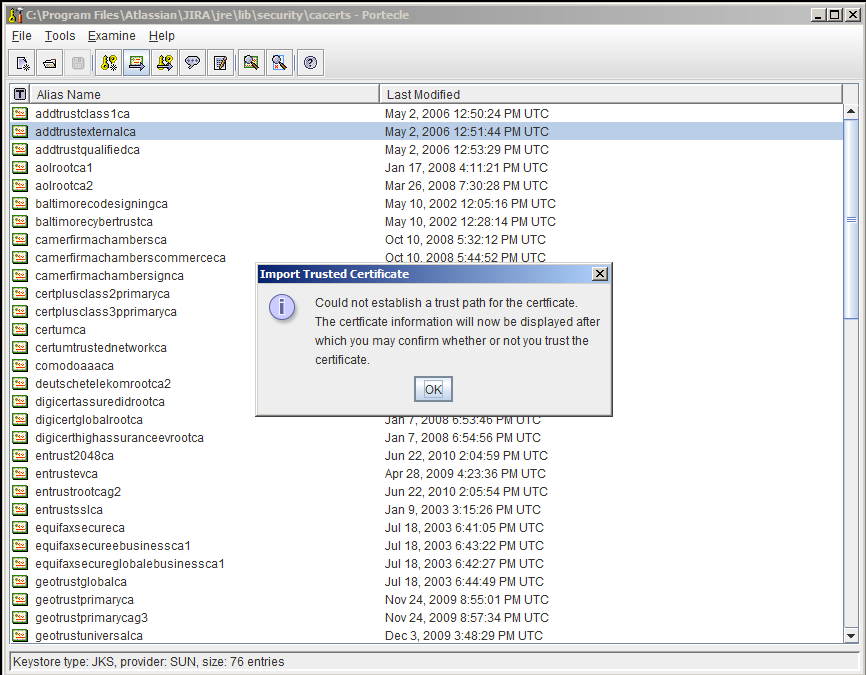
    1. You may hit this error: 
    2. If so, hit OK, and then accept the certificate as trusted.
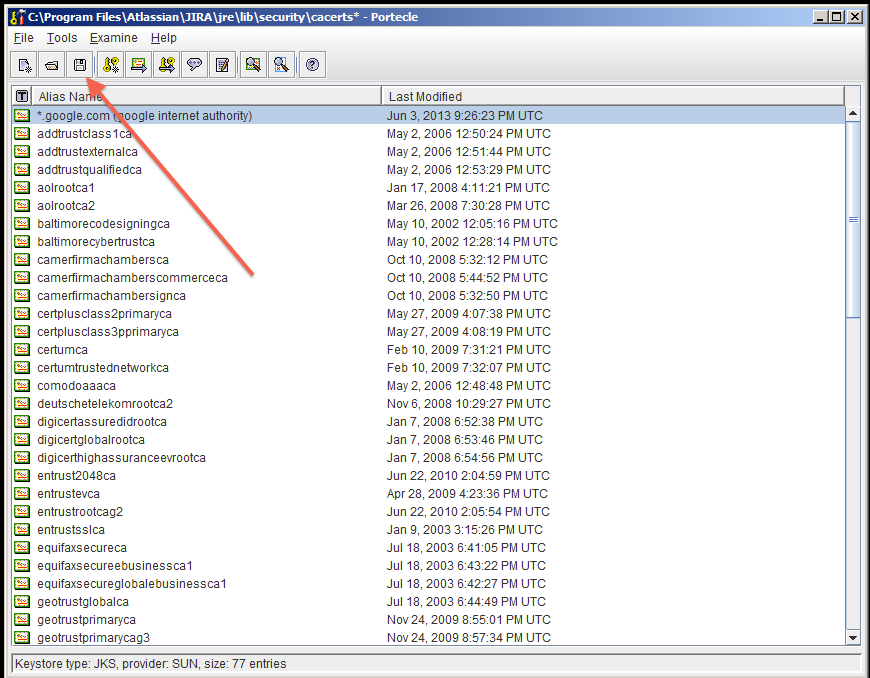
  10. Save the Key Store to disk:
  11. Restart your application.
  12. Test that you can connect to the host. GOOK LUCKY!
Cách khác nếu trên thất bại

Add SSL Certificates automatically!
Kiểm tra và dùng 1 trong các cách dưới đây !
  1. Make sure you have imported the public certificate of the target instance into the truststore according to the Connecting to SSL Services instructions.
  2. Make sure any certificates have been imported into the correct truststore; you may have multiple JRE/JDKs. See Installing Java for this.
  3. Check to see that the correct truststore is in use. If -Djavax.net.ssl.trustStore has been configured, it will override the location of the default truststore, which will need to be checked.
  4. Check if your Anti Virus tool has "SSL Scanning" blocking SSL/TLS. If it does, disable this feature or set exceptions for the target addresses (check the product documentation to see if this is possible).
  5. If connecting to a mail server, such as Exchange, ensure authentication allows plain text.
  6. Verify that the target server is configured to serve SSL correctly. This can be done with the SSL Server Test tool.

Source: confluence.atlassian.com/kb/unable-to-connect-to-ssl-services-due-to-pkix-path-building-failed-779355358.html
Xem Tiếp

Tomcat cách deploy war file [Manager Application]

Leave a Comment
Tomcat cách deploy war file [Manager Application]
Kết quả hình ảnh cho tomcat
Video hướng dẫn: https://www.youtube.com/watch?v=9X9DA8oVodk 

Khi vào localhost:8080, bạn sẽ chọn Manager App -> đăng nhập sẽ không được
Để có tài khoản bạn vào: \apache-tomcat-8.0.37\conf\tomcat-users.xml
Sau đó xóa hết nội dụng file đó và chèn các lệnh bên dưới:
Lúc này user và pass là admin

<?xml version='1.0' encoding='utf-8'?>
<tomcat-users>

<role rolename="manager-gui"/>
<role rolename="manager-script"/>
<role rolename="manager-jmx"/>
<role rolename="manager-status"/>
<role rolename="admin"/>
<user username="admin" password="admin" roles="admin,manager-gui,manager-script"/>

</tomcat-users>
Xem Tiếp

Cách khắc phục không chạy được hàm ajax trên chrome coccoc

Leave a Comment

Cách khắc phục không chạy được hàm ajax trên chrome coccoc

jQuery .load() not working in Chrome Coccoc

Cách khắc phục không chạy được hàm load() của jquery trên chrome coccoc

Bị lỗi trên có thể do vấn đề bảo mật của Chrome
Trong hình ảnh có thể có: văn bản
Cách fix đơn giản 3 bước áp dụng cho chrome và cococ:
1 Ở Desktop, nhấn chuột phải vào icon chrome hay coccoc -> Properties
2 Mục Target có dạng  ...\Browser\Application\browser.exe3 Ta thêm --allow-file-access-from-files vào cuối dòng đó -> Apply -> OK
Tức sau khi xong sẽ có dạng: ...\Browser\Application\browser.exe --allow-file-access-from-files
Nếu dòng trên (bước 3) vẫn không được thì thay dòng này: --disable-web-security
Xem Tiếp

Hướng dẫn thao tác với tổ chức nhóm trong Github

Leave a Comment

Hướng dẫn thao tác với tổ chức nhóm trong Github

Để tạo một nhóm cho nhiều người cùng làm việc ta làm như sau:
Tại mục Choose the organization’s plan chọn Open Source để miễn phí, nhưng lúc này các Repo trong tổ chức sẽ là public.
  • Mời các thành viên cho tổ chức
Lúc này vào trang cá nhân của bạn sẽ thấy tại mục Organizations có tổ chức mới vừa tạo. Để cấu hình tổ chức này ta click thẳng vào nó.
Ở đây tôi sẽ tạo một team mới như hình sau:
Các member của team này có quyền write với các repo của team.
Với 3 mức: Read Access, Write Access, Admin Access Github cho phép chúng ta phân quyền tới các thành viên của nhóm.
Để mời một người dùng khác vào team, ta click vào team đó và search tên của người dùng cần tìm
Sau đó hệ thống sẽ yêu cầu bạn nhập password để xác thực, nếu thành công, một email xác nhận sẽ được gửi đến người được mời và người này sẽ xác nhận có tham gia vào tổ chức hay không.
Để tạo một repo cho tổ chức, ta chỉ cần click vào tổ chức đó, sau đó chọn Create new Repostory. Các hành động clone, add, commit,... làm như bình thường.

5. Issues

Giả sử bạn đang theo dõi repo của tôi và thấy có một số chỗ cần sửa đổi, bạn có thể comment ý kiến của mình vào Repo đó. Sau đó người quản trị sẽ xem xét, thay đổi và trả lời bạn.
Để làm việc này bạn cần vào repo đó, click vào Issue. Ví dụ như hình sau:
Sau đó chọn New issue (màu xanh) để tạo một issue mới.
Lúc này tại Repo của người quản trị sẽ thấy một Issue mới, người quản trị có thể click vào Issue này để xem, sau đó xem xét sửa đổi, comment lại. Khi sửa đổi hoàn tất thì sẽ đóng issue đó lại.
Bằng cách tạo issue, bạn có thể đăng các câu hỏi, thắc mắc của mình cho chủ của repo đó.
nguồn: https://github.com/hocchudong/git-github-for-sysadmin#ngonngumarkdown
Xem Tiếp

Download IDM Patched Full New

Leave a Comment

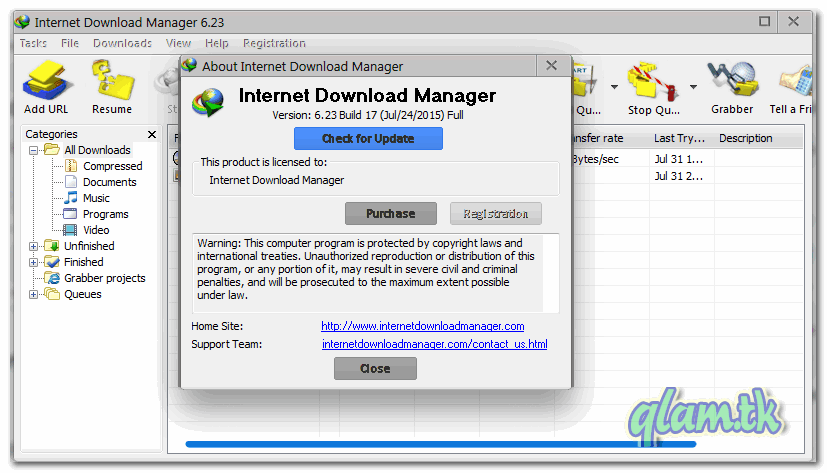
Internet Download Manager Patched Full 6.25 build 25 New

Internet Download Manager Patched được cập nhật thường xuyên Link bên dưới! IDM (Internet Download Manager) là phần mềm hỗ trợ tải file video, âm thanh mp3, ... các định dạng văn bản, file cài đặt, file nén ... trên mạng internet. Có thể nói về tốc độ, IDM hoàn toàn vượt trội so với các phần mềm hỗ trợ download hiện nay. Với việc tích hợp với các trình duyệt web nổi tiếng, bắt link tải dễ dàng nhiều định dạng như flv,mp4... IDM cho thấy tính năng download của mình rất thích hợp cho nhiều việc khác nhau. Download IDM Silent Install - IDM repack Full new idm20box

<script>Với phiên bản Download IDM Patched Full 2015 chúng ta không còn phải phiền toái với việc crack thế nào nữa, mọi thứ đều tự động. Chỉ cần Cài Và Chạy :)idm_2<script>


-Vui lòng xóa bản cũ trước khi cài -Không update trong bản này, mỗi lần có bản mới sẽ cập nhật bên dưới

New ! Download IDM Patched Full 6.25 build 25

Download IDM
and Older: Download IDM Patched Full 2015 ver 6.25 build 24
Download IDM Patched Full 2015 ver 6.25 build 10
Download IDM Patched Full 2015 ver 6.23 build 20
Download IDM Patched Full 2015 ver 6.23 build 17
Xem Tiếp

Cách tải toàn bộ Playlist Video trên Youtube

1 comment

Cách tải toàn bộ Playlist Video trên Youtube

Cách download Youtube Playlist về máy tính

1. Dịch vụ Yotube Multi Downloader Online

Đây là dịch vụ tải toàn bộ Playlist trên Youtube trực tuyến và hoàn toàn miễn phí cho người sử dụng. Để có thể sử dụng chương trình này, bạn cần phải cài đặt phần mềm IDM phiên bản mới để có thể tải toàn bộ list video
Bước 1:
Bạn truy cập trang chủ theo đường link tại đây.
Bước 2:
Tại giao diện chính của chương trình, lựa chọn chất lượng video mà bạn muốn tải về.
Cách tải nguyên Playlist Video trên Youtube
Truy cập vào Youtube và copy URL playlist mà bạn muốn tải toàn bộ và sau đópaste vào khung download của chương trình. Bạn sẽ thấy xuất hiện toàn bộ video có trong list tải.
Youtube Multi Downloader Online
Bước 3:
Copy toàn bộ đường link ở bên dưới. 
Youtube Multi Downloader Online
Sau đó paste toàn bộ đường link đó vào trong Notepad. Lưu lại và bạn nhớ tạo thư mục cho Notepad này để tiện sử dụng nhé.
Youtube Multi Downloader Online
Bước 4:
Mở phần mềm IDM có trong máy tính. Tại giao diện chính, bạn nhấn vào phầnTask, chọn Import và sau đó nhấn vào phần From text file để nhập file Notepad vừa tạo.
Youtube Multi Downloader Online
Bước 5:
Xuất hiện đường dẫn lưu file Notepad vừa tạo, nhấn Open để mở file.
Youtube Multi Downloader Online
Bước 6:
Xuất hiện toàn bộ video trong playlist Youtube. Bạn click chuột vào phần Check All để đánh dấu toàn bộ video cần tải về.
Youtube Multi Downloader Online
Bước 7:
Tiếp theo tích vào ô All files to one directory và nhấn vào Browse. Tại đây, bạn có thể chọn thư mục lưu trữ toàn bộ video được tải về và nhấn OK để chọn.
Youtube Multi Downloader Online
Bước 8:
Sau khi đã chọn được thư mục chứa video, bạn nhấn chọn OK. Xuất hiện bảng mới, chọn Main download queue, tích vào ô Start queue process. Nhấn OK để tiến hành tải video.
Youtube Multi Downloader Online
Bước 9:
Như vậy, toàn bộ video có trong playlist Youtube đã được tải như hình dưới.
Nguồn: quantrimang
Xem Tiếp