Fix lỗi Unable to Connect to SSL Services due to PKIX Path Building Failed
Gửi mail hay đọc mail inbox Java thường sẽ gặp lỗi Unable to Connect to SSL Services due to PKIX Path Building Failed
Dưới đây là cách khắc phục :DProblem - tại sao bị thế!
Attempting to access applications that are encrypted with SSL (for example HTTPS, LDAPS, IMAPS) throws an exception and the connection is refused. This can happen when attempting to establish a secure connection to any of the following:
- Active Directory server
- Mail server
- Another Atlassian application using Application Links
For example, the following error appears in the UI when Using the JIRA Issues Macro:
While the following appears in the logs:
at sun.security.validator.PKIXValidator.doBuild(PKIXValidator.java:387)
========= Solve - giải quyết làm theo từng bước nhé ========
Chi tiết cách dễ nhất:
Obtain and Import the Server's Public Certificate
- Download and install the Portecle
- Ensure the
<JAVA_HOME> variable is pointing to the same version of Java that your application uses. See our Setting JAVA_HOME docs for further information on this.
 If running on a Linux/UNIX server, X11 will need to be forwarded when connecting to the server (so you can use the GUI), as below:
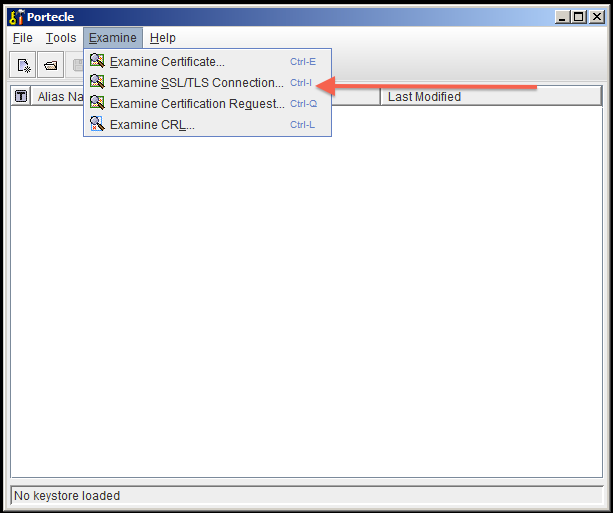
 - Select the Examine menu and then click Examine SSL/TLS Connection:
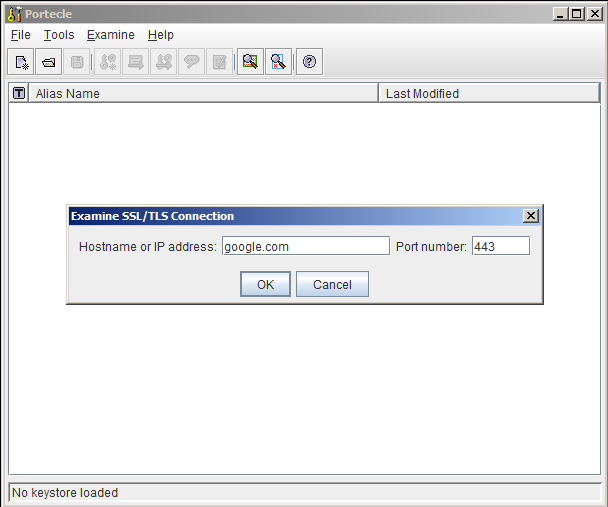
- Enter the SSL Host and Port of the target system:
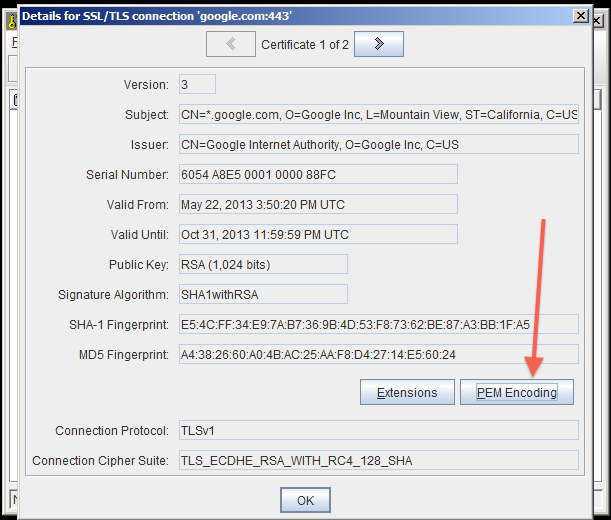
- Wait for it to load, then select the public certificate and click on PEM:
- Export the certificate and save it.
- Go back to the main screen and select the Open an existing keystore from disk option, select
cacerts (for example $JAVA_HOME/lib/security/cacerts) then enter the password (pass mặc định (the default) là changeit).
- Select the Import a trusted certificate into the loaded keystore button:
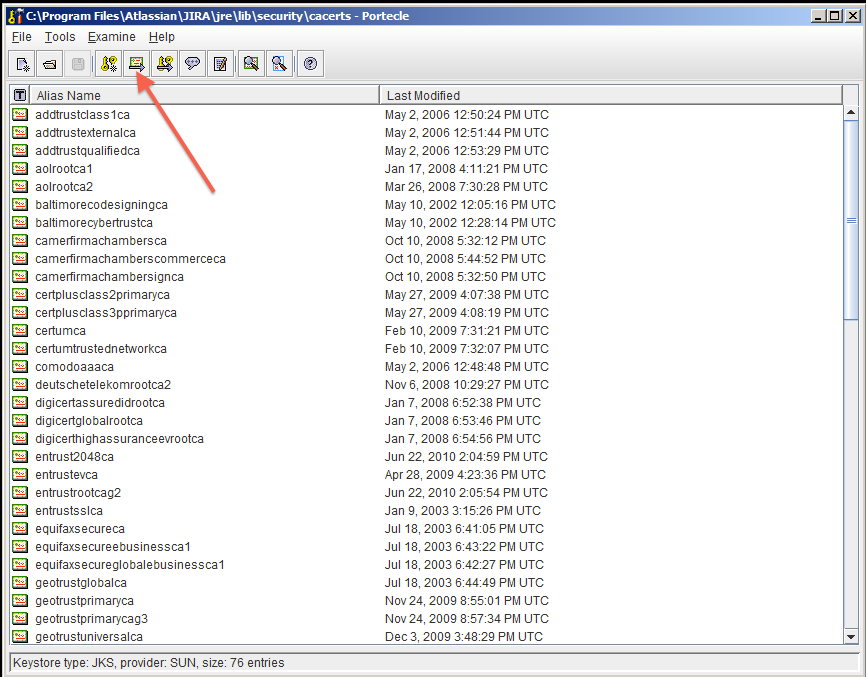
- Select the certificate that was saved in step 6 and confirm that you trust it, giving it an appropriate alias (e.g.: confluence).
- You may hit this error:
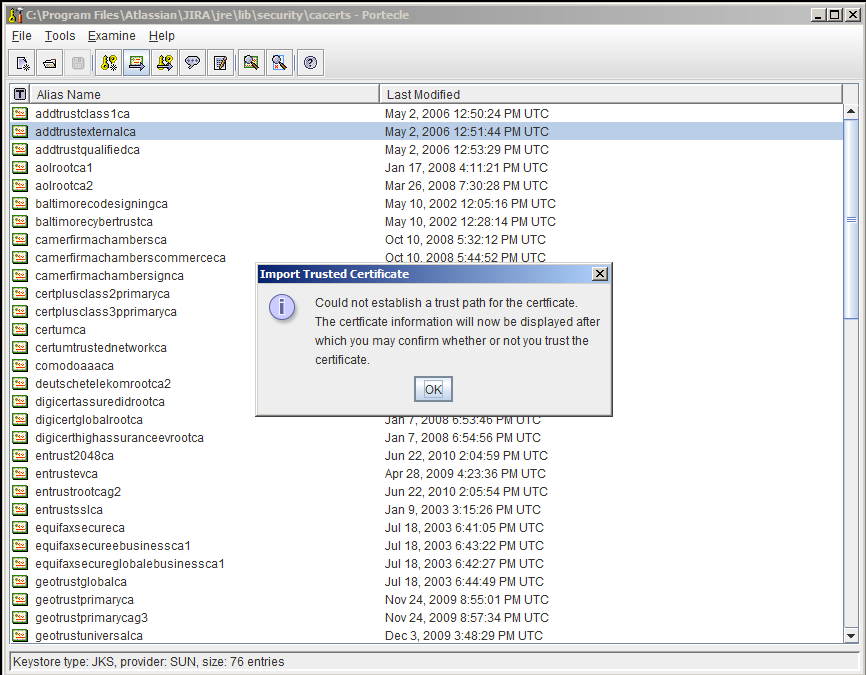
- If so, hit OK, and then accept the certificate as trusted.
- Save the Key Store to disk:

- Restart your application.
- Test that you can connect to the host. GOOK LUCKY!
Cách khác nếu trên thất bại
Ensure the
If running on a Linux/UNIX server, X11 will need to be forwarded when connecting to the server (so you can use the GUI), as below:
<JAVA_HOME> variable is pointing to the same version of Java that your application uses. See our Setting JAVA_HOME docs for further information on this.cacerts (for example $JAVA_HOME/lib/security/cacerts) then enter the password (pass mặc định (the default) là changeit).- You may hit this error:
- If so, hit OK, and then accept the certificate as trusted.
- Make sure you have imported the public certificate of the target instance into the truststore according to the Connecting to SSL Services instructions.
- Make sure any certificates have been imported into the correct truststore; you may have multiple JRE/JDKs. See Installing Java for this.
- Check to see that the correct truststore is in use. If
-Djavax.net.ssl.trustStorehas been configured, it will override the location of the default truststore, which will need to be checked. - Check if your Anti Virus tool has "SSL Scanning" blocking SSL/TLS. If it does, disable this feature or set exceptions for the target addresses (check the product documentation to see if this is possible).
- If connecting to a mail server, such as Exchange, ensure authentication allows plain text.
- Verify that the target server is configured to serve SSL correctly. This can be done with the SSL Server Test tool.
Source: confluence.atlassian.com/kb/unable-to-connect-to-ssl-services-due-to-pkix-path-building-failed-779355358.html

![[IMG]](https://lh3.googleusercontent.com/blogger_img_proxy/AEn0k_vcUho4makS_UxGzDGqZlWF2Dju6LpJYnHonDr5PS_ZM0B4Yh9h9cONy7_qPid-ELoHy6KVKnjQN36HX1XZZcF6WlVQjChtPVSADW80JgewzV3RRKOLmLZoGnghAnE9PeKXrc3YEfRYxQgqeG4HiYWzzvkBUOKo7CQMxWoxQ2Ja=s0-d)
![[IMG]](https://lh3.googleusercontent.com/blogger_img_proxy/AEn0k_vnhNurI_WmYNHWAl2XJgG7cfE7s2pEyFPXNXXpQlMlZ6MW8_6oy0puZf4De0Ccc9QZpNCDQLEvLZpHEpCYFSTyLiuy72QU44T_vA0C62HnWLJ7x_AV1DdPMDh9xgCFt89cKXsSdg1ubWUDTurt=s0-d)
![[IMG]](https://lh3.googleusercontent.com/blogger_img_proxy/AEn0k_vY5FSubVwFPQD1UGO1R0YpoLHwoI3cUgJuojwMTAxjo1HikpQ84dEa3TOu_xY4RaItEY9P181gjn9D2dbRv0Fq-_79M4z9MJk-yDGx5LDXDBAPsObYT0ZbMjVVJwdUunAlQ8G0ZaQ-kw6-ZQ=s0-d)
![[IMG]](https://lh3.googleusercontent.com/blogger_img_proxy/AEn0k_u4VLInYzgS8mqiBm5XCSLseSblUNhpvGxqF3tjkKnk-CBWag2ecVdgcyLoFacrMLH8tqtrFl_Zzelqhu3UM6K6glsCj2wPWnvjLJGPtnJg72hbqq42drSk-vFi8kNLYLuvvaGd_uYZR8rh1HlBUQ=s0-d)
![[IMG]](https://lh3.googleusercontent.com/blogger_img_proxy/AEn0k_vF-ThYyZnkEbGheZnPEW35sITfYhDXexBg3gDMcZAu40A_NY2USqD0MLOXcD34kKHg-D81A8iQMfJDPzt-SK3a0Jtn8ZBNRhvZW1gF97cWSpCbkSgbztDCymPYx-xtvYDRfuOrSUxpkCFSATrqNfY=s0-d)
![[IMG]](https://lh3.googleusercontent.com/blogger_img_proxy/AEn0k_t30xaAP_qLYucI78HV2-9mjXKnW4UEXJEKh77j6rDn80IXnKTw-ELLwErN9dGptor3joijrAoCZm5UNHEO99_EOj6W9wKTwRC14i2aQf0UTjkVEVpsughXtCMe35mgZ-u3ajCDd1T8AywCyL87HQ=s0-d)
![[IMG]](https://lh3.googleusercontent.com/blogger_img_proxy/AEn0k_vTJEYjSwNnJ6fVZeJ_TklPmVytCENOJMTSMQfZH_9-3ElX3JOfDQULmO1-qXwnRkfWLsMripvv6nKmQoUR-6fEa3s3TBPYoCBI4BzlqWaOuvzNUppacr6CGfGUUEs_LGLT6kGFWwc-Q1TpA-8fMyk=s0-d)
![[IMG]](https://lh3.googleusercontent.com/blogger_img_proxy/AEn0k_s7eZofnayMv2ocqOY7z3UWAcSZhVzFuVzoLob6x2KsBqHZiW9hE6AucMIKVe5AJnQ4MTvcjDWBwZOFYVvwZC3YCBNpjyHhrWgXTu4rDUi_Kh-gMiltie8QzjMoUTP_FwN2QQviKYPyuqD8GInD=s0-d)
![[IMG]](https://lh3.googleusercontent.com/blogger_img_proxy/AEn0k_ta4Qz4x7A5yyE8NH2saw1jtlfQz7YHN2H2bpuiUao0ZibUO4FoR-QZXn-nOovKREAoLyplp4JCKphLojYiz0aGaw9-S5ltBoRV52CnMXauzC0R3bGE11d8VPFwNha1-8j5_cCw40IVfm6mfEONvYjv=s0-d)
