Cách tạo USB Boot 2021 2GB qlam siêu nhẹ

Leave a Comment

Hướng dẫn tạo USB boot 2021 cho USB 2gb siêu nhẹ và đầy đủ phần mềm để cứu hộ máy tính


Cài USB boot qua 2 bước cực kì đơn giản.


USB Boot là gì?


USB Boot là một chiếc USB có chứa hệ điều hành nhỏ gọn để cài Windows cứu hộ máy tính. Ví dụ bạn gặp lỗi không khởi động được hay không boot vào Windows được thì USB Boot sẽ cứu máy tính bạn.


Nguồn usb boot từ NHV đã lược bỏ 1 số phần để dung lượng nhẹ (1.7GB) cho USB 2gb.


Tính năng của NHV Boot 2021 (chỉ hỗ trợ 64 bit nhé)


  • Win10PE 20H2 mới chỗ trợ cài đặt phần mềm dạng .exe và .msi Native nhận mạng LAN + Wifi.

  • Hỗ trợ khởi động theo 2 chuẩn UEFI và Legacy/CSM.

  • Hỗ trợ nhận ổ cứng laptop Gen 11 Intel.

  • Hỗ trợ nhận Touchpad trên laptop gen 11 Intel và các đời máy cũ hơn.

  • Tốc độ load WinPE rất nhanh.

  • Hỗ trợ Pstart Menu Apps đa dạng đầy đủ công cụ cứu trợ máy tính.

  • Đơn giản dễ dùng nhiều tính năng.

Hướng dẫn tạo USB Boot với NHV-BOOT-2021Hướng dẫn tạo USB boot cho usb 2gb siêu nhẹ và đầy đủ phần mềm để cứu hộ máy tính.


Xem danh sách apps. Click vào hình hoặc đây để zoom hình ảnh


Cài đặt để USB của bạn có thể BOOT vào máy tính (Cài USB boot qua 2 bước cực kì đơn giản)


  • 1 USB ít nhất dung lượng 2GB và đã Format trống nhé.

  • Tải file ở dưới về rồi giải nén và copy vào USB của bạn. Xong Rồi!!!

Link tải USB Boot 2021 1.7GB


Phần mềm cần thiết sau khi cài Windows


Cách nén file tối ưu nhất với 7 zip


Bạn có thắc mắc gì thì hãy bình luận bên dưới nhé!


Công cụ, Phần mềm, Tool
Thủ thuật
Xem Tiếp

Dùng 2 động từ (verb) đứng cạnh nhau trong tiếng Anh

Leave a Comment

Bài viết tóm tắt cách dùng 2 động từ đứng cạnh nhau trong tiếng Anh.


Trong tiếng Anh, khi chúng ta muốn sử dụng hai động từ với nhau, chúng ta thường đặt động từ thứ hai ở dạng nguyên thể. Thông thường, động từ thứ 2 sẽ có dạng hoặc là TO DO; DO; DID hoặc DOING. Với số lượng động từ đa dạng như trong tiếng Anh, việc chia động từ này nhiều khi cũng khá phức tạp.


QUI TẮC CHIA 2 ĐỘNG TỪ ĐỨNG CẠNH NHAU


tovandving
tovandving

1. To infinitive (động từ nguyên mẫu với TO)


Cụm động từ nguyên mẫu: là một nhóm từ bắt đầu bằng một động từ nguyên mẫu có To (to inf)


Examples:


infinitive


They agreed to lower the price.
He appeared to be the most experienced member of the group.


object + infinitive


I advised him to take the job.
They invited Mike to go out for drinks after work.


optional object + infinitive


I asked to take the day off.  (no object)
I asked my boss to give me the day off. (object = my boss)


infinitiveobject + infinitiveoptional object + infinitive
agree

appear

arrange

care

claim

decide

demand

deserve

fail

get (be allowed to)

hesitate

hope

intend

learn

manage

offer

plan*

pretend

refuse

seem

swear

wait
advise**

allow**

cause

convince

encourage**

force

get (cause to)

hire

invite

order

permit**

remind

require**

tell

warn
ask

choose

expect

need

prepare

promise

threaten

want

wish

would like

*”plan” can also be used as “plan on + gerund.”

**These verbs can also be followed by the gerund


2. Bare infinitive (động từ nguyên mẫu không TO)


Examples:


object + base infinitive (the infinitive without to)


I had my secretary call my clients for me.  
I never let my children stay up late at night. 


object + base infinitive or gerund


I heard him complain.
I heard him complaining. 


I saw Chris leave the room.
I saw Chris leaving the room.


object + base infinitiveobject + base infinitive or gerund
have

help

let

make
feel

hear

listen to

look at

notice

observe

see

smell

watch


Note that when “have” is used to communicate obligation, it is followed by the infinitive (“I have to work tomorrow,” for example).


3. Gerunds (V-ing)


Examples:


gerund


I finished making all of my sales calls at around three o’clock this afternoon.
Kevin dislikes carrying his cell phone with him everywhere he goes.


preposition + gerund


He apologized for coming late.
This time they insisted on getting a better price.


gerundpreposition + gerund
admit

advise**

allow**

appreciate

avoid

can’t help

complete

consider

defend

delay

deny

despise

discuss

dislike

don’t mind

encourage**

enjoy

finish

imagine

involve

keep

mention

mind

miss

permit**

practice

recommend

report

require**

resist

risk

suggest

tolerate

understand
accuse of

agree with

apologize for

believe in

blame for

complain about

concentrate on

congratulate someone on

cope with

decide against

depend on

dream about/of

feel like

get used to

insist on

look forward to

plan on*

prevent someone from

rely on

succeed in

specialize in

stop someone from

talk about/of

think about/of

warn someone against

worry about

*”plan on” can also be “plan + infinitive”

**These verbs can also be followed by an object and the infinitive

Note that the verbs in the second column of section 4 can be followed by an object and the gerund.


 4. Verbs Followed by either the Infinitive or Gerund (to V, V_ing)


Examples:


infinitive or gerund (with no real change in meaning)


I love to go to the beach.
I love going to the beach. (same meaning)


I can’t stand to work late at night.

I can’t stand working late at night. (same meaning)


infinitive or gerund (with a change in meaning)


infinitive or gerund (with no real change in meaning)infinitive or gerund (with a change in meaning)
can’t stand

cease

continue

hate

like

love

neglect

prefer

propose
begin

forget

keep

need

regret

remember

start

stop

try


Học hành, Tiếng Anh
English
Xem Tiếp

Tutorial MERN React Node Next.js Multi User SEO Blogging Platform

Leave a Comment

Hướng dẫn MERN React Node Next.js Multi User SEO Blogging Platform


Khóa học cho:


A Web Developer looking to Build API with Node JS and MongoDB

A Web Developer looking to Build Fast, Interactive and Scalable Web Applications using React and NextJs

A Web Developer looking to Build a FullStack SEO Multi User Blogging Application using MERN Stack

A Web Developer looking to build SSR React Apps using Next Js

A Web Developer looking to build production ready app with Role based Authentication and Authorization system

A Web Developer looking to build practical real world project for real world use with React Node and NextJs


Yêu cầu:


Basic Understanding JavaScript or any other programming language

Basic Understanding of React Js

Basic Understanding of Node Js

Welcome to learn Full Stack / MERN Stack Web Development with React Node Mongo DB and NextJs. In this course you will learn to build backend API with Node, Express and Mongo DB. You will learn to build frontend web app with React and NextJs. You will learn to build SEO web app using NextJs which is a framework for building production level React apps.

By the end of this course you will have build a production ready SEO multi user blogging platform. This course is your ultimate workshop for building full stack MERN Web Apps with detailed focus on Node React NextJs and SEO.

Link video please contact me on the Fanpage


What you’ll learn


User Signup / Signin

Forgot Password / Reset Password

Account Activation on User Signup

Social Login with Google

JWT based Authentication System

Admin / User Dashboard

Role Based Authorization System

Advance CRUD with Image Upload

Blogs Search

Load More Blogs

Categories

Tags

SEO – Search Engine Optimization

Practical Real World Project running live on the server

API Development with Node Express MongoDB

Frontend Web Development with React Hooks and NextJs

SSR with NextJs

User Public Profile Page with List of Blogs and Contact Form

Blog Author Private Contact Form

User Private Dashboard

Multiple User Authorization System

Multi User System that can be Scaled to Build Marketplace App

Standard Contact Form

DISQUS Commenting System

Related Blogs

Google Analytics Integration

Sendgrid for Sending Emails

Deploying to Digital Ocean Cloud Servers

Adding Domain

Cloudflare CDN and Free SSL

Writing Clean Code

Scalable Project Structure


MERN React Node Next.js Multi User SEO Blogging Platform


Học hành, Lập trình
Javascript, Lập trình
Xem Tiếp

Cấu hình IP tĩnh cho CentOS 7 trên VirtualBox

Leave a Comment

Configure Static IP Address in CentOS 7 Virtual Box


5 bước để cấu hình IP tĩnh cho CentOS 7 trên VirtualBox một cách đơn giản và nhanh chóng. Chúng ta cùng bắt đầu!


1. Cấu hình VirtualBox cho CentOS 7 như hình


Chuyển Network sang Bridged Adapter
cau-hinh-ip-tinh-cho-centos-7-tren-virtualbox


2. Đăng nhập vào máy ảo Centos 7 và chỉnh sửa file ifcfg-enp0s3


vi /etc/sysconfig/network-scripts/ifcfg-enp0s3

Cấu hình ip tĩnh cho Centos 7 bằng cách chỉnh sửa phần in đậm dưới đây:


TYPE=Ethernet
PROXY_METHOD=none
BROWSER_ONLY=no
BOOTPROTO=static
DEFROUTE=yes
IPV4_FAILURE_FATAL=no
IPV6INIT=yes
IPV6_AUTOCONF=yes
IPV6_DEFROUTE=yes
IPV6_FAILURE_FATAL=no
IPV6_ADDR_GEN_MODE=stable-privacy
NAME=enp0s3
UUID=6ab8c39d-6b8a-476e-85f8-6acaa996da02
DEVICE=enp0s3
ONBOOT=yes
IPADDR=192.168.100.99
NETMASK=255.255.255.0
GATEWAY=192.168.100.1
DNS=8.8.8.8

3. Chỉnh sửa file /etc/resolv.conf


vi /etc/resolv.conf


Thay đổi nội dung:


nameserver 8.8.8.8

4. Reset cấu hình mạng cho máy ảo centos 7 để update phần cấu hình trên


service network restart

5. Bạn có thể test bằng lệnh ping google:


ping google.com

Xong mình đã hướng dẫn Cấu hình IP tĩnh cho CentOS 7 trên VirtualBox. Hãy tự nhiên bình luận bên dưới nếu thắc mắc bạn nhé!


Xem thêm: Cách sửa lỗi WARNING: UNPROTECTED PRIVATE KEY FILE! trên Linux và Mac OS


Lập trình, Linux
Thủ thuật
Xem Tiếp

Cách sửa lỗi WARNING: UNPROTECTED PRIVATE KEY FILE! trên Linux và Mac OS

Leave a Comment

How to Fix “WARNING: UNPROTECTED PRIVATE KEY FILE!” on Mac and Linux


Amazon Lightsail giảm giá 50% các plan, thêm 2 gói mới » Canh Me


@@@@@@@@@@@@@@@@@@@@@@@@@@@@@@@@@@@@@@@@@@@@@@@@@@@@@@@@@@@
@ WARNING: UNPROTECTED PRIVATE KEY FILE! @
@@@@@@@@@@@@@@@@@@@@@@@@@@@@@@@@@@@@@@@@@@@@@@@@@@@@@@@@@@@
Permissions 0644 for '/path_to_key.pem' are too open.
It is required that your private key files are NOT accessible by others.
This private key will be ignored.
bad permissions: ignore key: /path_to_key.pem
Permission denied (publickey).

Lỗi thường gặp khi dùng lệnh SSH connect server, chả hạn bạn dùng Amazon Lightsail.


Cách sửa lỗi qua 2 bước terminal đơn giản:


Bạn muốn kết nối tới server thông qua SSH thì bạn cần tải file .pem về máy. Sau đó dùng lệnh sau:


$ sudo chmod 600 /path_to_key.pem

Sau đó


$ sudo chmod 755 ~/.ssh

Tại sao tôi gặp lỗi WARNING: UNPROTECTED PRIVATE KEY FILE!


Lỗi xảy ra do khoá riêng tư (key.pem trong ví dụ trên) quá dễ truy cập đối với người dùng trên hệ thống. Đây là một vấn đề bảo mật vì khi đó bạn không phải là người duy nhất có thể sử dụng khóa. Khóa riêng tư chỉ được phép truy cập cho một người dùng.

Ví dụ: nếu kẻ tấn công bằng cách nào đó có được quyền truy cập vào hệ thống của bạn, thì chúng sẽ có thể truy cập vào khóa riêng tư của bạn.

 
Xong mình đã hướng dẫn bạn cách sửa lỗi WARNING: UNPROTECTED PRIVATE KEY FILE! Nếu bạn có thắc mắc gì hãy bình luận bên dưới nhé!


Học hành, Lập trình
Lập trình, Thủ thuật
Xem Tiếp

Cách Ép kiểu String, Number, Boolean trong Javascript

Leave a Comment

Cách Ép kiểu String, Number, Boolean trong Javascript – Type Conversion


Trong bài viết này mình sẽ hướng dẫn các bạn cách ép kiểu trong JavaScript. Có 3 loại ép kiểu chính mà chúng ta hay sử dụng nhất đó là: ToStringToNumber và ToBoolean. Bây giờ chúng ta sẽ đi vào chi tiết từng loại nhé.

Xem thêm: Viết code Javascript ngắn gọn với Array Distinct và Short-Circuit Evaluation


Chuyển đổi thành String


Để chuyển đổi nhanh chóng 1 số thành 1 chuỗi string, chúng ta có thể dùng concatenation operator + theo sau là ngoặc kép “” .
Ví dụ chuyển đổi number sang string 


const val = 3 + "";
console.log(val); // Result: "3"
console.log(typeof val); // Result: "string"

Chuyển đổi thành Boolean


Bên cạnh các giá trị boolean thông thường true và false trong, JavaScript cũng xử lý tất cả các value khác như là ‘truthy’ hay ‘falsy’. Nếu chúng đã được xác định thì các value trong JavaScript là ‘truthy’.
Xem thêm: giá trị falsy là gì ?

Chúng ta có thể chuyển đổi dễ dàng giữa true và false bằng cách dùng operator phủ định ! , vốn cũng sẽ chuyển đổi type thành “boolean" . Loại chuyển đổi type này có thể khá tiện dụng trong xử lý các conditional statement.
Ví dụ chuyển đổi sang boolean


const isTrue = !0;
const isFalse = !1;
const alsoFalse = !!0;
console.log(isTrue); // Result: true
console.log(typeof true); // Result: "boolean"

Chuyển đổi thành Số


Thêm addition operator + vào trước toán hạng cần chuyển thành số.

Ví dụ chuyển đổi string, boolean sang number.


let int = "10";
int = +int;
console.log(int); // Result: 10
console.log(typeof int); Result: "number"

Cái này cũng có thể được dùng để chuyển các boolean thành số, như bên dưới đây:


console.log(+true); // Return: 1
console.log(+false); // Return: 0

Trường hợp + sẽ vận hành như 1 concatenation operator hơn là addition operator có thể sẽ xảy ra. Khi đó (và bạn muốn return 1 số nguyên, không phải 1 số thực) bạn có thể sử dụng 2 dấu ngã: ~~ thay vào đó.

1 dấu ngã, được biết như là ‘bitwise NOT operator’, là 1 operator tương đương với   -n-1. Cho nên, ví dụ là ~10 sẽ bằng với -11 .

Sử dụng 2 dấu ngã liên tiếp làm điều hoà hoạt động 1 cách hiệu quả, bởi vì - (-n-1) -1 = n+1 -1 = n . Nói cách khác, ~-11 bằng 10 .


const int = ~~"10"
console.log(int); // Result: 10
console.log(typeof int); Result: "number"

Cho dù mình không nghĩ trong hầu hết trường hợp sử dụng, bitwise này cũng có thể dùng trên các boolean: ~true = -2 và ~false = -1 .


Quick Float to Integer – Chuyển nhanh số thực thành số nguyên với ‘bitwise OR operator’


Nếu bạn muốn chuyển đổi 1 số thực thành 1 số nguyên, bạn có thể dùng Math.floor() , Math.ceil() hay Math.round() . Nhưng cũng có 1 cách nhanh hơn để chuyển 1 số thực thành 1 số nguyên bằng | , nó chính là ‘bitwise OR operator’.


console.log(20.9 | 0); // Result: 20
console.log(-20.9 | 0); // Result: -20

Hành vi của | khá đa dạng dựa trên việc bạn đang làm việc với số dương hay số âm, nên chỉ sử dụng  bitwise or operator này khi bạn đã chắc chắn hiểu nó.


  • Nếu n là dương, n | 0 làm tròn xuống 1 cách hiệu quả.

  • Nếu n là âm, nó sẽ làm tròn lên hiệu quả.

Để tăng độ chính xác cho nó, operation này gỡ bỏ bất cứ gì đến sau dấu thập phân, cắt số thực thành số nguyên.

Bạn có thể lấy hiệu ứng làm tròn bằng cách dùng ~~ , như ở trên, và thực tế là bất kỳ bitwise operator nào cũng sẽ buộc 1 số thực thành 1 số nguyên.


Xóa các chữ số cuối – Remove Final Digits


‘Bitwise OR operator’ cũng có thể được dùng để xóa số cuối của một số nguyên. Điều này có nghĩa là chúng ta không cần phải dùng code như thế này để chuyển đổi giữa các type:


let str = "1553";
Number(str.substring(0, str.length - 1));
// Thay vào đó, bitwise OR operator cho phép chúng ta viết:
console.log(6553 / 10 | 0) // Result: 655
console.log(6553 / 100 | 0) // Result: 65
console.log(6553 / 1000 | 0) // Result: 6

Xem thêm: Viết code Javascript ngắn gọn với Array Distinct và Short-Circuit Evaluation


Học hành, Lập trình
Javascript, Lập trình
Xem Tiếp

Viết code Javascript ngắn gọn với Array Distinct và Short-Circuit Evaluation

Leave a Comment

Mẹo viết code Javascript ngắn gọn hơn


Dưới đây là một số cách xử lí vấn đề dùng cách viết javascript thật ngắn ngọn, súc tích. Nếu bạn đọc giả có cách viết hay hơn hãy bổ sung ở phía bình luận cuối trang nhá.


JavaScript Array Distinct


Set type object đã được ra mắt trong ES6, cùng với spread operator(), chúng ta có thể dùng nó để tạo 1 array mới chỉ gồm các giá trị duy nhất (unique values).

Ví dụ:


  • Distinct elements of an array of primitive values

  • Distinct property values of an array of objects


const array = [2, 2, 3, 5, 8, 5, 8]
const distinctArray = [...new Set(array)]; // Result: [2, 3, 5, 8]
// Distinct property values of an array of objects
const array = [
"name":"Nam", "age": 20,
"name":"Truong", "age": 10,
"name":"Linh", "age": 10,
];
const distinctAges = [...new Set(array.map(e=>e.age))]; // [20,10]


Short-Circuit Evaluation


Ternary operator là 1 cách nhanh gọn để viết các statement điều kiện đơn giản (và đôi khi phải lồng vào nhau), ví dụ như là:


Bạn thấy dòng 2 phía trên áp dụng ternary operator nhưng cũng phức tạp hơn mức cần thiết. Thay vào đó, chúng ta có thể dùng logical operators ‘and’ && và ‘or’ || để đánh giá các expression nhất định 1 cách còn ngắn gọn hơn.
Cách làm việc của nó

Giả sử ta muốn return chỉ 1 trong 2 hay nhiều option.


And &&


Sử dụng && (And chỉ đúng nếu tất cả toán hạng đều đúng, return về giá trị của toán hạng cuối cùng) bằng không sẽ return khi gặp giá trị “falsy” đầu tiên.


Or ||


Dùng || sẽ return true khi gặp giá trị “truthy” đầu tiên. Nếu mỗi toán hạng đánh giá tới false, evaluated expression cuối cùng sẽ được return.


Ví dụ 1: Chúng ta muốn return length của 1 variable, nhưng ta lại không biết variable type.

Chúng ta có thể dùng statement if/else để kiểm tra xem type của foo có được chấp nhận không, nhưng việc này có thể hơi dài dòng. Thay vào đó short circuit evaluation cho phép chúng ta có thể làm như thế này:


Nếu variable của foo là truthy, nó sẽ được return. Nếu không thì, length của array trống sẽ được return: 0 .
Ví dụ 2:

Đã bao giờ bạn gặp vấn đề truy cập 1 nested object property? Bạn sẽ không biết rằng liệu object hay 1 trong các sub-property có tồn tại, và điều này có thể gây ra các lỗi khó chịu.

Giả dụ chúng ta muốn truy cập vào 1 property có tên data bên trong this.state, nhưng data lại không được xác định cho tới khi chương trình của ta return thành công 1 fetch request.

Thông thường ta sẽ viết 1 lệnh điều kiện:


Nhưng điều đó cũng có vẻ hơi lặp đi lặp lại. ‘or’ operator có thể giải quyết nó nhanh gọn hơn:


Chuỗi tùy chọn – Optional Chaining


const name = this.state.data?.name

Cú pháp ?. đặt sau data, tức là ta đang kiểm tra xem data đó có tồn tại hay không? Hoặc trong nhiều trường hợp data có giá trị null hoặc undefined thì sao? Lúc này Optional Chaining sẽ không return về error mà nó chỉ trả về undefined. Vì thế, name sẽ có giá trị undefined. Khi javascript tìm thấy null hoặc undefined, nó sẽ short circuit và ngừng đi sâu hơn.
Optional Chaining còn áp dụng được cho cả hàm:

Nếu data tồn tại và getAge tồn tại thì gọi hàm getAge()
const age = this.state.data?.getAge?.()


Dynamic properties


Nếu data tồn tại thì lấy giá trị của data[1]
const data = this.state.data?.[1]


Default values


Cú pháp Nullish coalescing operator biểu diễn dưới dạng ?? Nó cũng khá dễ đọc. Nếu bên vế trái có giá trị undefined, khi đó data sẽ có giá trị bên phải ?? tức là ‘Default name’
const data = this.state.data?.name ?? 'Default name'


Học hành, Lập trình
Javascript, Lập trình
Xem Tiếp

Hướng dẫn cài đặt ng spice trên Mac os Linux Windows

Leave a Comment

How to install ng spice on mac, linux, windows


Ngspice là thư viện mô phỏng mạch điện tử hỗn hợp (the open source Spice circuit simulator). Nó là sự kế thừa của phiên bản ổn định mới nhất của Berkeley SPICE, phiên bản 3f.5, được phát hành vào năm 1993.


Install ngspice on Mac OS X:


Option 1: (allows very latest version install, )

Install XCode Tools if you haven’t already.
Download ngspice at: https://sourceforge.net/projects/ngspice/files/ng-spice-rework/

In your working area type:

tar zxvf ng-spice-rework-25.tar

Go into the newly created ngspice directory and type:

./configure

./make

sudo make install

when finished, ngspice will be installed in

/usr/local/bin/ngspice
Option 2:

(easiest way, binary package)
Download ngspice at: https://sourceforge.net/projects/ngspice/files/ng-spice-rework/

Download and install: ngspice-26.pkg

Install instructions are in: INSTALL_MAC_OS_X. It installs like any Mac package file.
Option 3:

(less easier way, compile from source)

Install macports, see: http://www.macports.org/install.php

I recommend using the Mac OS X Package (.pkg) Installer.

Once installed, in a terminal window, type:

sudo port install ng-spice

This will install ngspice into the /opt directory.

After this, ngspice will be available at the command prompt.

Type ngspice, not ng-spice.


Install ngspice on Ubuntu:


sudo vi /etc/apt/sources.list

-remove all comments on path lines

sudo apt-get update

sudo apt-get install build-essential linux-headers-`uname -r`

sudo apt-get install libtool automake autoconf

sudo apt-get install flex bison texinfo

sudo apt-get install libx11-dev libxaw7-dev
Download ngspice at: https://sourceforge.net/projects/ngspice/files/ng-spice-rework/

gunzip ng-spice-rework-26.tar.gz

tar xvf ng-spice-rework-26.tar
Go into the newly created ngspice directory and type:

./autogen.sh

./configure

./make

sudo make install

when finished, ngspice will be installed in

/usr/local/bin/ngspice


Install ngspice on Windows


To install ngspice on PC
Download ngspice_version.zip at: https://sourceforge.net/projects/ngspice/files/ng-spice-rework/

This is MS Windows executable, 32 bit that also includes XSPICE

code models, examples, tests, and manual.


Học hành, Lập trình, Linux, MacOs, Mô phỏng, Phần mềm
Thủ thuật
Xem Tiếp

Khóa học React Hooks Video Player 2020

Leave a Comment

Course React Hooks Video Player 2020


Dưới đây là series hướng dẫn lập trình video player dùng react hooks với styled components. Nguồn từ Udemy.


What will we do in the course?

We’ll build a React js Video Player where you can create a list of videos and select from the list. The Video Player can play both YouTube and Vimeo videos and will also persist state in local storage of played videos etc.


Yêu cầu bạn đã biết:


  • Basic Javascript knowledge

  • Basic Coding knowledge

  • Basic CSS knowledge

Khóa học áp dụng các công nghệ để tạo React js Video Player:


  • React Hooks in stateless functional components

  • Styled Components

  • ES6 Syntax

  • Higher Order Components

  • React Router

  • Local Storage to persist state


Học hành, Lập trình
Lập trình, React
Xem Tiếp

Khóa học lập trình Python toàn tập Tiếng Việt

Leave a Comment

Khóa học lập trình Python toàn tập từ cơ bản đến nâng cao Tiếng Việt


Trong khóa học này sẽ giúp bạn chưa có kiến thức lập trình (Python from scratch) học lập trình Python cơ bản tới nâng cao. Bài giảng tiếng Việt vô cùng dễ hiểu, mỗi video tập trung vào trọng tâm chính.
python learning
Là một ngôn ngữ lập trình thông dịch do Guido van Rossum tạo ra năm 1990. Python hiện nằm trong top 5 ngôn ngữ lập trình phổ biến nhất trên thế giới. Đây cũng là ngôn ngữ nổi tiếng về sự chặt chẽ, nhanh, mạnh, và có mặt ở mọi hệ điều hành. Nhu cầu tuyển dụng các lập trình viên sử dụng Python ngày càng cao từ các doanh nghiệp phát triển hệ thống ERP (ODOO), các framework phát triển ứng dụng web như: Django, Pyramid, Flask, Bottle…
Seri lập trình Python có 89 video (source unica), trung bình video dài chỉ 7 phút thôi bao gồm:


  • Phần 1: Các khái niệm cơ bản trong lập trình Python.

  • Phần 2: Biểu thức trong lập trình Python.

  • Phần 3: Đối tượng String trong lập trình Python.

  • Phần 4: Đối tượng List, Tuples, Sets và Dictionary.

  • Phần 5: Thao tác với hàm tự định nghĩa trong lập trình Python.

  • Phần 6: Hướng đối tượng và thao tác với File trong Python.

  • Phần 7: Tìm hiểu về module và quản lý lỗi trong Python.

  • Phần 8: Thao tác làm việc với cơ sở dữ liệu.

  • Phần 9: Tìm hiểu thao tác làm việc với mảng qua thư viện Numpy.

  • Phần 10: Thao tác quản lý dữ liệu với Pandas.

  • Phần 11: Bài tập tình huống.


Tham khảo các bài viết về lập trình Pythonhttps://shareeverythings.com/category/lap-trinh/python/


Học hành, Lập trình
Lập trình, Python
Xem Tiếp

Tutorial React Testing with Jest and Enzyme

Leave a Comment

Khóa học React Testing with Jest and Enzyme


Lập trình React, Redux, Hooks and Context Code với Test Driven Development(TDD). Khóa học dưới đây tập trung vào Test trên React nên dành cho các bạn nào đã lập trình qua JavaScript và React / Redux nhé. (Source udemy)

Xem thêm:React Hooks cách dùng các hàm thông dụng cùng với Typescript


Code source:


Course Resources: React Testing with Jest and Enzyme
Note: These are in the order they are presented in the course, with the exception of putting the course repo first.
GitHub Repository for the course
https://github.com/flyrightsister/udemy-react-testing-projects
Creating a React app from scratch
https://medium.com/@JedaiSaboteur/creating-a-react-app-from-scratch-f3c693b84658
https://jestjs.io/docs/en/webpack.html#handling-static-assets
Configuring Jest
https://facebook.github.io/jest/docs/en/configuration.html
Enzyme shallow wrapper documentation
http://airbnb.io/enzyme/docs/api/shallow.html
Enzyme shallow wrapper .find() documentation
http://airbnb.io/enzyme/docs/api/ShallowWrapper/find.html
Enzyme shallow wrapper selector documentation
http://airbnb.io/enzyme/docs/api/selector.html
Enzyme shallow wrapper state documentation
http://airbnb.io/enzyme/docs/api/ShallowWrapper/setState.html
http://airbnb.io/enzyme/docs/api/ShallowWrapper/state.html
Jest expect API
https://facebook.github.io/jest/docs/en/expect.html
Bootstrap 4 “get started” docs
https://getbootstrap.com/docs/4.0/getting-started/introduction/
Enzyme shallow wrapper .prop() method
http://airbnb.io/enzyme/docs/api/ShallowWrapper/prop.html
Kent Dodds Blog Post for Context with Embedded State
https://kentcdodds.com/blog/application-state-management-with-react


Học hành, Lập trình
Lập trình, React
Xem Tiếp

Lập trình web Python Django RESTful API Framework

Leave a Comment

Hướng dẫn lập trình CRUD Restful API với Django Python dễ dàng.


Ứng dụng các công nghệ để lập trình web với python:


  • Python

  • Django REST Framework

  • SQL lite

  • Visual Studio Code

  • Python extension by Microsoft

Tại sao dùng Django REST Framework?


Django REST Framework (REST Framework) cung cấp 4 tính năng:


  1. Browsable API

  2. Auth Support

  3. Throttling: giới hạn quyền truy cập của người dùng.

  4. Serializers: chuyển đổi model thành json object.


Nếu bạn là người bắt đầu với lập trình web python thì đừng bỏ lỡ bài viết:


Django Project Setup


Xem thêm:


Tạo thư mục django-employee và kích hoạt virtualenv:


$ mkdir django-employee
$ cd django-employee
$ python -m venv env

Nhấn Ctrl + Shift + P chọn Python: Selection interpreter và chọn bản python bạn muốn dùng. Chi tiết hơn bạn tham khảo bài viết này

Lúc này sẽ xuất hiện (env) ở command line.
django_helloworld (5)


(env)$ pip install django 
(env)$ django-admin startproject myemployee

Cấu trúc dự án lúc này:


└── myemployee
├── manage.py
└── myemployee
├── __init__.py
├── settings.py
├── urls.py
└── wsgi.py


Cấu hình cho Django REST Framework


Chúng ta sẽ tạo app employee.


(env)$ cd myemployee
(env)$ python manage.py startapp employee
(env)$ pip install djangorestframework

Bây giờ chúng ta cấu hình cho Django project dùng REST Framework.

Đầu tiên, bạn thêm employeerest_framework vào mục INSTALLED_APPS trong myemployee/myemployee/settings.py:


INSTALLED_APPS = [
'django.contrib.admin',
'django.contrib.auth',
'django.contrib.contenttypes',
'django.contrib.sessions',
'django.contrib.messages',
'django.contrib.staticfiles',
'employee',
'rest_framework'

]

Tiếp theo, định nghĩa settings cho REST Framework, thêm code bên dưới vào file settings.py :


REST_FRAMEWORK = 
# Use Django's standard `django.contrib.auth` permissions,
# or allow read-only access for unauthenticated users.
'DEFAULT_PERMISSION_CLASSES': [],
'TEST_REQUEST_DEFAULT_FORMAT': 'json'

Điều này sẽ không giới hạn việc truy cập tới API và thiết lập mặc định trả về JSON cho tất cả các request.

Do mình develop ở localhost nên không cần đòi hỏi giới hạn truy cập. Nhưng nếu ở production thì phải giới hạn việc truy cập tới endpoints. Xem thêm ở đây.

Cấu trúc project hiện tại thế này:


└── myemployee
├── manage.py
├── employee
│ ├── __init__.py
│ ├── admin.py
│ ├── apps.py
│ ├── migrations
│ │ └── __init__.py
│ ├── models.py
│ ├── tests.py
│ └── views.py
└── myemployee
├── __init__.py
├── settings.py
├── urls.py
└── wsgi.py


Database mình sẽ dùng mặc định là SQLite của Django đã hỗ trợ nên không cấu hình phần này.

Tiếp theo, chúng ta sẽ định nghĩa model Employee trong file django-employee/myemployee/employee/models.py:


from django.db import models
class Employee(models.Model):
name = models.CharField(max_length=255)
age = models.IntegerField()
created_at = models.DateTimeField(auto_now_add=True)
updated_at = models.DateTimeField(auto_now=True)
def get_info(self):
return 'Name: ' + self.name + ' age: ' + self.age
def __repr__(self):
return self.name + ' is added.'

Thực thi  migration cho database:


(env)$ python manage.py makemigrations
(env)$ python manage.py migrate

Bạn hãy check database db.sqlite3 sẽ thấy thay đổi.


Serializers


Trước khi tạo API, chúng ta sẽ định nghĩa serializer cho model Employee. Hiểu đơn giản serializers là cách chúng ánh xạ các field trong class model (chuyển từ class model sang json và ngược lại).

Thêm code django-employee/myemployee/employee/serializers.py:


from rest_framework import serializers
from .models import Employee
class EmployeeSerializer(serializers.ModelSerializer):
class Meta:
model = Employee
fields = ('name', 'age', 'created_at', 'updated_at')

ModelSerializer sẽ ánh xạ tương ứng các field cho model Employee.

Bây giờ là phần quan trọng, tiến hành làm RESTful API nào !


Cấu trúc restful (xem thêm)


EndpointHTTP MethodCRUD MethodResult
employeesGETREADGet all employee
employees/:idGETREADGet a single employee
employeesPOSTCREATEAdd a single employee
employees/:idPUTUPDATEUpdate a single employee
employees/:idDELETEDELETEDelete a single employee

Trước khi implement API routes chúng ta sẽ định nghĩa skeleton để return empty và map chúng với URL tương thích trong file django-employee/myemployee/employee/views.py:


from rest_framework.decorators import api_view
from rest_framework.response import Response
from rest_framework import status
from .models import Employee
from .serializers import EmployeeSerializer
@api_view(['GET', 'DELETE', 'PUT'])
def get_delete_update_employee(request, pk):
try:
employee = Employee.objects.get(pk=pk)
except Employee.DoesNotExist:
return Response(status=status.HTTP_404_NOT_FOUND)
# get details of a single employee
if request.method == 'GET':
return Response()
# delete a single employee
elif request.method == 'DELETE':
return Response()
# update details of a single employee
elif request.method == 'PUT':
return Response()
@api_view(['GET', 'POST'])
def get_post_employee(request):
# get all employee
if request.method == 'GET':
return Response()
# insert a new record for a employee
elif request.method == 'POST':
return Response()

Tạo URLs đúng với views trong file django-employee/myemployee/employee/urls.py:


from django.conf.urls import url
from . import views
urlpatterns = [
url(
r'^api/employee/(?P<pk>[0-9]+)$',
views.get_delete_update_employee,
name='get_delete_update_employee'
),
url(
r'^api/employee/$',
views.get_post_employee,
name='get_post_employee'
)
]

Đồng thời update file django-employee/myemployee/myemployee/urls.py:


from django.conf.urls import include, url
from django.contrib import admin
urlpatterns = [
url(r'^', include('employee.urls')),
url(
r'^api-auth/',
include('rest_framework.urls', namespace='rest_framework')
),
url(r'^admin/', admin.site.urls),
]

Browsable API


Tất cả các route đã map với function, chúng ta sẽ test thử REST Framework’s Browsable API và xem chúng làm việc thế nào nha.
Tại Command line gõ:


(env)$ python manage.py runserver

Truy cập: http://localhost:8000/api/employee

Bạn sẽ thấy giao diện HTML với API response.
pythonrestfull

Bây giờ chúng ta sẽ bổ sung cho đủ các hàm trong file views.


Routes


GET ALL


Update code ở file employee/views.


@api_view(['GET', 'POST'])
def get_post_employee(request):
# get all employee
if request.method == 'GET':
employees = Employee.objects.all()
serializer = EmployeeSerializer(employees, many=True)
return Response(serializer.data)
# insert a new record for a employee
elif request.method == 'POST':
return Response()

POST


Inserting employee cũng có 2 trường hợp: hợp lệ và không hợp lệ.


@api_view(['GET', 'POST'])
def get_post_employee(request):
# get all employee
if request.method == 'GET':
employees = Employee.objects.all()
serializer = EmployeeSerializer(employees, many=True)
return Response(serializer.data)
# insert a new record for a employee
if request.method == 'POST':
data =
'name': request.data.get('name'),
'age': int(request.data.get('age'))

serializer = EmployeeSerializer(data=data)
if serializer.is_valid():
serializer.save()
return Response(serializer.data, status=status.HTTP_201_CREATED)
return Response(serializer.errors, status=status.HTTP_400_BAD_REQUEST)

Tại đây, chúng sẽ chèn dòng mới bởi serializing và xác nhận field hợp lệ trước khi chèn vào database.

Truy cập: http://localhost:8000/api/employee/ và thêm data mẫu bên dưới.


"name": "Lam",
"age": 4

GET Single


Get employee có 2 trường hợp:


  1. Hợp lệ: employee tồn tại

  2. Không hợp lệ: employee không tồn tại

@api_view(['GET', 'UPDATE', 'DELETE'])
def get_delete_update_employee(request, pk):
try:
employee = Employee.objects.get(pk=pk)
except Employee.DoesNotExist:
return Response(status=status.HTTP_404_NOT_FOUND)
# get details of a single employee
if request.method == 'GET':
serializer = EmployeeSerializer(employee)
return Response(serializer.data)


PUT


Method PUT để cập nhật 1 employee


@api_view(['GET', 'DELETE', 'PUT'])
def get_delete_update_employee(request, pk):
try:
employee = Employee.objects.get(pk=pk)
except Employee.DoesNotExist:
return Response(status=status.HTTP_404_NOT_FOUND)
# get details of a single employee
if request.method == 'GET':
serializer = EmployeeSerializer(employee)
return Response(serializer.data)
# update details of a single employee
if request.method == 'PUT':
serializer = EmployeeSerializer(employee, data=request.data)
if serializer.is_valid():
serializer.save()
return Response(serializer.data, status=status.HTTP_204_NO_CONTENT)
return Response(serializer.errors, status=status.HTTP_400_BAD_REQUEST)
# delete a single employee
elif request.method == 'DELETE':
return Response()

DELETE


To delete a single record, an ID is required:


@api_view(['GET', 'DELETE', 'PUT'])
def get_delete_update_employee(request, pk):
try:
employee = Employee.objects.get(pk=pk)
except Employee.DoesNotExist:
return Response(status=status.HTTP_404_NOT_FOUND)
# get details of a single employee
if request.method == 'GET':
serializer = EmployeeSerializer(employee)
return Response(serializer.data)
# update details of a single employee
if request.method == 'PUT':
serializer = EmployeeSerializer(employee, data=request.data)
if serializer.is_valid():
serializer.save()
return Response(serializer.data, status=status.HTTP_204_NO_CONTENT)
return Response(serializer.errors, status=status.HTTP_400_BAD_REQUEST)
# delete a single employee
if request.method == 'DELETE':
employee.delete()
return Response(status=status.HTTP_204_NO_CONTENT)

Xong! Bạn có thể thử với các Restful API như mục trên, danh sách employee api click đây.
Mình đã Hướng dẫn lập trình web Python CRUD Restful API với Django Python qua dự án Employee dễ dàng. Các bạn có thắc gì cứ bình luận bên dưới nhé!


Download source code Python web:


Employee project


Học hành, Lập trình
Lập trình, Python
Xem Tiếp

React Hooks cách dùng các hàm thông dụng cùng với Typescript

Leave a Comment

Hướng dẫn React Hooks với TypeScript – Hướng dẫn dùng các tính năng mới qua ví dụ dễ hiểu


React Hooks cách dùng các hàm thông dụng cùng với Typescript


Hooks được thêm vào React 16.8 tại hội thảo React 2018. Tính năng mới bổ sung khá tuyệt vời giúp cho Functional Component hay Stateless Component có thể làm mọi thứ mà Class Component làm được.

Bài viết mình tóm gọn nên phù hợp cho các bạn đã biết React nhé ❤️. Sau đây mình tóm tắt nhanh cách dùng một số hàm chính của React Hook: useState, useEffect, useRef, useMemo, useCallback.


useState


useState đây là hàm mà bạn sẽ dùng rất nhiều. Thay vì dùng this.state từ class components, bạn có thể truy cập state hiện tại với 1 giá trị khởi tạo nó và 1 hàm gọi để thay đổi state.

Ví dụ:


import React from 'react';
// Khởi tạo props initial = 0
const Counter:FC< initial?: number > = ( initial = 0 ) =>
// clicks là state, setClicks là hàm setState cho state clicks
const [clicks, setClicks] = React.useState(initial);
return <>
<p>Clicks: clicks</p>
<button onClick=() => setClicks(clicks+1)>+</button>
<button onClick=() => setClicks(clicks-1)>-</button>
</>


useEffect


useEffect liên quan tới side effects. Việc thêm event listeners, thay đổi document, fetching data… sẽ ảnh hưởng tới React lifecycle component (componentDidUpdatecomponentDidMountcomponentWillUnmount). useEffect dùng để tối ưu hóa việc gọi hàm và clean up chúng. Các hàm này chỉ có trong class component. useEffect giúp bạn làm điều này!  Phương thức này có 2 tham số:


  • 1 hàm anonymous không có tham số.

  • 1 mảng chứa tham số, hàm trên chỉ được gọi khi tham số này thay đổi.


// Giả sử có state là name. document.title sẽ đổi khi name thay đổi
const [name, setName] = React.useState('Stefan');
useEffect(() =>
document.title = `Hello $name`;
, [name])


Không có hàm componentWillUnmount cho functional component. Làm thế nào để clean up ?
Việc return sẽ thực hiện hàm removeEventListener sẽ tương tự cho componentWillUnmount.


React.useEffect(() => 
const handler = () =>
document.title = window.width;

window.addEventListener('resize', handler);
// ⚡️ sẽ không compile
return true;
// ✅ sẽ compile
return () =>
window.removeEventListener('resize', handler);

)


useContext


useContext cho phép bạn truy cập thuộc tính context bất cứ đâu trong components. Nó tương tự Context.Consumer trong class components:


import React, useContext from 'react';
// Khởi tạo đối tượng context lang với type là string
export const LanguageContext = React.createContext( lang: 'en' );
const Display = () =>
// Gọi lang với type là string
const lang = useContext(LanguageContext);
return <>
<p>Your selected language: lang</p>
</>


useRef


Giờ đây bạn có thể dùng useRef sẽ thay thế cho this.myRef = React.createRef() trong class component. useRef dùng để truy cập các đối tương bên trong HTML Node.


import React from 'react';
function TextInputWithFocusButton()
// Thường khởi tạo refs với giá trị null
const inputRef = React.useRef(null);
const onButtonClick = () =>
// (?) Typescript sẽ quăng lỗi vì inputRef có thể null. Fix code bên dưới nhé
inputRef.current.focus();
;
return (
<>
<input ref=inputRef type="text" />
<button onClick=onButtonClick>Focus the input</button>
</>
);


Lưu ý với typescript:


  • Phải khởi tạo refs là null.

  • inputRef có thể null. TypeScript cần check là inputRef.current not null mới cho gọi hàm focus().


function TextInputWithFocusButton() 
// Báo cho typescipt biết type cụ thể của refs là HTMLInputElement
const inputRef = useRef<HTMLInputElement>(null);
const onButtonClick = () =>
// Kiểm tra inputRef tồn tại trước khi dùng hàm bên trong nó
if(inputRef && inputRef.current)
inputRef.current.focus();

;
return (
<>
<input ref=inputRef type="text" />
<button onClick=onButtonClick>Focus the input</button>
</>
);


useMemo


useMemo cũng tương tự useEffect nó chỉ chạy khi có tham số thay đổi. useMemo dùng như là pure function để tạo 1 phần HTML cho component.

Lưu ý khi dùng với TypeScript, useMemo sẽ trả về type object giống với hàm bên trong trả về.


const getStatus = React.useMemo(() => (status ? <Tag className=statusClass>status</Tag> : ''), [status]);
render()
return <div>getStatus</div>


Trong ví dụ trên: getStatussẽ trả về JSX.Element do hàm anonymous bên trong trả về JSX.Element. Hàm này chỉ render lại khi status thay đổi.


useCallback


useCallback cũng tương tự useMemo. Nhưng nó trả về callback function, not a value.


const memoCallback = React.useCallback((a: number) => 
// doSomething
, [a])
// ⚡️ Không compile, vì không có tham số.
memoCallback();
// ✅ Compile
memoCallback(3);


Xong. Mình đã hướng dẫn bạn cách dùng một số hàm thông dụng trong React Hooks. Bạn có thắc mắc gì thì đừng ngần ngại mà bình luận dưới nhé!


Học hành, Lập trình
Lập trình, React
Xem Tiếp

Cấu trúc RESTful API là gì ?

Leave a Comment

Cấu trúc RESTful API là gì ?


RESTful Structure


Kết quả hình ảnh cho restful api

Xu hướng lập trình Single Page như hiện nay nên hầu hết response trả về json. Quy ước chung cho url thế nào để gửi request và trả về json data. Trong Restful API, endpoints tức URLs sẽ quy ước cấu trúc API và cái mà người dùng cuối truy cập data từ ứng dụng thông qua phương thức HTTP: GET, POST, PUT, DELETE. Cụ thể bên dưới.

Ví dụ:

Mình lấy ví dụ để dễ hiểu, giả sử mình có model employee. Khi bạn gửi request /employees. Server sẽ trả về danh sách employee.


EndpointHTTP MethodCRUD MethodResult
employeesGETREADLấy tất cả employee
employees/:idGETREADLấy 1 employee
employeesPOSTCREATEThêm 1 employee
employees/:idPUTUPDATECập nhật 1 employee
employees/:idDELETEDELETEXóa 1 employee

Các bài viết lập trình web dùng Restful API:


Lập trình Spring Boot CRUD đơn giản MyEmployee


Hướng dẫn lập trình CRUD Restful API với Django Python dễ dàng. (updating)


Học hành, Lập trình
Phần mềm PC
Xem Tiếp

Lập trình website Python với Django Framework

Leave a Comment

Tạo website hello world đơn giản với Django Framework


Python không có sẵn khả năng làm web, chính vì thế, chúng ta cần phải có một số module nhất định để lập trình web với Python.
django_helloworld (7)

Với nhu cầu ngày càng đa dạng, lập trình viên nên chuyển sang một số framework Python như Django hay Flask để có thể cho ra các ứng dụng web phức tạp.

Các dịch vụ nổi tiếng như Instagram, Reddit, Quora và Disqus đều được phát triển trên nền Python.


Django framework là gì?


Django là một web framework khá nổi tiếng được viết hoàn toàn bằng ngôn ngữ Python. Nó không phải là một micro-framework như Flask, mà là một framework với đầy đủ các thư viện, module hỗ trợ các web-developer.

Django được so sánh khá nhiều với Ruby on Rails.


Tại sao nên dùng Django framework


Nếu bạn đang muốn xây dựng 1 website một cách nhanh nhất, thì Django luôn là một trong những lựa chọn hàng đầu mà bạn nên cân nhắc.

Django framework có đầy đủ các yếu tố phục vụ cho người bắt đầu(starter):


  • Nhanh: Chỉ vài dòng code là bạn có ngay trang web. Do Django có sẵn các thư viện về user authentication, content admin, site maps, RSS feed v.v…

  • Đảm bảo về tính bảo mật: Hạn chế các lỗi bảo mật thông thường như SQL Injection, cross-site scripting, cross-site request forgery hay clickjacking nữa.

  • Khả năng mở rộng tốt: Django framework có thể đáp ứng lượng traffic lớn, nghĩa là bạn không cần phải lo lắng về khả năng mở rộng sản phẩm của mình nữa.

  • Tính linh hoạt: Xây dựng CMS, hoặc Ecommerce Website, hay kể cả Social Network, Scientific Computing Platforms, tất cả đều có thể với Django framework.

Xem thêm: Hướng dẫn cài đặt Python trên Windows Linux đơn giản


Cài đặt Django trên Windows


  • Nhấn tổ hợp phím Window + R,

  • cmd nhấn enter để mở một cửa sổ terminal, sau đó gõ:

pip install django

Cài đặt Django trên Linux, Mac


  • Tổ hợp phím Ctrl + Alt + T để mở Terminal

  • Gõ:

sudo apt-get install python3-django

Chờ một lát để quá trình cài đặt diễn ra.

Bắt tay vào chủ đề chính nào, bây giờ mình sẽ


Hướng dẫn tạo 1 website hello world đơn giản với Django Framework


Công cụ:


  • Visual Studio Code

  • Python Extension

Đầu tiên, bạn tạo folder project đặt tên helloworldpython
django_helloworld (2)

Tại thư mục đó mở Visual Studio Code (đã cài extension Python)


Tạo môi trường ảo (virtual environment) để Django được cài vào đó.


Sử dụng môi trường ảo sẽ tránh cài đặt Django vào môi trường Python global và cung cấp cho bạn quyền kiểm soát chính xác các thư viện được sử dụng trong một ứng dụng. Một môi trường ảo cũng giúp bạn dễ dàng tạo tệp requirements.txt (giống file pom.xml trong maven Java)

Thay vì mỗi lần cài bạn phải cài từng thư viện một. Bạn không thể nhớ hết được và phải gõ nhiều lần. File requirements.txt sẽ giúp bạn tránh điều này.

Bạn có thể tạo file requirements.txt thủ công nhưng mình khuyến nghị dùng lệnh  pip freeze tạo tự động dựa trên các thư việc đã được cài trong môi trường ảo.
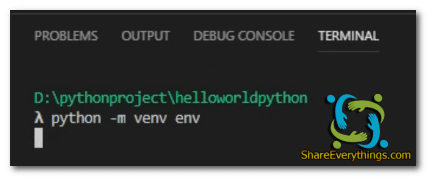
Tạo môi trường ảo(virtual environment) với tên env:


# macOS/Linux
sudo apt-get install python3-venv # If needed
python3 -m venv env
# Windows
python -m venv env

django_helloworld (3)
Tạo file requirements.txt:


  • Nhấn Ctrl+Shift+` để mở terminal.

  • Gõ: pip freeze > requirements.txt và chèn Django==2.2.4 vào file đó.

Kích hoạt môi trường ảo:

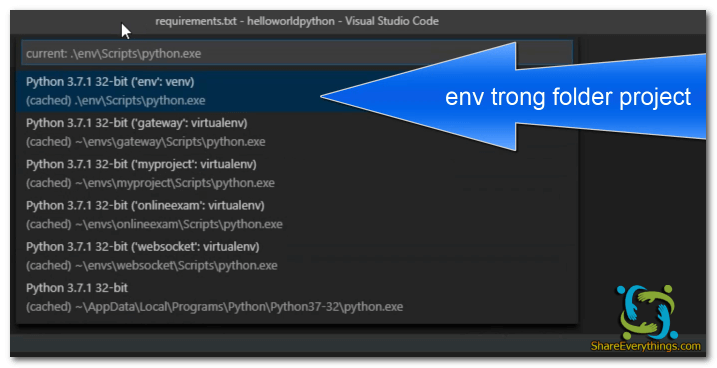
Trong Visual Studio Code, View > Command Palette or (Ctrl+Shift+P) > Chọn Python: Select Interpreter

Chọn env vừa tạo
django_helloworld (4)
Sau khi kích hoạt môi trường bạn sẽ thấy (env) trước dòng lệnh terminal
Cài đặt thư viện vào môi trường ảo vừa chọn:
pip install -r requirements.txt

Nếu bạn gặp lỗi SSL thì chạy lệnh sau:
pip install -r requirements.txt --trusted-host pypi.org
django_helloworld (5)


Hoặc bạn không dùng file requirements.txt thì install django với lệnh: pip install django


Tạo Django Project


django-admin startproject web_project .

dấu . cuối để cài project vào ngay thư mục hiện tại.
django_helloworld (6)

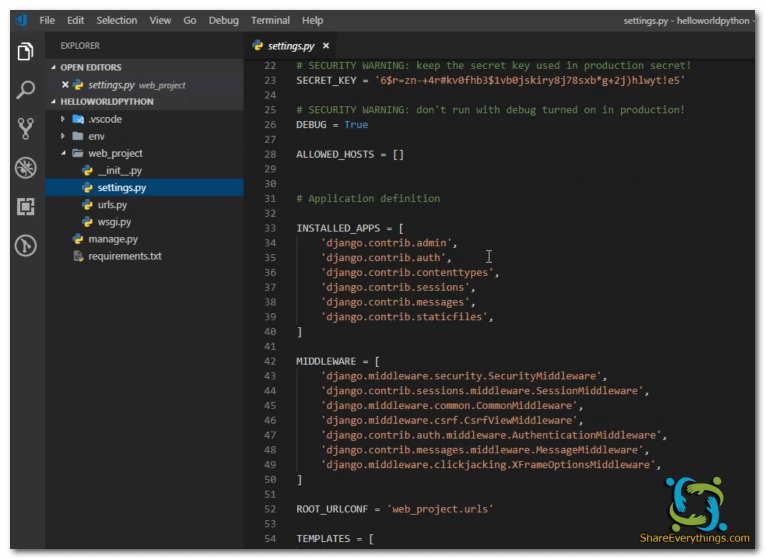
Sau khi chạy lệnh trên sẽ có 1 số file:
manage.py: File quản trị dòng lệnh Django cho dự án. Ví dụ khi bạn start project django: python manage.py runserver

Một thư mục con có tên web_project, chứa các tệp sau:


  • __init__.py: một tệp trống cho Python biết thư mục này là gói Python.

  • settings.py: File cấu hình cho project Django mà bạn sẽ sửa đổi trong quá trình phát triển ứng dụng web.

  • urls.py: chứa danh sách url cho project Django giống với controller bên Java, mà bạn cũng sửa đổi trong quá trình phát triển.

  • wsgi.py: File cấu hình máy chủ web tương thích WSGI. Bạn không cần để ý nó trong bài viết này.

Chưa cần làm gì hết, hãy chạy project của bạn lên nào:
python manage.py runserver

Mặc định là port 8000. Bạn muốn port khác 5000 chẳng hạn, dùng lệnh này:  python manage.py runserver 5000


Giữ Ctrl và nhấn vào link http://127.0.0.1:8000/ để chạy trang web.

Tèn ten! Một trang web khá đẹp mặc định của Django xuất hiện !!!
django_helloworld (7)

Bây giờ chúng ta muốn in ra dòng chữ Hello, Django! from ShareEverythings.com thay vì trang mặc định, làm như sau.


Tạo app cho project Django


Gõ:


python manage.py startapp helloqlam

Sau khi chạy lệnh, bạn sẽ thấy có 1 thư mục là helloqlam, trong đó có:


  • admin.py: quản lí trang admin cho app

  • models.py: model của app

  • apps.py: cấu hình cho app, ví dụ tên định danh của app

  • views.py: chứa các hàm xử lí khi url hay controller gọi, file này giống service bên Java

Chỉnh sửa file views.py, để in ra hello world ở home page


from django.shortcuts import render
from
django.http import HttpResponse
def home(request):
return HttpResponse("Hello, Django! from ShareEverythings.com")

Tạo file urls.py với nội dung bên dưới để gọi hàm home trong file views.py trên


from django.urls import path
from helloqlam import views
urlpatterns = [
path("", views.home, name="home"),
]

Trong thư mục web_project, chỉnh sửa file urls.py,để gọi urls từ app helloqlam


from django.contrib import admin
from django.urls import path, include
urlpatterns = [
path('admin/', admin.site.urls),
path("", include("helloqlam.urls")),
]

Lưu hết lại, và chạy project nào:
python manage.py runserver

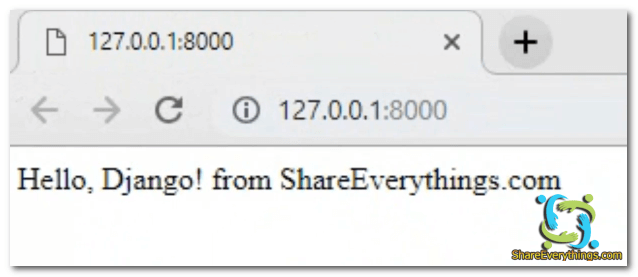
Mở trình duyệt với: http://127.0.0.1:8000/. Bạn sẽ thấy Hello, Django! from ShareEverythings.com
django_helloworld (1)


Video hướng dẫn chi tiết Tạo website Django Framework trong 5 phút:


Xong rồi! Mình đã hướng dẫn các bạn lập trình website Python với Django Framework thông qua hello world app đơn giản.

Bạn có thắc mắc thì bình luận bên dưới nhé!


Django Framework, Học hành, Lập trình
Lập trình, Python
Xem Tiếp