Link Source: Quan hệ Many To Many Hibernate với Spring Boot
Thể loại: Java, Lập trình
Tags: Hibernate Framework, Học hành, Lập trình, Spring Framework
Hướng dẫn tạo quan hệ liên kết nhiều nhiều (many to many) trong hibernate spring boot không tạo bản phụ
Many To Many Relationship Mapping with Spring Boot
Trong bài này mình sẽ hướng dẫn dùng annotation manytomany không thêm bảng phụ (trung gian) trong hibernate + spring boot + mysql
Hướng dẫn dùng annotation manytomany với bảng phụ (trung gian) trong hibernate + spring boot + mysql – đang update 🙂
Quan Hệ Liên Kết Giữa Các Đối Tượng Trong Hibernate
Association Mappings
Sau đây là bốn cách thức biểu diễn các mối quan hệ giữa các đối tượng, nó được biểu diễn theo hướng 1 chiều hoặc 2 chiều.
| MAPPING TYPE | DESCRIPTION |
|---|---|
| Many-to-One | Mapping mối quan hệ nhiều – một trong Hibernate |
| One-to-One | Mapping mối quan hệ một – một trong Hibernate |
| One-to-Many | Mapping mối quan hệ một – nhiều trong Hibernate |
| Many-to-Many | Mapping mối quan hệ nhiều – nhiều trong Hibernate |
Hướng dẫn quan hệ nhiều nhiều (many to many) hibernate jpa với Spring Boot Project
Các công nghệ sử dụng:
- Spring Boot
- MySQL
- Hibernate JPA (Spring Data)
Các công cụ phần mềm cần:
- JDK 1.8 or later
- Maven 3 or later
- MySQL Server 5.6 or later
- Eclipse + Plugin spring suite tool
Tạo bảng trong cơ sở dữ liệu
Trong bài này chúng ta sẽ có 3 bảng trong cơ sở dữ liệu: book, publisher, book_publisher. Nhưng bên java chúng ta chỉ cần 2 entity là book.java và publisher.java thôi.
Lược đồ cơ sở dữ liệu như bạn thấy bảng phụ chỉ có 2 khóa chính của 2 bản chính. Nếu thêm 1 field vào bản phụ này thì sao? Khi đó bạn không thể làm theo hướng dẫn này mà bạn phải làm theo Hướng dẫn dùng annotation manytomany với bảng phụ (trung gian) trong hibernate + spring boot + mysql
Database jpa_manytomany code:
CREATE DATABASE IF NOT EXISTS `jpa_manytomany`;
USE `jpa_manytomany`;

DROP TABLE IF EXISTS `book`;
CREATE TABLE `book` (
 `id` int(10) unsigned NOT NULL AUTO_INCREMENT,
 `name` varchar(255) DEFAULT NULL,
 PRIMARY KEY (`id`)
) ENGINE=InnoDB AUTO_INCREMENT=15 DEFAULT CHARSET=utf8;

DROP TABLE IF EXISTS `publisher`;
CREATE TABLE `publisher` (
 `id` int(10) unsigned NOT NULL AUTO_INCREMENT,
 `name` varchar(255) DEFAULT NULL,
 PRIMARY KEY (`id`)
) ENGINE=InnoDB AUTO_INCREMENT=19 DEFAULT CHARSET=utf8;


DROP TABLE IF EXISTS `book_publisher`;
CREATE TABLE `book_publisher` (
 `book_id` int(10) unsigned NOT NULL,
 `publisher_id` int(10) unsigned NOT NULL,
 PRIMARY KEY (`book_id`,`publisher_id`),
 KEY `fk_bookpublisher_publisher_idx` (`publisher_id`),
 CONSTRAINT `fk_bookpublisher_book` FOREIGN KEY (`book_id`) REFERENCES `book` (`id`) ON DELETE CASCADE ON UPDATE CASCADE,
 CONSTRAINT `fk_bookpublisher_publisher` FOREIGN KEY (`publisher_id`) REFERENCES `publisher` (`id`) ON DELETE CASCADE ON UPDATE CASCADE
) ENGINE=InnoDB DEFAULT CHARSET=utf8;
Cấu trúc project spring boot
Vào phần chính nào, mình dùng Eclipse + plugin Spring suite Tool để tạo project spring boot nhanh nhất.
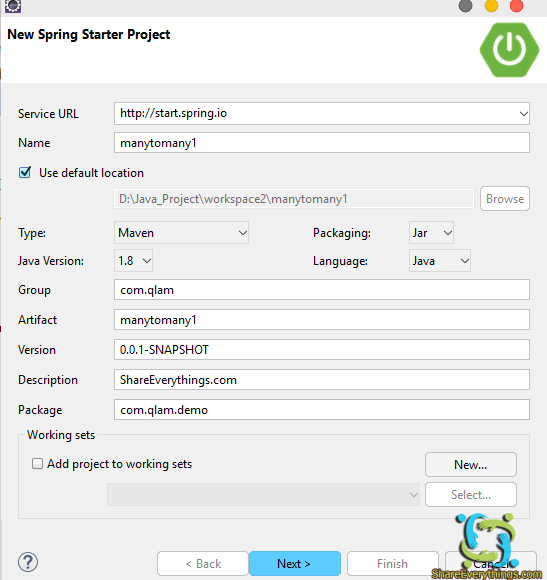
Tạo project Spring Starter Project như hình
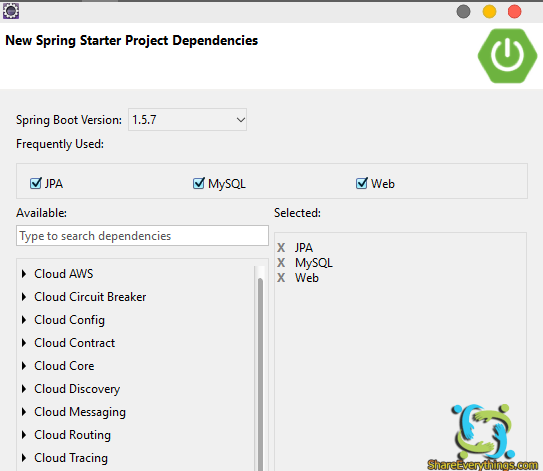
Sau đó thiết lập project
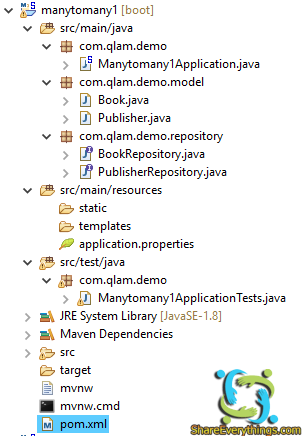
Sau khi tạo xong bạn sẽ thấy có class Manytomany1Application.java và file pom.xml
Nội dung file Manytomany1Application.java
package com.qlam.demo;

import org.springframework.boot.SpringApplication;
import org.springframework.boot.autoconfigure.SpringBootApplication;

@SpringBootApplication
public class Manytomany1Application

	public static void main(String[] args)
		SpringApplication.run(Manytomany1Application.class, args);
Nội dung file pom.xml
<?xml version="1.0" encoding="UTF-8"?>
<project xmlns="http://maven.apache.org/POM/4.0.0" xmlns:xsi="http://www.w3.org/2001/XMLSchema-instance"
	xsi:schemaLocation="http://maven.apache.org/POM/4.0.0 http://maven.apache.org/xsd/maven-4.0.0.xsd">
	<modelVersion>4.0.0</modelVersion>

	<groupId>com.qlam</groupId>
	<artifactId>manytomany1</artifactId>
	<version>0.0.1-SNAPSHOT</version>
	<packaging>jar</packaging>

	<name>manytomany1</name>
	<description>Demo project for Spring Boot</description>

	<parent>
		<groupId>org.springframework.boot</groupId>
		<artifactId>spring-boot-starter-parent</artifactId>
		<version>1.5.7.RELEASE</version>
		<relativePath/> <!-- lookup parent from repository -->
	</parent>

	<properties>
		<project.build.sourceEncoding>UTF-8</project.build.sourceEncoding>
		<project.reporting.outputEncoding>UTF-8</project.reporting.outputEncoding>
		<java.version>1.8</java.version>
	</properties>

	<dependencies>
		<dependency>
			<groupId>org.springframework.boot</groupId>
			<artifactId>spring-boot-starter-data-jpa</artifactId>
		</dependency>
		<dependency>
			<groupId>org.springframework.boot</groupId>
			<artifactId>spring-boot-starter-web</artifactId>
		</dependency>

		<dependency>
			<groupId>mysql</groupId>
			<artifactId>mysql-connector-java</artifactId>
			<scope>runtime</scope>
		</dependency>
		<dependency>
			<groupId>org.springframework.boot</groupId>
			<artifactId>spring-boot-starter-test</artifactId>
			<scope>test</scope>
		</dependency>
	</dependencies>

	<build>
		<plugins>
			<plugin>
				<groupId>org.springframework.boot</groupId>
				<artifactId>spring-boot-maven-plugin</artifactId>
			</plugin>
		</plugins>
	</build>


</project>
Khai báo các thực thể JPA Entity tức là các class trong package model
Tạo package com.qlam.demo.model
Sau đó bạn tạo class Book.java như bên dưới:
package com.qlam.demo.model;

import javax.persistence.*;
import java.util.Set;

@Entity
public class Book
 private int id;
 private String name;
 private Set<Publisher> publishers;

 public Book()


 public Book(String name)
 this.name = name;


 public Book(String name, Set<Publisher> publishers)
 this.name = name;
 this.publishers = publishers;


 @Id
 @GeneratedValue(strategy = GenerationType.AUTO)
 public int getId()
 return id;


 public void setId(int id)
 this.id = id;


 public String getName()
 return name;


 public void setName(String name)
 this.name = name;


 @ManyToMany(cascade = CascadeType.ALL)
 @JoinTable(name = "book_publisher", joinColumns = @JoinColumn(name = "book_id", referencedColumnName = "id"), inverseJoinColumns = @JoinColumn(name = "publisher_id", referencedColumnName = "id"))
 public Set<Publisher> getPublishers()
 return publishers;


 public void setPublishers(Set<Publisher> publishers)
 this.publishers = publishers;


 @Override
 public String toString()
 String result = String.format(
 "Book [id=%d, name='%s']%n",
 id, name);
 if (publishers != null)
 for(Publisher publisher : publishers)
 result += String.format(
 "Publisher[id=%d, name='%s']%n",
 publisher.getId(), publisher.getName());


 return result;
Tiếp theo bạn tạo class Publisher.java cũng nằm trong package com.qlam.demo.model
package com.qlam.demo.model;

import javax.persistence.*;
import java.util.Set;

@Entity
public class Publisher
 private int id;
 private String name;
 private Set<Book> books;

 public Publisher()


 public Publisher(String name)
 this.name = name;


 public Publisher(String name, Set<Book> books)
 this.name = name;
 this.books = books;


 @Id
 @GeneratedValue(strategy = GenerationType.AUTO)
 public int getId()
 return id;


 public void setId(int id)
 this.id = id;


 public String getName()
 return name;


 public void setName(String name)
 this.name = name;


 @ManyToMany(mappedBy = "publishers")
 public Set<Book> getBooks()
 return books;


 public void setBooks(Set<Book> books)
 this.books = books;
Mình sẽ giải thích một chút nhá!
@Entity khai báo đây là thực thể tương ứng với bảng trong cơ sở dữ liệu.
@Table dùng để maps các class java với bảng trong cơ sở dữ liệu theo tên. Ví dụ:
@Table(name = "bai")
public class Bai
Nếu bạn không khai báo tên trong @Table thì nó ngầm định bạn dùng tên bảng giống tên class.
@Id khai báo này cho biết thuộc tính này là khóa chính.
@Column dùng để maps với các field trong bảng cơ sở dữ liệu. Nếu bạn để trống, không khai báo thì nó ngầm định tên thuộc tính trong class tương ứng với tên field trong bảng.
@ManyToMany khai báo quan hệ many-to-many giữa 2 thực thể. Ví dụ cụ thể: quan hệ nhiều nhiều giữa book và publisher, nên trong class Book sẽ có danh sách các publisher và ngược lại.
@JoinTable thường đi chung với khai báo quan hệ liên kết Association Mappings. Được hiểu là kết với bảng nào. Ví dụ bảng book sẽ kết với bảng book_publisher qua cột ( @JoinColumn ) book_id và tham chiếu cột còn lại là: publisher_id
@JoinTable(name = "book_publisher", joinColumns = @JoinColumn(name = "book_id", referencedColumnName = "id"), inverseJoinColumns = @JoinColumn(name = "publisher_id", referencedColumnName = "id"))mappedBy được dùng bên bảng còn lại là publisher nói rằng sẽ maps với thuộc tính publishers bên bảng book. Ví dụ bên dưới!
@ManyToMany(mappedBy = "publishers")
 public Set<Book> getBooks()
 return books;
Tạo Spring Data JPA Repository
Sau khi tạo xong các class trong Model, chúng ta sẽ tạo Repository cho các class tương ứng. Ở đây mình làm nhanh để tập trung vào phần hibernate many to many nên không có class Service hay Implement nhá!
Spring Data JPA chứa một số kho tích hợp để thực hiện một số chức năng phổ biến để làm việc nhanh với cơ sở dữ liệu như: findOne, findAll, save, …
Tạo class BookRepository.java trong package com.qlam.demo.repository
package com.qlam.demo.repository;

import org.springframework.data.jpa.repository.JpaRepository;
import com.qlam.demo.model.Book;

public interface BookRepository extends JpaRepository<Book, Integer>
Tiếp tục tạo class PublisherRepository.java trong package com.qlam.demo.repository
package com.qlam.demo.repository;

import org.springframework.data.jpa.repository.JpaRepository;

import com.qlam.demo.model.Publisher;

public interface PublisherRepository extends JpaRepository<Publisher, Long>
Khai báo chuỗi kết nối trong file Application Properties
Trong file application.properties thêm các đoạn code kết nối với mysql
spring.datasource.url=jdbc:mysql://localhost/jpa_manytomany
spring.datasource.username=root
spring.datasource.password=root
spring.datasource.driver-class-name=com.mysql.jdbc.Driver

spring.jpa.show-sql=true
spring.jpa.properties.hibernate.dialect=org.hibernate.dialect.MySQL5Dialect
Bạn cần lưu ý 3 dòng đầu tùy chỉnh lại cho đúng với kết nối mysql của bạn.
Chạy thử chương trình
Trong file Manytomany1ApplicationTests.java trong phần src/test/resources mình tạo một số đối tượng để test thử như bên dưới.
package com.qlam.demo;

import java.util.HashSet;

import javax.transaction.Transactional;

import org.junit.Test;
import org.junit.runner.RunWith;
import org.slf4j.Logger;
import org.slf4j.LoggerFactory;
import org.springframework.beans.factory.annotation.Autowired;
import org.springframework.boot.test.context.SpringBootTest;
import org.springframework.test.context.junit4.SpringRunner;

import com.qlam.demo.model.Book;
import com.qlam.demo.model.Publisher;
import com.qlam.demo.repository.BookRepository;
import com.qlam.demo.repository.PublisherRepository;

@RunWith(SpringRunner.class)
@SpringBootTest
public class Manytomany1ApplicationTests
	private static final Logger logger = LoggerFactory.getLogger(Manytomany1Application.class);
	@Autowired
	private BookRepository bookRepository;

	@Autowired
	private PublisherRepository publisherRepository;

	@Test
	@Transactional
	public void contextLoads()
		// save a couple of books
		Publisher publisherA = new Publisher("Publisher A");
		Publisher publisherB = new Publisher("Publisher B");
		Publisher publisherC = new Publisher("Publisher C");

		bookRepository.save(new HashSet<Book>()

				add(new Book("Book A", new HashSet<Publisher>()

						add(publisherA);
						add(publisherB);

				));

				add(new Book("Book B", new HashSet<Publisher>()

						add(publisherA);
						add(publisherC);

				));

		);

		// fetch all books
		for (Book book : bookRepository.findAll())
			logger.info("\n" + book.toString());


		// save a couple of publishers
		Book bookA = new Book("Book A");
		Book bookB = new Book("Book B");

		publisherRepository.save(new HashSet<Publisher>()

				add(new Publisher("Publisher A", new HashSet<Book>()

						add(bookA);
						add(bookB);

				));

				add(new Publisher("Publisher B", new HashSet<Book>()

						add(bookA);
						add(bookB);

				));

		);

		// fetch all publishers
		for (Publisher publisher : publisherRepository.findAll())
			logger.info("\n"+publisher.toString());
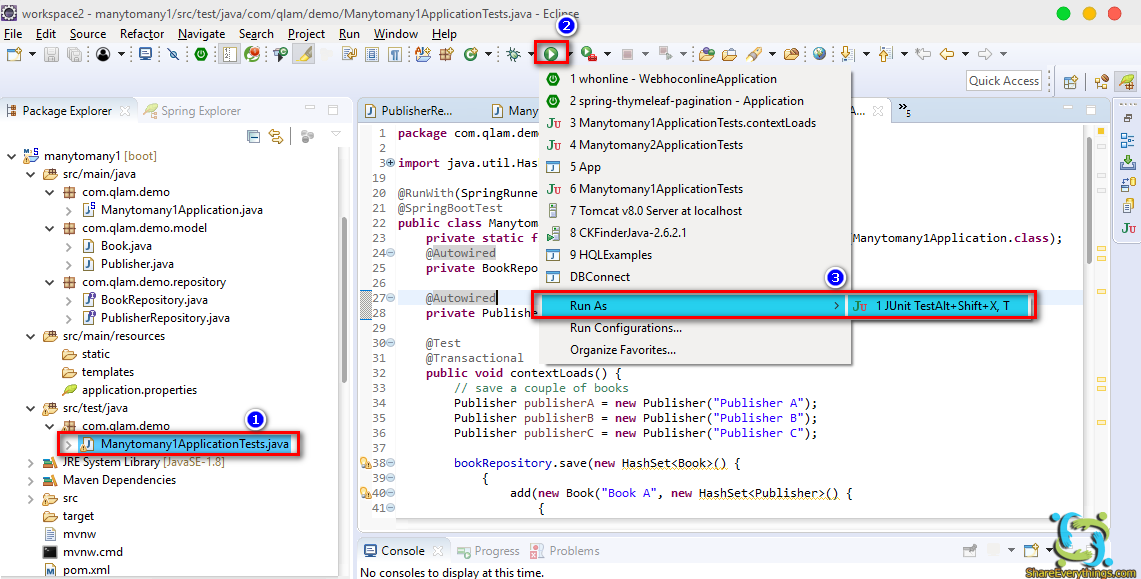
Để chạy project spring boot bạn chọn theo hình dưới!
Kết quả chạy, mình chỉ copy phần chính thôi!
2017-10-02 15:17:52.498 INFO 11172 --- [ main] c.qlam.demo.Manytomany1ApplicationTests : Started Manytomany1ApplicationTests in 7.008 seconds (JVM running for 8.777)
2017-10-02 15:17:52.551 INFO 11172 --- [ main] o.s.t.c.transaction.TransactionContext : Began transaction (1) for test context [DefaultTestContext@2698dc7 testClass = Manytomany1ApplicationTests, testInstance = com.qlam.demo.Manytomany1ApplicationTests@6c0b51da, testMethod = contextLoads@Manytomany1ApplicationTests, testException = [null], mergedContextConfiguration = [WebMergedContextConfiguration@43d7741f testClass = Manytomany1ApplicationTests, locations = '', classes = 'class com.qlam.demo.Manytomany1Application', contextInitializerClasses = '[]', activeProfiles = '', propertySourceLocations = '', propertySourceProperties = 'org.springframework.boot.test.context.SpringBootTestContextBootstrapper=true', contextCustomizers = set[org.springframework.boot.test.context.SpringBootTestContextCustomizer@3bfdc050, org.springframework.boot.test.context.filter.ExcludeFilterContextCustomizer@5c3bd550, org.springframework.boot.test.json.DuplicateJsonObjectContextCustomizerFactory$DuplicateJsonObjectContextCustomizer@6a4f787b, org.springframework.boot.test.mock.mockito.MockitoContextCustomizer@0, org.springframework.boot.test.autoconfigure.properties.PropertyMappingContextCustomizer@0, org.springframework.boot.test.autoconfigure.web.servlet.WebDriverContextCustomizerFactory$Customizer@3fee9989], resourceBasePath = 'src/main/webapp', contextLoader = 'org.springframework.boot.test.context.SpringBootContextLoader', parent = [null]]]; transaction manager [org.springframework.orm.jpa.JpaTransactionManager@5b0dbfb]; rollback [true]
Hibernate: insert into book (name) values (?)
Hibernate: insert into publisher (name) values (?)
Hibernate: insert into publisher (name) values (?)
Hibernate: insert into book (name) values (?)
Hibernate: insert into publisher (name) values (?)
2017-10-02 15:17:53.386 INFO 11172 --- [ main] o.h.h.i.QueryTranslatorFactoryInitiator : HHH000397: Using ASTQueryTranslatorFactory
Hibernate: select book0_.id as id1_0_, book0_.name as name2_0_ from book book0_
Hibernate: select publishers0_.book_id as book_id1_1_0_, publishers0_.publisher_id as publishe2_1_0_, publisher1_.id as id1_2_1_, publisher1_.name as name2_2_1_ from book_publisher publishers0_ inner join publisher publisher1_ on publishers0_.publisher_id=publisher1_.id where publishers0_.book_id=?
2017-10-02 15:17:53.887 INFO 11172 --- [ main] com.qlam.demo.Manytomany1Application :
Book [id=15, name='Book B']
Publisher[id=19, name='Publisher C']
Publisher[id=20, name='Publisher A']

Hibernate: select publishers0_.book_id as book_id1_1_0_, publishers0_.publisher_id as publishe2_1_0_, publisher1_.id as id1_2_1_, publisher1_.name as name2_2_1_ from book_publisher publishers0_ inner join publisher publisher1_ on publishers0_.publisher_id=publisher1_.id where publishers0_.book_id=?
2017-10-02 15:17:53.900 INFO 11172 --- [ main] com.qlam.demo.Manytomany1Application :
Book [id=16, name='Book A']
Publisher[id=21, name='Publisher B']
Publisher[id=20, name='Publisher A']

2017-10-02 15:17:53.900 INFO 11172 --- [ main] com.qlam.demo.Manytomany1Application :
Book [id=17, name='Book A']
Publisher[id=22, name='Publisher B']
Publisher[id=23, name='Publisher A']

2017-10-02 15:17:53.901 INFO 11172 --- [ main] com.qlam.demo.Manytomany1Application :
Book [id=18, name='Book B']
Publisher[id=24, name='Publisher C']
Publisher[id=23, name='Publisher A']

Hibernate: insert into publisher (name) values (?)
Hibernate: insert into publisher (name) values (?)
Hibernate: select publisher0_.id as id1_2_, publisher0_.name as name2_2_ from publisher publisher0_
2017-10-02 15:17:53.925 INFO 11172 --- [ main] com.qlam.demo.Manytomany1Application :
com.qlam.demo.model.Publisher@79ab97fd
Video chi tiết Hướng dẫn annotation many to many Hibernate Spring Boot không bản phụ
Xong rồi, qua bài Hướng dẫn tạo quan hệ liên kết nhiều nhiều (many to many) trong hibernate spring boot không tạo bản phụ bạn đã biết cách dùng project spring boot với annotation manytomany trong hibernate. Trong bài tiếp theo mình sẽ Hướng dẫn dùng annotation manytomany với bảng phụ (trung gian) trong hibernate + spring boot + mysql – đang update!
Link Source: Quan hệ Many To Many Hibernate với Spring Boot


0 comments:
Post a Comment