Fix lỗi Unable to Connect to SSL Services due to PKIX Path Building Failed

Leave a Comment

Fix lỗi Unable to Connect to SSL Services due to PKIX Path Building Failed

Gửi mail hay đọc mail inbox Java thường sẽ gặp lỗi Unable to Connect to SSL Services due to PKIX Path Building Failed

Dưới đây là cách khắc phục :D

Problem - tại sao bị thế!
Attempting to access applications that are encrypted with SSL (for example HTTPS, LDAPS, IMAPS) throws an exception and the connection is refused. This can happen when attempting to establish a secure connection to any of the following:
  • Active Directory server
  • Mail server 
  • Another Atlassian application using Application Links
For example, the following error appears in the UI when Using the JIRA Issues Macro:
1
Error rendering macro: java.io.IOException: Could not download: https://siteURL/jira/secure/IssueNavigator.jspa?view=rss&&type=12&type=4&type=3&pid=10081&resolution=1&fixfor=10348&sorter/field=issuekey&sorter/order=DESC&sorter/field=priority&sorter/order=DESC&tempMax=100&reset=true&decorator=none
While the following appears in the logs:
1
javax.net.ssl.SSLHandshakeException: sun.security.validator.ValidatorException: PKIX path building failed: sun.security.provider.certpath.SunCertPathBuilderException: unable to find valid certification path to requested target
sun.security.validator.ValidatorException: PKIX path building failed: sun.security.provider.certpath.SunCertPathBuilderException: unable to find valid certification path to requested target
at sun.security.validator.PKIXValidator.doBuild(PKIXValidator.java:387)

========= Solve - giải quyết làm theo từng bước nhé ========

Chi tiết cách dễ nhất:

Obtain and Import the Server's Public Certificate

  1. Download and install the Portecle 
  2. Ensure the <JAVA_HOME> variable is pointing to the same version of Java that your application uses. See our Setting JAVA_HOME docs for further information on this.
    (info) If running on a Linux/UNIX server, X11 will need to be forwarded when connecting to the server (so you can use the GUI), as below:
    1
    ssh -X user@server
  3. Select the Examine menu and then click Examine SSL/TLS Connection:
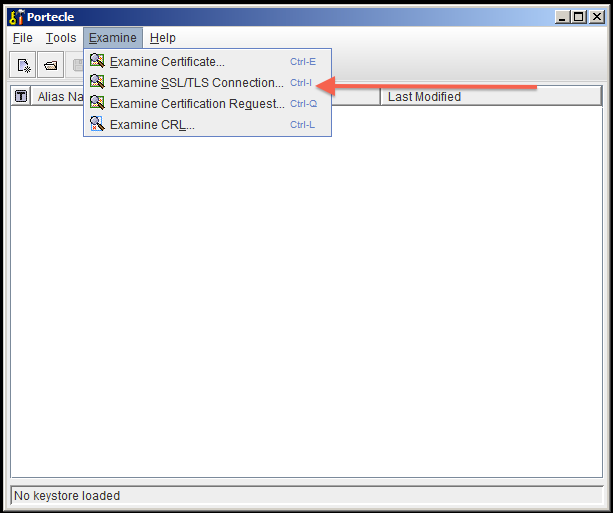
  4. Enter the SSL Host and Port of the target system:
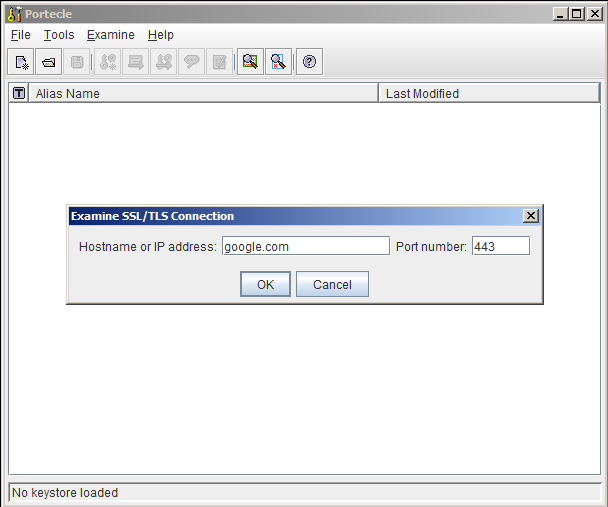
  5. Wait for it to load, then select the public certificate and click on PEM:
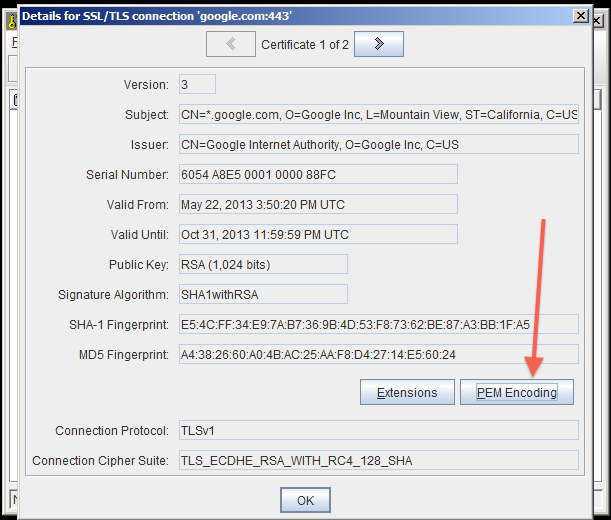
  6. Export the certificate and save it.
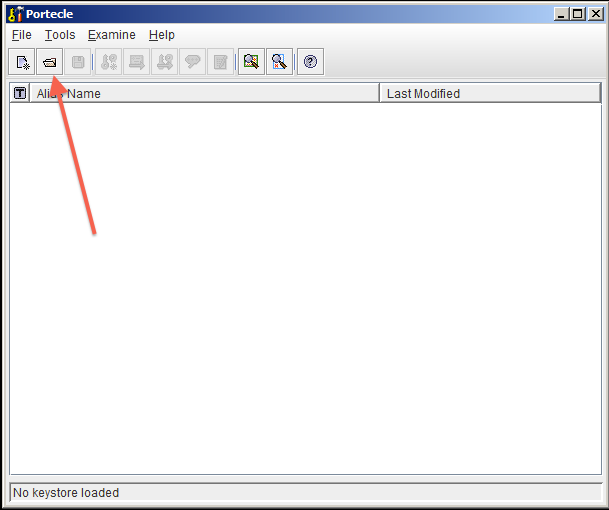
  7. Go back to the main screen and select the Open an existing keystore from disk option, select cacerts (for example $JAVA_HOME/lib/security/cacertsthen enter the password (pass mặc định (the default) là changeit).
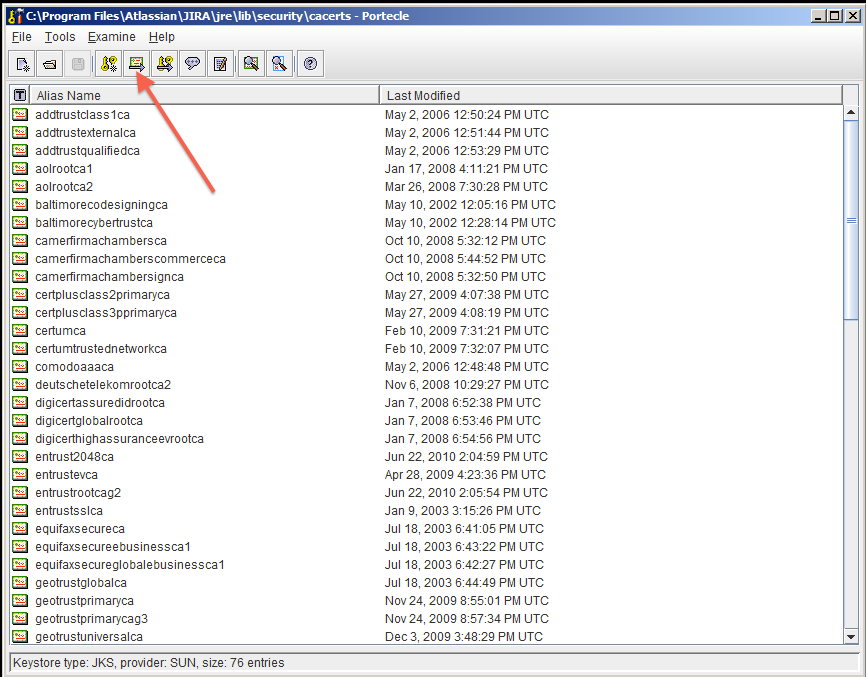
  8. Select the Import a trusted certificate into the loaded keystore button:
  9. Select the certificate that was saved in step 6 and confirm that you trust it, giving it an appropriate alias (e.g.: confluence).
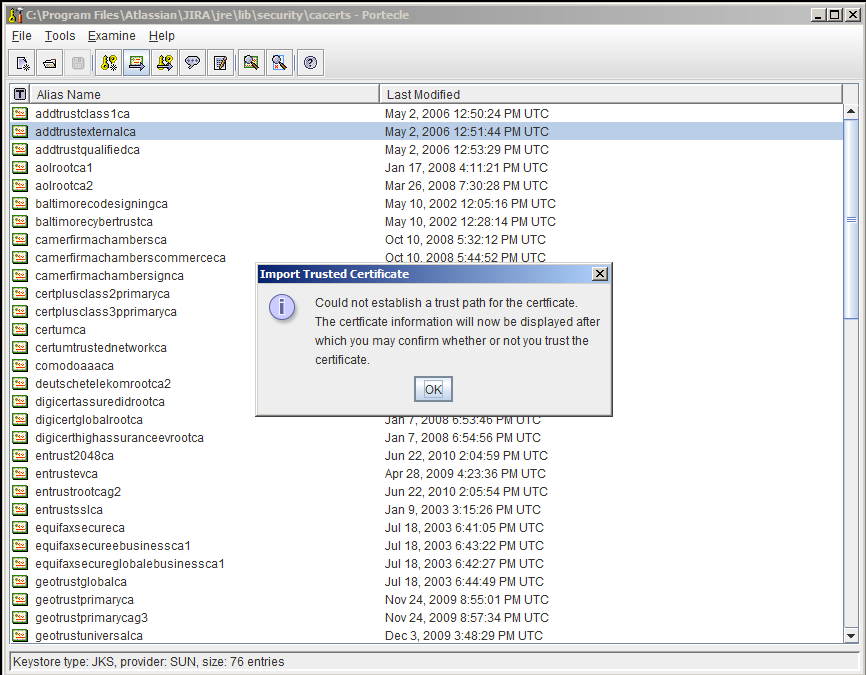
    1. You may hit this error: 
    2. If so, hit OK, and then accept the certificate as trusted.
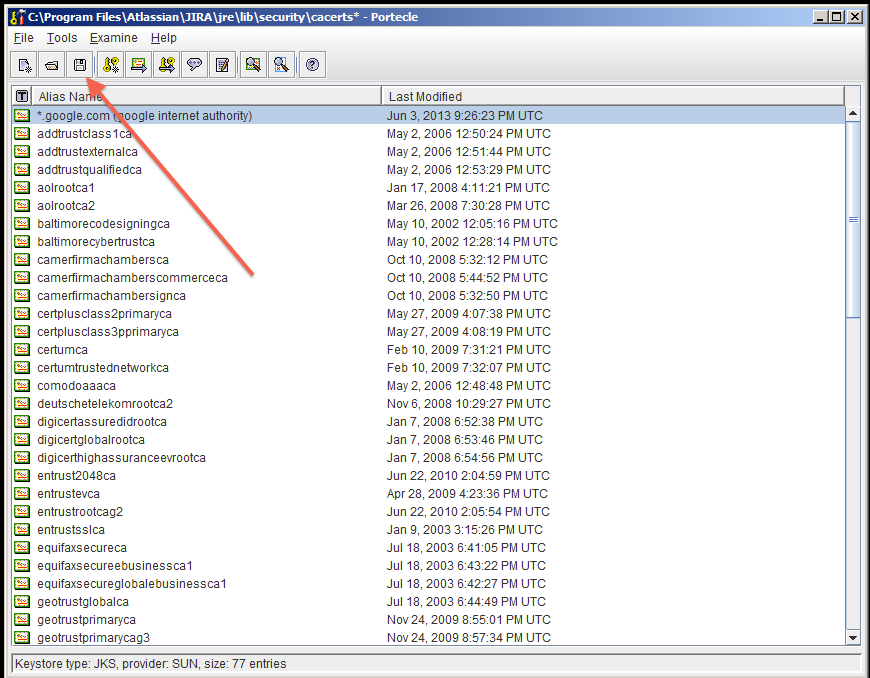
  10. Save the Key Store to disk:
  11. Restart your application.
  12. Test that you can connect to the host. GOOK LUCKY!
Cách khác nếu trên thất bại

Add SSL Certificates automatically!
Kiểm tra và dùng 1 trong các cách dưới đây !
  1. Make sure you have imported the public certificate of the target instance into the truststore according to the Connecting to SSL Services instructions.
  2. Make sure any certificates have been imported into the correct truststore; you may have multiple JRE/JDKs. See Installing Java for this.
  3. Check to see that the correct truststore is in use. If -Djavax.net.ssl.trustStore has been configured, it will override the location of the default truststore, which will need to be checked.
  4. Check if your Anti Virus tool has "SSL Scanning" blocking SSL/TLS. If it does, disable this feature or set exceptions for the target addresses (check the product documentation to see if this is possible).
  5. If connecting to a mail server, such as Exchange, ensure authentication allows plain text.
  6. Verify that the target server is configured to serve SSL correctly. This can be done with the SSL Server Test tool.

Source: confluence.atlassian.com/kb/unable-to-connect-to-ssl-services-due-to-pkix-path-building-failed-779355358.html
Xem Tiếp

Tomcat cách deploy war file [Manager Application]

Leave a Comment
Tomcat cách deploy war file [Manager Application]
Kết quả hình ảnh cho tomcat
Video hướng dẫn: https://www.youtube.com/watch?v=9X9DA8oVodk 

Khi vào localhost:8080, bạn sẽ chọn Manager App -> đăng nhập sẽ không được
Để có tài khoản bạn vào: \apache-tomcat-8.0.37\conf\tomcat-users.xml
Sau đó xóa hết nội dụng file đó và chèn các lệnh bên dưới:
Lúc này user và pass là admin

<?xml version='1.0' encoding='utf-8'?>
<tomcat-users>

<role rolename="manager-gui"/>
<role rolename="manager-script"/>
<role rolename="manager-jmx"/>
<role rolename="manager-status"/>
<role rolename="admin"/>
<user username="admin" password="admin" roles="admin,manager-gui,manager-script"/>

</tomcat-users>
Xem Tiếp

Cơ bản về GSON JSON

Leave a Comment
Google JSON
Gson also support the old java classes which had not support of generics in them for type information. It just work with these legacy classes smoothly.
In this tutorial, I am giving few examples of very common tasks you can perform with Google Gson.
Examples Listing

1) Two ways to create Gson objects
2) Convert Java objects to JSON format
3) Convert JSON to Java Objects
4) Writing an Instance Creator
5) Custom Serialization and De-serialization
6) Pretty Printing for JSON Output Format
7) Versioning Support
Before coming to examples, let’s have a POJO class which we will use in given examples.
public class Employee
{
   private Integer id;
   private String firstName;
   private String lastName;
   private List<String> roles;
    
   public Employee(){     
   }
    
   public Employee(Integer id, String firstName, String lastName, Date birthDate){
      this.id = id;
      this.firstName = firstName;
      this.lastName = lastName;
   }
    
   public Integer getId()
   {
      return id;
   }
   public void setId(Integer id)
   {
      this.id = id;
   }
   public String getFirstName()
   {
      return firstName;
   }
   public void setFirstName(String firstName)
   {
      this.firstName = firstName;
   }
   public String getLastName()
   {
      return lastName;
   }
   public void setLastName(String lastName)
   {
      this.lastName = lastName;
   }
   public List<String> getRoles()
   {
      return roles;
   }
   public void setRoles(List<String> roles)
   {
      this.roles = roles;
   }
    
   @Override
   public String toString()
   {
      return "Employee [id=" + id + ", firstName=" + firstName + ", " +
            "lastName=" + lastName + ", roles=" + roles + "]";
   }
}
Let’s jump into examples without putting more un-necessary text in between.


1) Two ways to create Gson objects

Gson object can be created in two ways. First way gives you a quick Gson object ready for faster coding, while second way uses GsonBuilder to build a more sophisticated Gson object.
//First way to create a Gson object for faster coding
Gson gson = new Gson();
//Second way to create a Gson object using GsonBuilder
Gson gson = new GsonBuilder()
             .disableHtmlEscaping()
             .setFieldNamingPolicy(FieldNamingPolicy.UPPER_CAMEL_CASE)
             .setPrettyPrinting()
             .serializeNulls()
             .create();
When using GsonBuilder, there are plenty of other useful options you can provide to Gson object. Go ahead and check them out.


2) Convert Java objects to JSON format

To convert the java objects to JSON format, use toJson() method.
Employee employee = new Employee();
employee.setId(1);
employee.setFirstName("Lokesh");
employee.setLastName("Gupta");
employee.setRoles(Arrays.asList("ADMIN", "MANAGER"));
Gson gson = new Gson();
System.out.println(gson.toJson(employee));
Output:
{"id":1,"firstName":"Lokesh","lastName":"Gupta","roles":["ADMIN","MANAGER"]}


3) Convert JSON to Java Objects

To convert the JSON to java object, use fromJson() method.
Gson gson = new Gson();
System.out.println(
    gson.fromJson("{'id':1,'firstName':'Lokesh','lastName':'Gupta','roles':['ADMIN','MANAGER']}",
    Employee.class));
     
Output:
Employee [id=1, firstName=Lokesh, lastName=Gupta, roles=[ADMIN, MANAGER]]


4) Writing an Instance Creator

In most of the cases, Gson library is smart enough to create instances even if any class does not provide default no-args constructor. But, if you found any problem using a class having no no-args constructor, you can useInstanceCreator support. You need to register the InstanceCreator of a java class type with Gson first before using it.
For example, Department.java does not have any default constructor.
public class Department
{
   public Department(String deptName)
   {
      this.deptName = deptName;
   }
   private String deptName;
   public String getDeptName()
   {
      return deptName;
   }
   public void setDeptName(String deptName)
   {
      this.deptName = deptName;
   }
    
   @Override
   public String toString()
   {
      return "Department [deptName="+deptName+"]";
   }
}
And our Employee class has reference of Department as:
public class Employee
{
   private Integer id;
   private String firstName;
   private String lastName;
   private List<String> roles;
   private Department department; //Department reference
    
   //Other setters and getters
}
To use Department class correctly, you need to register an InstanceCreator for Department.java as below:
class DepartmentInstanceCreator implements InstanceCreator<Department> {
   public Department createInstance(Type type)
   {
      return new Department("None");
   }
}
//Now <strong>use the above InstanceCreator</strong> as below
GsonBuilder gsonBuilder = new GsonBuilder();
gsonBuilder.registerTypeAdapter(Department.class, new DepartmentInstanceCreator());
Gson gson = gsonBuilder.create();
System.out.println(
            gson.fromJson("{'id':1,'firstName':'Lokesh','lastName':'Gupta','roles':['ADMIN','MANAGER'],'department':{'deptName':'Finance'}}",
            Employee.class));
             
Output:
Employee [id=1, firstName=Lokesh, lastName=Gupta, roles=[ADMIN, MANAGER], department=Department [deptName=Finance]]


5) Custom Serialization and De-serialization

Many times, we need to write/read the JSON values which are not default representation of java object. In that case, we need to write custom serializer and deserializer of that java type.
In our example, I am writing serializer and deserializer for java.util.Date class, which will help writing the Date format in “dd/MM/yyyy” format.
DateSerializer.java
import java.lang.reflect.Type;
import java.text.SimpleDateFormat;
import java.util.Date;
import com.google.gson.JsonElement;
import com.google.gson.JsonPrimitive;
import com.google.gson.JsonSerializationContext;
import com.google.gson.JsonSerializer;
public class DateSerializer implements JsonSerializer<Date>
{
   private static final SimpleDateFormat dateFormat = new SimpleDateFormat("dd/MM/yyyy");
   public JsonElement serialize(Date date, Type typeOfSrc, JsonSerializationContext context)
   {
      return new JsonPrimitive(dateFormat.format(date));
   }
}
DateDeserializer.java
import java.lang.reflect.Type;
import java.text.ParseException;
import java.text.SimpleDateFormat;
import java.util.Date;
import com.google.gson.JsonDeserializationContext;
import com.google.gson.JsonDeserializer;
import com.google.gson.JsonElement;
public class DateDeserializer implements JsonDeserializer<Date>
{
   private static final SimpleDateFormat dateFormat = new SimpleDateFormat("dd/MM/yyyy");
   public Date deserialize(JsonElement dateStr, Type typeOfSrc, JsonDeserializationContext context)
   {
      try
      {
         return dateFormat.parse(dateStr.getAsString());
      }
      catch (ParseException e)
      {
         e.printStackTrace();
      }
      return null;
   }
}
Now you can register these serializer and deserializer with GsonBuilder as below:
GsonBuilder gsonBuilder = new GsonBuilder();
gsonBuilder.registerTypeAdapter(Date.class, new DateSerializer());
gsonBuilder.registerTypeAdapter(Date.class, new DateDeserializer());
Complete example of serializer and deserializer is as below:
Employee employee = new Employee();
employee.setId(1);
employee.setFirstName("Lokesh");
employee.setLastName("Gupta");
employee.setRoles(Arrays.asList("ADMIN", "MANAGER"));
employee.setBirthDate(new Date());
GsonBuilder gsonBuilder = new GsonBuilder();
gsonBuilder.registerTypeAdapter(Date.class, new DateSerializer());
gsonBuilder.registerTypeAdapter(Date.class, new DateDeserializer());
Gson gson = gsonBuilder.create();
//Convert to JSON
System.out.println(gson.toJson(employee));
//Convert to java objects
System.out.println(gson.fromJson("{'id':1,'firstName':'Lokesh','lastName':'Gupta','roles':['ADMIN','MANAGER'],'birthDate':'17/06/2014'}"
                            , Employee.class));
                             
Output:
{"id":1,"firstName":"Lokesh","lastName":"Gupta","roles":["ADMIN","MANAGER"],"birthDate":"17/06/2014"}
Employee [id=1, firstName=Lokesh, lastName=Gupta, roles=[ADMIN, MANAGER], birthDate=Tue Jun 17 00:00:00 IST 2014]


6) Pretty Printing for JSON Output Format

The default JSON output that is provide by Gson is a compact JSON format. This means that there will not be any white-space in the output JSON structure. To generate a more readable and pretty looking JSON usesetPrettyPrinting() in GsonBuilder.
Gson gson = new GsonBuilder().setPrettyPrinting().create();
String jsonOutput = gson.toJson(employee);
Output:
{
  "id": 1,
  "firstName": "Lokesh",
  "lastName": "Gupta",
  "roles": [
    "ADMIN",
    "MANAGER"
  ],
  "birthDate": "17/06/2014"
}


7) Versioning Support

This is excellent feature you can use, if the class file you are working has been modified in different versions and fields has been annotated with @Since. All you need to do is to use setVersion() method of GsonBuilder.
GsonBuilder gsonBuilder = new GsonBuilder();
gsonBuilder.registerTypeAdapter(Date.class, new DateSerializer());
gsonBuilder.registerTypeAdapter(Date.class, new DateDeserializer());
//Specify the version like this
gsonBuilder.setVersion(1.0);
Gson gson = gsonBuilder.create();
Fields added in various versions in Employee.java
public class Employee
{
   @Since(1.0)
   private Integer id;
   private String firstName;
   private String lastName;
    
   @Since(1.1)
   private List<String> roles;
    
   @Since(1.2)
   private Date birthDate;
    
   //Setters and Getters
}
Now test the version feature:
//Using version 1.0 fields
gsonBuilder.setVersion(1.0);
Output:
{"id":1,"firstName":"Lokesh","lastName":"Gupta"}
/////////////////////////////////////////////////////////////
//Using version 1.1 fields
gsonBuilder.setVersion(1.1);
Output:
{"id":1,"firstName":"Lokesh","lastName":"Gupta","roles":["ADMIN","MANAGER"]}
/////////////////////////////////////////////////////////////
//Using version 1.2 fields
gsonBuilder.setVersion(1.2);
Output:
{"id":1,"firstName":"Lokesh","lastName":"Gupta","roles":["ADMIN","MANAGER"],"birthDate":"17/06/2014"}
That’s all for this very useful java library to convert java objects from /to JSON structure. Drop a comment is you have any query or feedback.
Source: programming-free.com/2013/03/ajax-fetch-data-from-database-in-jsp.html
Xem Tiếp