Windows 7 Aero Blue Lite Edition 2016 (x64) - Bản Cài Win7 Siêu Nhẹ, Full Soft

Leave a Comment
Windows 7 Aero Blue Lite Edition 2016 (x64) - Bản Cài Win7 Siêu Nhẹ, Full Soft - 1.03GB

[​IMG]

Windows 7 Aero Blue Lite Edition 2016 64-Bit the best Version based on the full version of Ultimate SP1 and the original Microsoft And files were deleted unimportant and unnecessary language packs them Version ships with all features in addition towards the well-known figure pictures que and fascinating themes. Size of the image is reduced to 1060 MB only. Windows ocuppies 2.7GB on fresh install without pagefile.It has Internet Explorer 9 (IE9) integrated with the updates for it until Jun-2012 (old IE8 replaced). It can be updated via Windows Update. All important hotfixes and optional updates work until Jun-2012.

Windows 7 Aero Blue 2016 Lite Edition 2016 64-Bit:
Original OS: Windows 7 Ultimate SP1
Version: 6.1 (Build 7601, Servicre Pack 1)
Language: English
Publisher: Microsoft
Author Assembly: Muhammad Sadeem
Re-Designer: Computer Worms Team
Type of Medicine: Windows Loader By Daz 2.1.7

Some Feature in This Windows & Why Download This OS ?
• Beautiful Aero Blue Theme & Backgrounds & Cursors that have been used with version.
• Fixed and stable Version means what exactly problems do not occur.
• Windows and ships only full Sized 1060 MB Whatever your potential.
• Version excellent and pre-loaded with some within the important programs the last updates.
• Integrated Some Usefull Program Pre-Activated & Pre-Installed.
• More faster and it also make your game experience better than before.
• Lite edition has been reduce some feature that make your notebook, laptop & Desktop PC slower.

Pre-Installed Applications:
• Foxid Reader v2.3
• Internet Download Manager 6.25 Build 12
• Typing Master Pro v7.0
• WinRAR 5.31 Final
• uTorrentPro 3.4.5 Build 41372
• USB Disk Security 6.5 Final
• Free Fire Screensaver Final
• Free ISO Burner 1.2
• Aero Glass Audio Player

PC Games:
• Cue Club PC Game
• Alien Wars PC Game

What has been removed:
All the languages except English (keyboards layouts are intact). *Language Packs cannot be installed*.

Drivers: video cards, modems, printers, scanners, TV tunners, fax machines, some storage controller.

Following gadgets are not here: Currency, MediaCenter, PicturePuzzle, RSSFeeds, SlideShow & Weather.

All the games: card games, Chess, Mahjong, Backgammon, Checkers, Spades, Minesweeper & Purble Place.

Hardware support for the following devices: iSCSI devices, Microsoft Multi-Path Bus and Smart cards.

Multimedia: Media Center, music and video samples, except these needed for Windows Experience Index, all sample pictures, all screensavers, all sounds, all the desktop themes except the default aero one.

Network: Internet Information Services, Remote Desktop & Assistance (Remote Desktop Connection here) RIP Listener, Simple Network Management Protocol (SNMP), Telnet Client, Telnet Server and TFTP Client.
.
Services: Distributed Transaction Coordinator (DTC), Error Reporting service, Offline Files, Quality
Windows Audio Video Experience, Windows Search (Indexing service only but not built-in search option).

System: most of Tablet PC components, BitLocker Drive Encryption, Manual Install and Upgrade Option, Help, Windows Easy Transfer, Sync Center, Subsystem for UNIX-based Applications (SUA), Welcome Center, Windows Defender, Accessibility, Speech Support & Narrator, Windows Journal, Migwizard, Microsoft IME, Jet Database Engine, Microsoft Message Queue (MSMQ), Parental Controls, System Recovery disc creation, Natural Language, Microsoft Client for NFS, Software Quality Management, built CD/DVD burning support.

What is integrated:
NOTHING except IE9. Some files are replaced with modified ones: msoe.dll, winsetup.dll and boot.sdi.

What about activation?
Windows should be activated after installation with proper key and certificate if SLIC 2.1 is found or
using "Windows Loader 2.1.7 by Daz"

Useful Tweaks Applied:
Allow 3rd party themes
Check for updates but do not download
Clear IE history upon exit; Disable Hibernation
Disable IE First Run Customize
Disable Search Online on unknown file extensions
Disable warning on IE9 tabs close
Double mouse speed; Enable DVD in Media Player
IE Homepage set to http://computerworm.net
Remove Shortcut prefix
Remove Windows Mail splash
Restore previous folder at Logon
Set Google as default Search Provider in IE9
Show Computer icon on desktop
Show 'Downloads' on Start Menu
Show hidden files and folders
Show Notepad statusbar
Take Ownership option with icon on right-click context menu
Turn on IE Clear Type text
Unlimited simultaneous downloads
When a popup is encountered - open in New Tab; Word Wrap in Notepad

I guarantee that my image is absolutely clean. If checksums don't match the image can contain viruses!

Easiest way to infect a computer is on fresh install while Anti-virus software is still not installed.

Have your drivers ready before setup! Drivers left are base system, sound and network adapter drivers

Screenshots

[​IMG]
[​IMG]
[​IMG]
[​IMG]
[​IMG]

INSTALLATION & INFORMATION - Hướng dẫn dùng
• Create bootable USB (highly recommended) with Rufus, (phần mềm mới nhất 2.6 chứa trong thư mục download) - Tạo usb boot với rufus (không biết thì bạn tìm trên google)
Boot toàn bộ file iso vào usb
Sử dụng khi cắm usb lúc boot vào máy!

Warning! - Nên Kiểm tra checksum sau khi tải về !
Compare checksums of the iso file! If they aren't like ones I posted below someone modified the Image!
File Size: 1.03 GB
SHA1 – 9facfaa23b19a070983aa43387faa897961bd2b0
MD5 – 54c71abb040da7e8490f2f36aa67646f
MD4 – acdb886b25bac3642c2cdf4ba4d0844e
CRC32 – 81779b56
Nguồn: snew.vn/threads/windows-7-aero-blue-lite-edition-2016-x64-ban-cai-win7-sieu-nhe-full-soft.381
Xem Tiếp

Counter Strike CSX Evo Revolution 3.0 2016

Leave a Comment

Thể loại: Game PC
Tags: Counter Strike, CS, Games

CSX Evo Revolution 3.0 – CSX Evo Revolution 2016


Counter-Strike (thường được gọi tắt là CS) là trò chơi điện tử thuộc thể loại bắn súng góc nhìn thứ nhất có tính chiến thuật cao được nhiều người trên thế giới biết đến ra đời dưới phiên bản của Half-Life do Lê Minh (Minh Gooseman)Jess Cliffe thực hiện.


Counter-Strike là game khá nổi tiếng và có rất nhiều bản mod. CSX Evo Revolution 3.0 là 1 trong số đó.


Hình ảnh game CSX Evo Revolution 3.0
CSX Evo Revolution

———- CSX Evo Revolution 3.0 2016 ———–


List Mods – Danh sách các phần mod

-Bom Missions

-Team Deathmatch

-Eliminate

-Dino Cross Counter

-Zombie Madness

-Ghost Fury

-Zombie Division

-Zombie Darkness

-Zombie Union

-Human Scenario

-Zombie Scenario

-Zombie Escape

-Zombie Original

-Bazooka

-Hidden [BETA]

-Deathrun BETA]

-Basic

-Zombie Fun

-Soccer [BETA]

-Gun Deathmatch


Update

-New Mods

-New System Quest

-New Weapons System

-Reboot Mods

-New Weapons

-etc


Note

-Not recommended In Windows 10

-Not recommended Instal In Local Disk

-Use CSX-EvoWpnEditor.exe To Change Weapons

-Use CSX-Launcher.exe To Change Mods And Configs

-Use Configs Resolution 1024 x 768 + Open GL

-Press F3 In Game To Open Menu CSX


Chú ý:


  • Không chạy được trên Windows 10

  • Không nên cài trên ổ đĩa chính như C:/

  • Dùng CSX-EvoWpnEditor.exe để thay đổi vũ khí

  • Dùng CSX-Launcher.exe để thay đổi Mod và Config

  • Nên thiết lập Resolution 1024 x 768 + Open GL

  • Nhấn F3 để Vào menu CSX

Tested And Work In :

– Windows XP

– Windows 7

– Windows 8


Download Counter Strike CSX Evo Revolution 3.0 2016


Counter Strike CSX Evo Revolution 3.0 2016 1.2GB


Link Source: http://downloadgamesoftfull.22web.org/game-pc/counter-strike-csx-evo-revolution-3-0-2016/
Xem Tiếp

Counter Strike Ultimate 3 - English Full

Leave a Comment

Thể loại: Game PC
Tags: Counter Strike, CS, Games

Counter Strike Ultimate 3 – English


Download Counter Strike Ultimate 3 Full Version Free + NEW MAP (Single Link and Patrial Link)


Lúc đầu Counter-Strike được tung ra dưới cái tên “Half-Life: Counter-Strike”, phiên bản đầu tiên thậm chí chỉ được gọi là 3rd-party Half-Life Modification(phần chơi phụ trong Half-Life), nhưng không lâu sau đó nó đã tách biệt hẳn với Half-Life và trở thành cả một loạt trò chơi chỉ vì cách chơi rất hay của nó. Tuy nhiên nó vẫn sử dụng theo cách chơi của Half-Life. Counter-Strike nâng cấp như: Counter-Strike: Condition Zero, Counter-Strike: Source, Counter-Strike: Anthology, Counter-Strike: Global Offensive và Counter-Strike Online. Bản sau cùng của dòng trò chơi này là Counter-Strike: Global Offensive (được dựng dựa trên nền tảng Source Engine).


English description (Wiki)


Counter-Strike (officially abbreviated as CS) is a series of multiplayer first-person shooter video games, in which teams of terroristsand counter-terrorists battle to, respectively, perpetrate an act of terror (bombing, hostage-taking) and prevent it (bomb defusal, hostage rescue). The series began on Windows in 1999 with the first version of Counter-Strike. It was initially released as amodification for Half-Life and designed by Minh “Gooseman” Le and Jess “Cliffe” Cliffe, before the rights to the game’s intellectual property were acquired by Valve Corporation, the developers of Half-Life.


The game was followed-up with Counter-Strike: Condition Zero, developed by Turtle Rock Studios and released in 2004. Later that same year, Counter-Strike: Source was released by Valve. Released only eight months after Counter-Strike: Condition Zero, in November 2004, the game was a remake of the original Counter-Strike and the first in the series to run on Valve’s newly createdSource engine.[1] The fourth game in the main series to have been developed by Valve, Counter-Strike: Global Offensive, was released in 2012 for Windows, OS X, Xbox 360, and PlayStation 3. Hidden Path Entertainment, who also worked on Counter-Strike: Source post-release, helped to develop the game alongside Valve.[2] Several spin-off titles have been released for Asian territories.


Minimum System Requirements:

  • 1.2 GHz Processor

  • 256MB RAM

  • DirectX 7 level graphics card

  • Windows 2000/XP

  • Mouse

  • Keyboard

Recommended System Requirements:

  • 2.4 GHz Processor

  • 512MB RAM, DirectX 9 level graphics card

  • Windows 2000/XP

  • Mouse

  • Keyboard

Counter Strike Ultimate 3


Game này gồm 8 mode :


1. Original

2. Death Match

3. Team Death Match

4. Gun Death Match

5. Human Secenario

6. Zombie Secenario

7. Zombie 3 – Heroes

8. Zombie 4 – Draknes


Link Download Counter Strike Ultimate 3 – English Full


Download Counter Strike Ultimate 3 – English Full 965MB


Link Source: http://downloadgamesoftfull.22web.org/game-pc/counter-strike-ultimate-3/
Xem Tiếp

CSO-NST 3 Special Edition v6.8

Leave a Comment

Thể loại: Game PC
Tags: Counter Strike, CS, Games

CSO-NST 3 Special Edition v6.8 new 2016


Counter-Strike (thường được gọi tắt là CS) là trò chơi điện tử thuộc thể loại bắn súng góc nhìn thứ nhất có tính chiến thuật cao được nhiều người trên thế giới biết đến ra đời dưới phiên bản của Half-Life do Lê Minh (Minh Gooseman) và Jess Cliffe thực hiện.


Hình ảnh game CSO-NST 3 Special Edition v6.8
CSO NST 3 Special Edition


Lúc đầu Counter-Strike được tung ra dưới cái tên “Half-Life: Counter-Strike”, phiên bản đầu tiên thậm chí chỉ được gọi là 3rd-party Half-Life Modification(phần chơi phụ trong Half-Life), nhưng không lâu sau đó nó đã tách biệt hẳn với Half-Life và trở thành cả một loạt trò chơi chỉ vì cách chơi rất hay của nó. Tuy nhiên nó vẫn sử dụng theo cách chơi của Half-Life. Counter-Strike nâng cấp như: Counter-Strike: Condition Zero, Counter-Strike: Source, Counter-Strike: Anthology, Counter-Strike: Global Offensive và Counter-Strike Online. Bản sau cùng của dòng trò chơi này là Counter-Strike: Global Offensive (được dựng dựa trên nền tảng Source Engine).


English description (Wiki)


Counter-Strike (officially abbreviated as CS) is a series of multiplayer first-person shooter video games, in which teams of terroristsand counter-terrorists battle to, respectively, perpetrate an act of terror (bombing, hostage-taking) and prevent it (bomb defusal, hostage rescue). The series began on Windows in 1999 with the first version of Counter-Strike. It was initially released as amodification for Half-Life and designed by Minh “Gooseman” Le and Jess “Cliffe” Cliffe, before the rights to the game’s intellectual property were acquired by Valve Corporation, the developers of Half-Life.


The game was followed-up with Counter-Strike: Condition Zero, developed by Turtle Rock Studios and released in 2004. Later that same year, Counter-Strike: Source was released by Valve. Released only eight months after Counter-Strike: Condition Zero, in November 2004, the game was a remake of the original Counter-Strike and the first in the series to run on Valve’s newly createdSource engine.[1] The fourth game in the main series to have been developed by Valve, Counter-Strike: Global Offensive, was released in 2012 for Windows, OS X, Xbox 360, and PlayStation 3. Hidden Path Entertainment, who also worked on Counter-Strike: Source post-release, helped to develop the game alongside Valve.[2] Several spin-off titles have been released for Asian territories.


Link Download CSO-NST 3 Special Edition 6.8 Full


CSO-NST 3 Special Edition v6.8 new 2016 1.45GB


Link Source: http://downloadgamesoftfull.22web.org/game-pc/cso-nst-3-special-edition-v6-8/
Xem Tiếp

Gọi Function sql server với Window Form C#

Leave a Comment

Gọi Function sql server với Window Form C#

Gọi function có tham số và trả về giá trị trong sql với C#

Call/Use a SQL Function in C#

Kết quả hình ảnh cho function sql server
Mình ví dụ có code trong sql:
Bước 1> Create A function

CREATE function [dbo].[function_xyz](@username varchar(200))
returns table
as
return (select [password] from [User] where username =@username)


Bước 2> use function in your C# code.. - gọi function vào c# như sau:

public String xemGiaSP(string masp)
{           
SqlConnection conn=new SqlConnection(@"SQLCONNECTION STRING"); //chuỗi kết nối
SqlCommand cmd = new SqlCommand("SELECT  dbo.function_xyz(@username)", conn);
       
        cmd.Parameters.AddWithValue("@username",masp);
        SqlDataAdapter da = new SqlDataAdapter(cmd);
        DataTable dt = new DataTable();
        da.Fill(dt);
        string str = dt.Rows[0][0].ToString(); //ở đây giá trị trả về chỉ là 1 chuỗi             
        return str;
}

//Nếu trả về bảng bạn dùng DataTable hứng thay vì string str:
Ví dụ:
DataTable x= dt;
return x;


Xem Tiếp

1 Số hosting free Cho Phép Kết nối Mysql Remote - Mysql từ xa

Leave a Comment

1 Số hosting free Cho Phép Kết nối Mysql Remote - Mysql từ xa

Kết quả hình ảnh cho mysql
Sau khi tìm 1 số hosting free cho phép kết nối mysql remote mình chia sẽ 2 hosting dưới này (Ưu nhược điểm của chúng đều đối nghịch nhau-> tùy vào mục đích mà dùng :))

1.eatj.com

Nhược: giới hạn kết nối, nên nếu app của bạn chạy nhiều câu lệnh truy vấn dẫn tới tắt nghẽn và bị chặn trong 1 khoảng thời gian. 
Dùng myphpadmin 5.0  cũ

Ưu: tốc độ tạm chấp nhận

Cách kết nối với web Java:
cons = DriverManager.getConnection(
                    "jdbc:mysql://72.13.93.206:3307/"+dbname+"?autoReconnect=true&useUnicode=true&characterEncoding=UTF-8", dbuser, dbpass);


2.https://db4free.net/

Nhược: tốc độ chậm hơn hosting phía trên

Ưu: ít giới hạn kết nối, cho phép nhiều kết nối hơn. 
Dùng myphpadmin 5.7 mới 

Cách kết nối với web Java:
cons = DriverManager.getConnection(
                    "jdbc:mysql://db4free.net:3306/"+dbname+"?autoReconnect=true&useUnicode=true&characterEncoding=UTF-8", dbuser, dbpass);

Theo mình biết là vậy. Do đa số hosting free PHP khác đều cấm remote mysql cho tài khoản FREE!
Nói chung, đã FREE thì chúng ta phải chịu sự ĐAU ĐỚN NÀY !!!
Xem Tiếp

Fix lỗi Unable to Connect to SSL Services due to PKIX Path Building Failed

Leave a Comment

Fix lỗi Unable to Connect to SSL Services due to PKIX Path Building Failed

Gửi mail hay đọc mail inbox Java thường sẽ gặp lỗi Unable to Connect to SSL Services due to PKIX Path Building Failed

Dưới đây là cách khắc phục :D

Problem - tại sao bị thế!
Attempting to access applications that are encrypted with SSL (for example HTTPS, LDAPS, IMAPS) throws an exception and the connection is refused. This can happen when attempting to establish a secure connection to any of the following:
  • Active Directory server
  • Mail server 
  • Another Atlassian application using Application Links
For example, the following error appears in the UI when Using the JIRA Issues Macro:
1
Error rendering macro: java.io.IOException: Could not download: https://siteURL/jira/secure/IssueNavigator.jspa?view=rss&&type=12&type=4&type=3&pid=10081&resolution=1&fixfor=10348&sorter/field=issuekey&sorter/order=DESC&sorter/field=priority&sorter/order=DESC&tempMax=100&reset=true&decorator=none
While the following appears in the logs:
1
javax.net.ssl.SSLHandshakeException: sun.security.validator.ValidatorException: PKIX path building failed: sun.security.provider.certpath.SunCertPathBuilderException: unable to find valid certification path to requested target
sun.security.validator.ValidatorException: PKIX path building failed: sun.security.provider.certpath.SunCertPathBuilderException: unable to find valid certification path to requested target
at sun.security.validator.PKIXValidator.doBuild(PKIXValidator.java:387)

========= Solve - giải quyết làm theo từng bước nhé ========

Chi tiết cách dễ nhất:

Obtain and Import the Server's Public Certificate

  1. Download and install the Portecle 
  2. Ensure the <JAVA_HOME> variable is pointing to the same version of Java that your application uses. See our Setting JAVA_HOME docs for further information on this.
    (info) If running on a Linux/UNIX server, X11 will need to be forwarded when connecting to the server (so you can use the GUI), as below:
    1
    ssh -X user@server
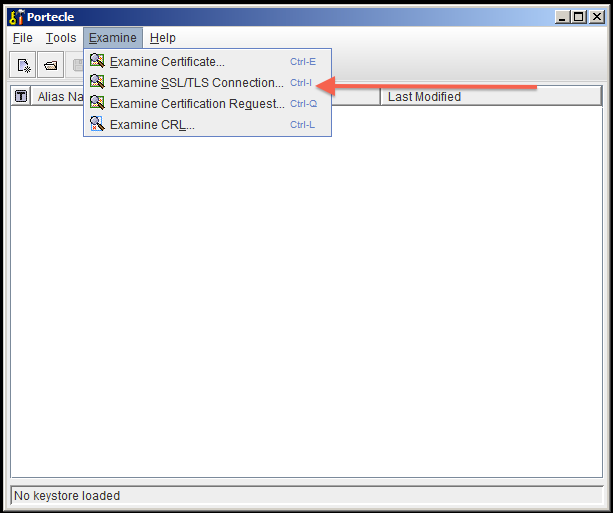
  3. Select the Examine menu and then click Examine SSL/TLS Connection:
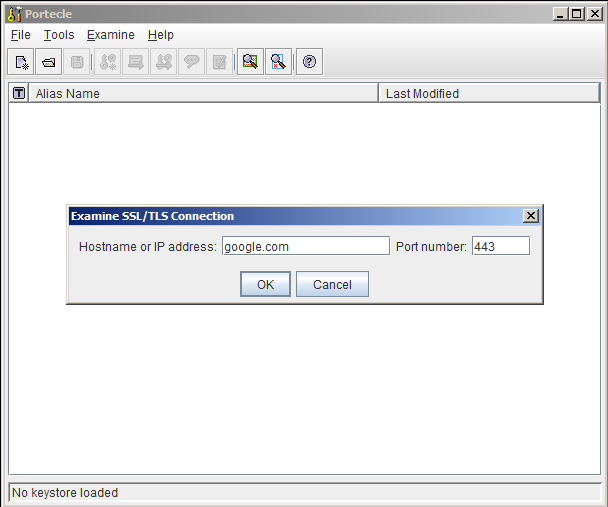
  4. Enter the SSL Host and Port of the target system:
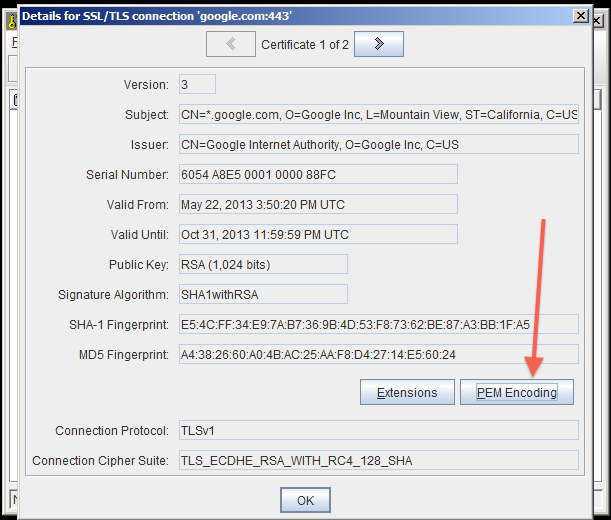
  5. Wait for it to load, then select the public certificate and click on PEM:
  6. Export the certificate and save it.
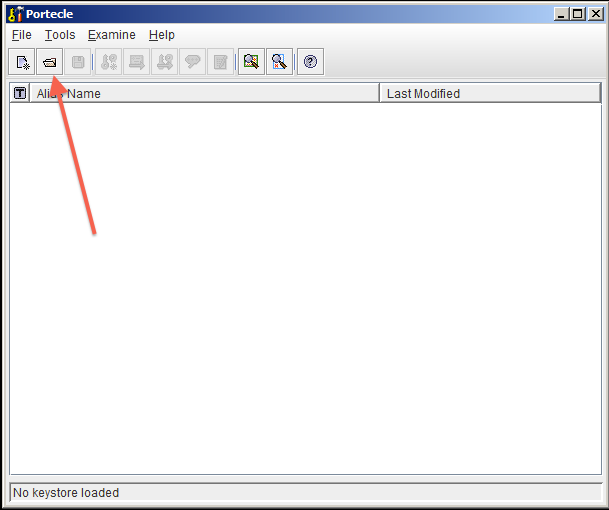
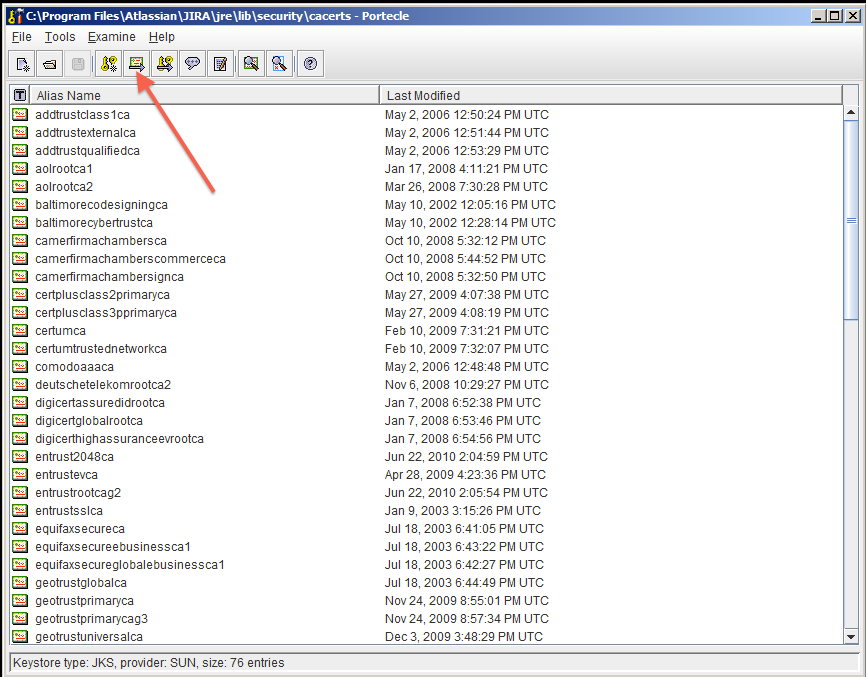
  7. Go back to the main screen and select the Open an existing keystore from disk option, select cacerts (for example $JAVA_HOME/lib/security/cacertsthen enter the password (pass mặc định (the default) là changeit).
  8. Select the Import a trusted certificate into the loaded keystore button:
  9. Select the certificate that was saved in step 6 and confirm that you trust it, giving it an appropriate alias (e.g.: confluence).
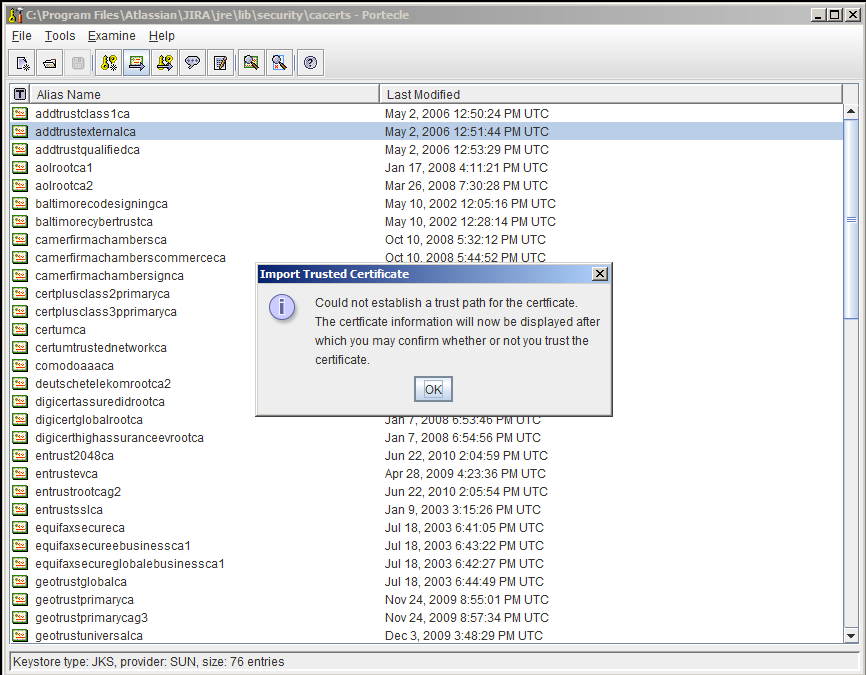
    1. You may hit this error: 
    2. If so, hit OK, and then accept the certificate as trusted.
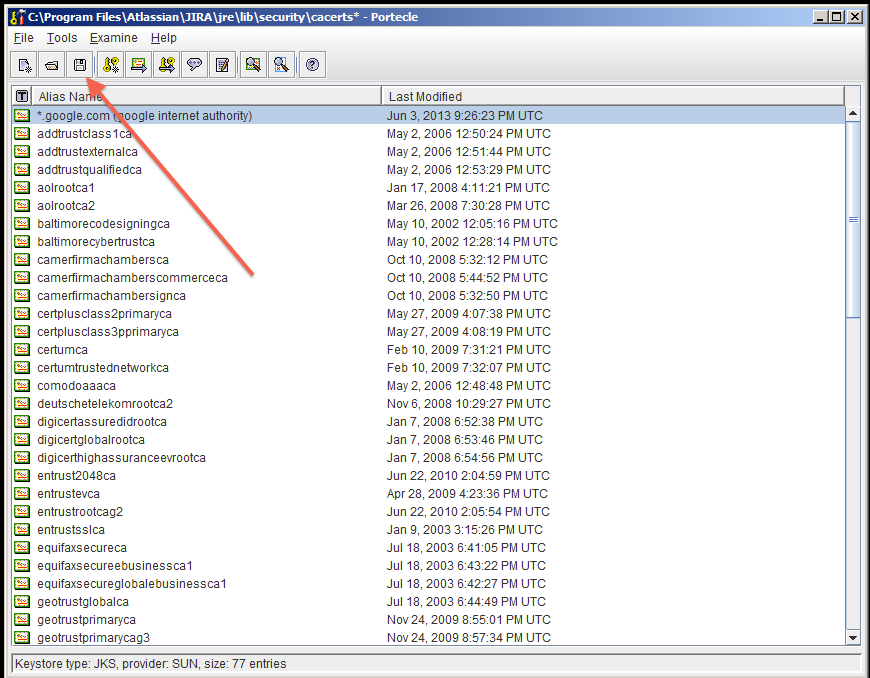
  10. Save the Key Store to disk:
  11. Restart your application.
  12. Test that you can connect to the host. GOOK LUCKY!
Cách khác nếu trên thất bại

Add SSL Certificates automatically!
Kiểm tra và dùng 1 trong các cách dưới đây !
  1. Make sure you have imported the public certificate of the target instance into the truststore according to the Connecting to SSL Services instructions.
  2. Make sure any certificates have been imported into the correct truststore; you may have multiple JRE/JDKs. See Installing Java for this.
  3. Check to see that the correct truststore is in use. If -Djavax.net.ssl.trustStore has been configured, it will override the location of the default truststore, which will need to be checked.
  4. Check if your Anti Virus tool has "SSL Scanning" blocking SSL/TLS. If it does, disable this feature or set exceptions for the target addresses (check the product documentation to see if this is possible).
  5. If connecting to a mail server, such as Exchange, ensure authentication allows plain text.
  6. Verify that the target server is configured to serve SSL correctly. This can be done with the SSL Server Test tool.

Source: confluence.atlassian.com/kb/unable-to-connect-to-ssl-services-due-to-pkix-path-building-failed-779355358.html
Xem Tiếp

Tomcat cách deploy war file [Manager Application]

Leave a Comment
Tomcat cách deploy war file [Manager Application]
Kết quả hình ảnh cho tomcat
Video hướng dẫn: https://www.youtube.com/watch?v=9X9DA8oVodk 

Khi vào localhost:8080, bạn sẽ chọn Manager App -> đăng nhập sẽ không được
Để có tài khoản bạn vào: \apache-tomcat-8.0.37\conf\tomcat-users.xml
Sau đó xóa hết nội dụng file đó và chèn các lệnh bên dưới:
Lúc này user và pass là admin

<?xml version='1.0' encoding='utf-8'?>
<tomcat-users>

<role rolename="manager-gui"/>
<role rolename="manager-script"/>
<role rolename="manager-jmx"/>
<role rolename="manager-status"/>
<role rolename="admin"/>
<user username="admin" password="admin" roles="admin,manager-gui,manager-script"/>

</tomcat-users>
Xem Tiếp

Cơ bản về GSON JSON

Leave a Comment
Google JSON
Gson also support the old java classes which had not support of generics in them for type information. It just work with these legacy classes smoothly.
In this tutorial, I am giving few examples of very common tasks you can perform with Google Gson.
Examples Listing

1) Two ways to create Gson objects
2) Convert Java objects to JSON format
3) Convert JSON to Java Objects
4) Writing an Instance Creator
5) Custom Serialization and De-serialization
6) Pretty Printing for JSON Output Format
7) Versioning Support
Before coming to examples, let’s have a POJO class which we will use in given examples.
public class Employee
{
   private Integer id;
   private String firstName;
   private String lastName;
   private List<String> roles;
    
   public Employee(){     
   }
    
   public Employee(Integer id, String firstName, String lastName, Date birthDate){
      this.id = id;
      this.firstName = firstName;
      this.lastName = lastName;
   }
    
   public Integer getId()
   {
      return id;
   }
   public void setId(Integer id)
   {
      this.id = id;
   }
   public String getFirstName()
   {
      return firstName;
   }
   public void setFirstName(String firstName)
   {
      this.firstName = firstName;
   }
   public String getLastName()
   {
      return lastName;
   }
   public void setLastName(String lastName)
   {
      this.lastName = lastName;
   }
   public List<String> getRoles()
   {
      return roles;
   }
   public void setRoles(List<String> roles)
   {
      this.roles = roles;
   }
    
   @Override
   public String toString()
   {
      return "Employee [id=" + id + ", firstName=" + firstName + ", " +
            "lastName=" + lastName + ", roles=" + roles + "]";
   }
}
Let’s jump into examples without putting more un-necessary text in between.


1) Two ways to create Gson objects

Gson object can be created in two ways. First way gives you a quick Gson object ready for faster coding, while second way uses GsonBuilder to build a more sophisticated Gson object.
//First way to create a Gson object for faster coding
Gson gson = new Gson();
//Second way to create a Gson object using GsonBuilder
Gson gson = new GsonBuilder()
             .disableHtmlEscaping()
             .setFieldNamingPolicy(FieldNamingPolicy.UPPER_CAMEL_CASE)
             .setPrettyPrinting()
             .serializeNulls()
             .create();
When using GsonBuilder, there are plenty of other useful options you can provide to Gson object. Go ahead and check them out.


2) Convert Java objects to JSON format

To convert the java objects to JSON format, use toJson() method.
Employee employee = new Employee();
employee.setId(1);
employee.setFirstName("Lokesh");
employee.setLastName("Gupta");
employee.setRoles(Arrays.asList("ADMIN", "MANAGER"));
Gson gson = new Gson();
System.out.println(gson.toJson(employee));
Output:
{"id":1,"firstName":"Lokesh","lastName":"Gupta","roles":["ADMIN","MANAGER"]}


3) Convert JSON to Java Objects

To convert the JSON to java object, use fromJson() method.
Gson gson = new Gson();
System.out.println(
    gson.fromJson("{'id':1,'firstName':'Lokesh','lastName':'Gupta','roles':['ADMIN','MANAGER']}",
    Employee.class));
     
Output:
Employee [id=1, firstName=Lokesh, lastName=Gupta, roles=[ADMIN, MANAGER]]


4) Writing an Instance Creator

In most of the cases, Gson library is smart enough to create instances even if any class does not provide default no-args constructor. But, if you found any problem using a class having no no-args constructor, you can useInstanceCreator support. You need to register the InstanceCreator of a java class type with Gson first before using it.
For example, Department.java does not have any default constructor.
public class Department
{
   public Department(String deptName)
   {
      this.deptName = deptName;
   }
   private String deptName;
   public String getDeptName()
   {
      return deptName;
   }
   public void setDeptName(String deptName)
   {
      this.deptName = deptName;
   }
    
   @Override
   public String toString()
   {
      return "Department [deptName="+deptName+"]";
   }
}
And our Employee class has reference of Department as:
public class Employee
{
   private Integer id;
   private String firstName;
   private String lastName;
   private List<String> roles;
   private Department department; //Department reference
    
   //Other setters and getters
}
To use Department class correctly, you need to register an InstanceCreator for Department.java as below:
class DepartmentInstanceCreator implements InstanceCreator<Department> {
   public Department createInstance(Type type)
   {
      return new Department("None");
   }
}
//Now <strong>use the above InstanceCreator</strong> as below
GsonBuilder gsonBuilder = new GsonBuilder();
gsonBuilder.registerTypeAdapter(Department.class, new DepartmentInstanceCreator());
Gson gson = gsonBuilder.create();
System.out.println(
            gson.fromJson("{'id':1,'firstName':'Lokesh','lastName':'Gupta','roles':['ADMIN','MANAGER'],'department':{'deptName':'Finance'}}",
            Employee.class));
             
Output:
Employee [id=1, firstName=Lokesh, lastName=Gupta, roles=[ADMIN, MANAGER], department=Department [deptName=Finance]]


5) Custom Serialization and De-serialization

Many times, we need to write/read the JSON values which are not default representation of java object. In that case, we need to write custom serializer and deserializer of that java type.
In our example, I am writing serializer and deserializer for java.util.Date class, which will help writing the Date format in “dd/MM/yyyy” format.
DateSerializer.java
import java.lang.reflect.Type;
import java.text.SimpleDateFormat;
import java.util.Date;
import com.google.gson.JsonElement;
import com.google.gson.JsonPrimitive;
import com.google.gson.JsonSerializationContext;
import com.google.gson.JsonSerializer;
public class DateSerializer implements JsonSerializer<Date>
{
   private static final SimpleDateFormat dateFormat = new SimpleDateFormat("dd/MM/yyyy");
   public JsonElement serialize(Date date, Type typeOfSrc, JsonSerializationContext context)
   {
      return new JsonPrimitive(dateFormat.format(date));
   }
}
DateDeserializer.java
import java.lang.reflect.Type;
import java.text.ParseException;
import java.text.SimpleDateFormat;
import java.util.Date;
import com.google.gson.JsonDeserializationContext;
import com.google.gson.JsonDeserializer;
import com.google.gson.JsonElement;
public class DateDeserializer implements JsonDeserializer<Date>
{
   private static final SimpleDateFormat dateFormat = new SimpleDateFormat("dd/MM/yyyy");
   public Date deserialize(JsonElement dateStr, Type typeOfSrc, JsonDeserializationContext context)
   {
      try
      {
         return dateFormat.parse(dateStr.getAsString());
      }
      catch (ParseException e)
      {
         e.printStackTrace();
      }
      return null;
   }
}
Now you can register these serializer and deserializer with GsonBuilder as below:
GsonBuilder gsonBuilder = new GsonBuilder();
gsonBuilder.registerTypeAdapter(Date.class, new DateSerializer());
gsonBuilder.registerTypeAdapter(Date.class, new DateDeserializer());
Complete example of serializer and deserializer is as below:
Employee employee = new Employee();
employee.setId(1);
employee.setFirstName("Lokesh");
employee.setLastName("Gupta");
employee.setRoles(Arrays.asList("ADMIN", "MANAGER"));
employee.setBirthDate(new Date());
GsonBuilder gsonBuilder = new GsonBuilder();
gsonBuilder.registerTypeAdapter(Date.class, new DateSerializer());
gsonBuilder.registerTypeAdapter(Date.class, new DateDeserializer());
Gson gson = gsonBuilder.create();
//Convert to JSON
System.out.println(gson.toJson(employee));
//Convert to java objects
System.out.println(gson.fromJson("{'id':1,'firstName':'Lokesh','lastName':'Gupta','roles':['ADMIN','MANAGER'],'birthDate':'17/06/2014'}"
                            , Employee.class));
                             
Output:
{"id":1,"firstName":"Lokesh","lastName":"Gupta","roles":["ADMIN","MANAGER"],"birthDate":"17/06/2014"}
Employee [id=1, firstName=Lokesh, lastName=Gupta, roles=[ADMIN, MANAGER], birthDate=Tue Jun 17 00:00:00 IST 2014]


6) Pretty Printing for JSON Output Format

The default JSON output that is provide by Gson is a compact JSON format. This means that there will not be any white-space in the output JSON structure. To generate a more readable and pretty looking JSON usesetPrettyPrinting() in GsonBuilder.
Gson gson = new GsonBuilder().setPrettyPrinting().create();
String jsonOutput = gson.toJson(employee);
Output:
{
  "id": 1,
  "firstName": "Lokesh",
  "lastName": "Gupta",
  "roles": [
    "ADMIN",
    "MANAGER"
  ],
  "birthDate": "17/06/2014"
}


7) Versioning Support

This is excellent feature you can use, if the class file you are working has been modified in different versions and fields has been annotated with @Since. All you need to do is to use setVersion() method of GsonBuilder.
GsonBuilder gsonBuilder = new GsonBuilder();
gsonBuilder.registerTypeAdapter(Date.class, new DateSerializer());
gsonBuilder.registerTypeAdapter(Date.class, new DateDeserializer());
//Specify the version like this
gsonBuilder.setVersion(1.0);
Gson gson = gsonBuilder.create();
Fields added in various versions in Employee.java
public class Employee
{
   @Since(1.0)
   private Integer id;
   private String firstName;
   private String lastName;
    
   @Since(1.1)
   private List<String> roles;
    
   @Since(1.2)
   private Date birthDate;
    
   //Setters and Getters
}
Now test the version feature:
//Using version 1.0 fields
gsonBuilder.setVersion(1.0);
Output:
{"id":1,"firstName":"Lokesh","lastName":"Gupta"}
/////////////////////////////////////////////////////////////
//Using version 1.1 fields
gsonBuilder.setVersion(1.1);
Output:
{"id":1,"firstName":"Lokesh","lastName":"Gupta","roles":["ADMIN","MANAGER"]}
/////////////////////////////////////////////////////////////
//Using version 1.2 fields
gsonBuilder.setVersion(1.2);
Output:
{"id":1,"firstName":"Lokesh","lastName":"Gupta","roles":["ADMIN","MANAGER"],"birthDate":"17/06/2014"}
That’s all for this very useful java library to convert java objects from /to JSON structure. Drop a comment is you have any query or feedback.
Source: programming-free.com/2013/03/ajax-fetch-data-from-database-in-jsp.html
Xem Tiếp